Welcome to RennTech.org Community, Guest
There are many great features available to you once you register at RennTech.org
You are free to view posts here, but you must log in to reply to existing posts, or to start your own new topic. Like most online communities, there are costs involved to maintain a site like this - so we encourage our members to subscribe or donate. All subscriptions and donations go to the costs operating and maintaining this site. We prefer that guests take part in our community and we offer a lot in return to those willing to join our corner of the Porsche world. This site is 99 percent member supported (less than 1 percent comes from advertising) - so please consider an annual subscription or donation to keep this site running.
Here are some of the features available - once you subscribe RennTech.org
- View Classified Ads
- DIY Tutorials
- Porsche TSB Listings (limited)
- VIN Decoder
- Special Offers
- Paint Codes
- Registry
- Videos System
- View Reviews
- and get rid of this welcome message
It takes just a few minutes to register, and it's quality Porsche information at a low cost.
Contributing Members also get these additional benefits:
(you become a Contributing Member by subscribing or donating money to the operation of this site)
- No ads - advertisements are removed
- Access the Contributors Only Forum
- Contributing Members Only Downloads
- Send attachments with PMs
- All image/file storage limits are substantially increased for all Contributing Members
- Option Codes Lookup
- VIN Option Lookups (limited)


Schnell Gelb
-
Posts
309 -
Joined
-
Last visited
Content Type
Profiles
Events
Forums
Exterior Paint Colors
Downloads
Tutorials
Links Directory
Collections
Classifieds
Store
Everything posted by Schnell Gelb
-
Yes, but who knew? Just thought it may help Durametric get a free plug on Renntech if they announced such useful news here first ? Certainly useful for their customers. It is also reassuring that they are still supporting their product. And for those who are thinking : Wow,I'll buy a Durametric knock-off from Asia via Fleabay and then just download the latest version of the software from Durametric to replace the junkware that comes on the k-o version.Nope-won't work. Hope this helps
-
There is a very recent update. I used it today -- works great.Don't struggle with the old versions . Pity Durametric does not announce their updates here since we keep plugging for them !
-
There is a very recent update. I used it today -- works great.Don't struggle with the old versions . Pity Durametric does not announce their updates here since we keep plugging for them !
-
In those 2 sentences you have proof of the value of subscribing to Renntech. Any other Porsche Forum would have pages of banter and dickering before you would find such a gem - if at all. I made a mistake installing my first RMS and confessed my sins here. I had to redo using an improved home-brew tool.Fortunately that was before I installed the trans. Set at the correct depth,the new seal does not leak a drop. I am grateful to Renntech Forum members who took the time to specify the different depth for the different seal.
-
In Search you will find some well-informed comments(not mine) about usin a slightly different depth to set the seal.Perhaps if the c/s exhibits some wear from the old seal . The correct tool is a mere part of the reinstall. The fanatical cleaning is the other -also in Search. Ignoring either/both of these issues may result in a leak despite the correct updated part and the correct tool.
-
Secondary Air Test Readiness monitor incomplete
Schnell Gelb replied to mesutter's topic in 986 Series (Boxster, Boxster S)
I have just corrected several minor issues - Timing,Lifters,Injectors and have no DTC's, engine runs perfectly - except... SAI & Evap "Not Ready " or 'Fail' on your Durametric Readiness test. . It needs the silly Drive Cycle magic . I say magic because there seem to be several different variations on the Official Drive Cycle. One is as simple as running the COLD engine at 2900 rpm for at least 90 seconds .But not over 3k. For those struggling and who have had no luck with the official drive cycle here are 5 versions I culled from other locations. The SAI "Not Ready' is stubborn even when there are no SAI faults. " secondary air should set after a dead cold start and it only takes one cycle to set...unless it's not a pass. Check air pump operation Check vacuum system for leaks Check shut of valve operation Check o2 sensor operation Check flow through system into exhaust." Good Luck ! There is a You Tube on the BMW Drive Cycle which may be helpful also? here is what I followed Drive in 10 minute cycles 1400-2800 Rpm in 5-6 gear as slow as you can drive in light traffic. If you stop or go out of RPM range the cycle resets the timer. After 5-6 cycles you will probably have it. For Evap you must have 1/3 to 2/3 of a tank of fuel.edit ,others say 1/4 to 3/4.1/4 did not work for me. As soon as I filled over 1/2 ,the Evap set ready. Start the car cold and let it idle for 10 minutes with lots of accessories on. (lights, A/C or heater) Do the same at the end of the drive cycle. I have run the following drive cycle on my Boxster and 993s (Edit - not this is a different car!)with great success. The key is to lug the engine. And longer times is better than shorter. I have the hardest time with the second 3:15 second run for 3:15 minutes. I have started doing it on the freeway shoulder. If the CHP stop me I'll claim mechanical issue. True! Do the cycle twice. If all codes are not set, let the car cool and try it again. It has taken me up to three times to get all of them set. But usually twice will do it. Good luck. Start engine, let idle for approx. 2 min, 10 secs. Accelerate to 20-30 MPH, Maintain steady speed for approx 3 min, 15 secs. Accelerate to 40-60 MPH, Maintain steady speed for approx 15 mins. Decelerate and come to a stop. Then: Idle in Neutral for 5 mins. (manual trans.) Idle in Drive for 5 mins. (Tiptronic trans.) During the drive cycle, do not exceed 3,000 rpm or 60 mph. sometimes you can get it to work without actually driving the car. just hold the following RPM ranges from 2-5 minutes: Idle 1500 2000 2500 3000 Idle the checks usually happen before the 5 minutes is up, but without a scan tool hooked up you won't know when it happens. Porsche 911 Drive Cycle - OBDII Emission Monitor Reset Procedure Prior to starting the driving cycle ensure your Porsche's fuel tank is between 1/4 and 3/4 full. Also do not exceed 3,000 rpm or 60 mph during any portion of the drive cycle. Take extra caution when perform the Porsche drive cycle on public roadways. if you think you will be unable to safely perform the drive cycle please seek assistance from an experienced Porsche mechanic or smog check repair center. A. Start your Porsche 911 and let it idle for approximately 2 1/2 minutes. This will allow the ECU to diagnose oxygen sensor aging; meaning the computer will be monitoring the oxygen sensor warm-up period and reaction to rising exhaust temperatures. During this period the ECU is also testing the Secondary Air Injection system. B. Begin driving. Accelerate to 20-30 MPH and maintain your speed for 3 1/2 minutes. The ECU will be testing catalytic converter efficiency. C. Next, accelerate to 40-60 MPH. Once again maintain steady speed, this time for approximately 15 minutes. The EVAP system is now being tested along with adaptation range (2) and the oxygen sensor (switching). D. Decelerate and come to a complete stop. If equipped with a manual transmission, idle in neutral for 3 minutes. If equipped with an automatic Tiptronic transmission, idle in drive (D) for 3 minutes. Adaptation range (2) is now being tested. E. Repeat steps B through D. Drive cycle complete. The dealer said they can do a computerized forced readiness for about $160....smh. Is this my only option?? After spending over $3000 to get to this point I feel like "oh well, what's another $200"...smh -
IT RUNS GREAT ! First the bad news. When I started it after fitting the upgraded Bosch injectors the smoke was as bad as ever. Disconsolate I let it smoke at idle for 20 minutes before the smoke began to abate. Eventually it cleared up. Long fast/slow/heavy/light traffic drive - superb ! No check engine light. But is is now showing "Not Ready " Grrr. Fixed that in the past & have the drive cycle figured out so not worried. To test leak down and compression the kit linked below was useful because of the included extension/adapter tube. Still a fiddle but doable with care. You can buy the tube from others but it costs more than this entire kit. Be aware the couplers are "Lincoln" not the regular Industrial style 1/4" Amflo style Great service from this company. http://www.ebay.com/itm/Engine-Compression-Gauge-Tester-10mm-12mm-14mm-18mm-threads-with-extension-tube-/372029804444?hash=item569eb44f9c:g:uHUAAOSwTyZZeWon
-
An Engine Ear would have conclusive diagnosed the Injector vs Lifter noise. The solenoid inside a lifter always has some ticking - it is just the design of it. The Lifters on the other hand .... Speculation = It is almost as unlikely that a different weight oil will "fix" a noisy M96 Lifter as Techron will fix a noisy injector solenoid. The solution to both problems is usually replacement. Glad to read your situation was the exception because Lifter replacement with the engine in the car is challenging even with practice . Injector change is fiddly and awkward but much easier and faster than Lifter replacement. There are no obvious upgrades to our old lifters but several part number revisions. Injectors have been upgraded. Check the new 15 ohm version from Bosch .I am trying them now.
-
99 boxster doesn't always start
Schnell Gelb replied to Russ_525's topic in 986 Series (Boxster, Boxster S)
If you mean the key in the Start position does not opearte the starter motor = Ignition Switch ? Next time try jiggling the switch to see if that helps. Search also the "Y" connector. Doing a full service may be a good idea - poking around may revel a loose battery connection/starter motor connection etc. -
Correct - flooding. Spark is good on ll cylinders.Noid Test light flashes correctly at # 1 injector when cranking. Leak-down and compression are good on Cyl 1 and similar to the other 5 cylinders -cold. I'll let the excess fuel evaporate overnight and retest in case that was affecting the readings. Edit: I failed to evaporate/remove all the old gas from the exhaust system and this caused confusion when I restarted the engine after the fault had been repaired - see later Post. I'll get some confirmation of the injector part number interchangeability/upgrade in the morning and add it. I bought "Bosch Gen III EV1 Fuel Injectors 0280156211" for $200 ,set of 6 delivered. They worked perfectly - see later Post.
-
I have no idea how ! I am going to try starting it with the header +plugs removed on Bank 1 to see where the gas flows from. Dangerous but I am desperate to get this car fixed ! A stupid but effective test ! The engine ran for a nanosecond on just Bank 2 -yikes ! The gas is pouring out of cyl #1 exhaust ports when the engine is started. 2 & 3 are dry.Nothing to do with SAI. I shall edit/delete previous reference to SAI .So somehow that injector #1 wiring is grounding itself continuously ? Nope -the Noid light flashes correctly so really all 6 injectors should be replaced ? Best to have 6 new,identical, upgraded as a set I guess. But which part number? and 15.4 ohm or 12 ohm ? 6 new injectors for $300 seems very reasonable - compared to what I spent on 48 Lifters. And so much easier to replace. See later Post for part # used - it worked great. 15.4 ohm http://www.ebay.com/itm/6-UPGRADE-OEM-Porsche-Boxster-H6-911-H6-Bosch-4-HOLE-Nozzle-Fuel-Injectors/272857357050?ssPageName=STRK%3AMEBIDX%3AIT&_trksid=p2060353.m1438.l2649 12 ohm: http://www.ebay.com/itm/6-BOSCH-Fuel-Injectors-OEM-Porsche-1997-2001-BOXSTER-BOXSTER-S-2-5-2-7-3-2-NEW/261320663318?ssPageName=STRK%3AMEBIDX%3AIT&_trksid=p2055119.m1438.l2649 Here is an older discussion of the subject.If there is a better reference from Renntech, I'll delete this one and insert our own http://986forum.com/forums/performance-technical-chat/55115-fuel-injector-cleaning-swap.html We are getting closer to a diagnosis but I am still concerned that the white smoke was oil +gas(not just gas) but that diagnosis must wait until the gas leak into Cyl 1 is fixed. I fitted a NOID light to the Cyl 1 Injector connector.When I crank, it flashes so no circuit problems . With Key on and engine off there is no leakage from any injector.No, not even #1. Here is a video showing what the white smoke looks like: There are lots of videos that show the procedure for checking the cause of overfueling an injector.Most seem to be circuit related and caused by abrasion/heat/oil. Like this: That is why the Noid Test is important because it is easy and accessible on the M96. The wiring harness for the injectors is in a relatively cool part of the engine.It is very difficult to visually check the harness. If you suspect one injector and consider replacing it - what if it's performance is slightly different to the others/ That is why I decided to replace all 6. Surprisingly, it was not very expensive if you buy Bosch parts. In theory a test would be to measure residual pressure at the Bank one fuel rail - but how?
-
Thank you JFP. I now suspect the AOS is O.K. because it still smokes profusely with the corrugated hose from the AOS to the Intake plugged per Pelican;s suggestion. There is a small puddle of oil under Cyl # 1 on the floor.So I have removed #1 spark plug again to inspect for oil residue - none. Just dropping the cat+ header to see where the oi is coming from . Ah ,ah ! it was leakage from removing the Oil Pressure Tester from the oil pressure sensor tapping in the crank case.It is directly above Cyl #1 on Bank 1 ! So (amusing)false alarm.Thank goodness for that ! The serious issue is raw gasoline in the Bank 1 header which has been a deteriorating problem for a while. When I remove the cat/header the 3 exhaust ports up inside the cylinder head are dry and the valves look dry. The steel gasket and header face are very wet with gas. As part of the SAI system there are 7 small ports cast into the cylinder head exhaust manifold face. 6 ports are approx 3/16" in diameter & spaced 2 per cylinder .But between 2 &3 there is one much larger port approx. 7/16" in diameter. This seems to be the source of the raw gasoline. What 'feeds' this port, please? Does this mean (all 3?) Bank 1 fuel injectors are constantly spraying gas in huge quantities regardless of DME signals? Or just jammed open with deposits ? I did have a similar problem on Cyl #4 a while ago.So I replaced the fuel pressure regulator and the #4 injector. I flow tested the removed injector and it seemed perfect on the bench test rig.The engine ran well and did not leak fuel after that .Now the big Bank 1 leak. Remove all 3 injectors ? These are all the upgraded 4 hole type. Maybe time to replace all 6 injectors. I can find the correct part # ( ? 0280155890 = 996 606 120 00 ? ) but some say 12 ohms ( Bosch Part number: 0280155890 ) ,others say 15.4 ohms( Part number: 0280156211 ) .Both Listings claim to be compatible with my car ! Does the 3 ohms matter as long as all 6 are identical? BTW the 15.4 ohm are cheaper. I reeeealy appreciate your insight into this weird problem
-
2001 Boxster S 90k miles newly rebuilt engine. I just fitted a new AOS and it shows 4.6" but has huge clouds of oil smoke ! Edit - well, maybe not oil but un-burnt gas on a cold start? -see later Posts for diagnostics. Diagnosis: 1.I suspected the old AOS was due for replacement based on age and some white smoke after start up. The old AOS tested O.K. but replaced it anyway. The new one seemed no different in terms of white oil smoke production. I dissected the old AOS to see if the diaphragm was sagging/torn. It was perfect .I epoxy-ed it back together to carry as an emergency spare. Now I have huge plumes of white oil smoke and 4.6" of water vacuum on the Pyle manometer. BTW the oil pressure at start-up is 75+ lbs on a newly rebuilt engine and the compression/leakdown is perfect and even on all 6 cyl So is the 4.6" AOS defective/marginal ? What should a new, perfect AOS measure ? Pelican say 4"- 7" is O.K. and above 9 is fail - so I may have to try the block-off hack for diagnosis here: " If you're still not sure, you can take a closer look at the hose that connects the air-oil separator to the intake manifold (yellow arrow, Figure 2). If the unit is failing, then there will be a significant amount of oil or residue in this tube. If the car is running rough, then removing this tube and blocking off both ends should disable the system and restore previous performance. This is not a long-term fix, but instead a short-term diagnosis step to use before you replace the air-oil separator. " I ask because there has been discussion of defective,new AOS units from even reputable suppliers. I bought my new (4.6") one from name begins with Auto and ends AZ. I used to buy from RND/SSF in Los Angeles but they have 'retired'. 2. There is also a ?related? P0301 Misfire which I had blamed on Ticking Lifters(now replaced). The code persists . There is gasoline seeping from around Cylinder # 1 header tube at the steel gasket. That is near where the SAI pumps into. Coincidence? I did recently repair /completely overhaul the SAI system to pass the Ca Smog Test. It passed easily and ran well until the lifters started ticking(again). There is a good spark at Cyl 1 and it has good compression/leakdown compared to the other cylinders. Why would a marginal AOS push gasoline out of the gasket near Cyl 1 exhaust pipe? Car starts easily and runs smoothly other than Cyl 1. What other tests to do for diagnosis ? BTW if the Cyl 1 misfire caught your attention ,the best recent ,comprehensive Thread on that subject that I found to help is linked below. Interesting that there were multiple causes but mainly bad lifters,Variocam issues and a mismatched/under-performing injector on cyl#1. Fuel Trims were not very helpful in the diagnosis. https://rennlist.com/forums/996-forum/917082-yet-another-996-cylinder-1-misfire-thread.html
-
Cranks but no start -Misfire
Schnell Gelb replied to Schnell Gelb's topic in 986 Series (Boxster, Boxster S)
Ahsai was correct. The timing was "out " on Bank 2. Once I corrected the timing (camshafts r&r) it started immediately and ran well with no ticking Lifters until............ That will be the next Thread ! I hope this Thread has been useful to gather in one place several hard to find resources . -
Secondary Air Injection Pump
Schnell Gelb replied to jhshelton's topic in 996 Series (Carrera, Carrera 4, Carrera 4S, Targa)
The vacuum reservoir should be pressure tested. Easy project. The leak is usually in the base where it seals to the dome. Not visible to the naked eye. Pressure test only confirms. -
For a simple way to confirm TDC Overlap vs TDC compression use Leak down Tester. The Whistle needs a simple mod to use if the engine is in the car(Boxster) Details here:
-
See Oct 26 post above for "Witness window " and longer bolts + nuts. Without these it is very easy to mess up !
-
Try this for photos ?
-
Cranks but no start -Misfire
Schnell Gelb replied to Schnell Gelb's topic in 986 Series (Boxster, Boxster S)
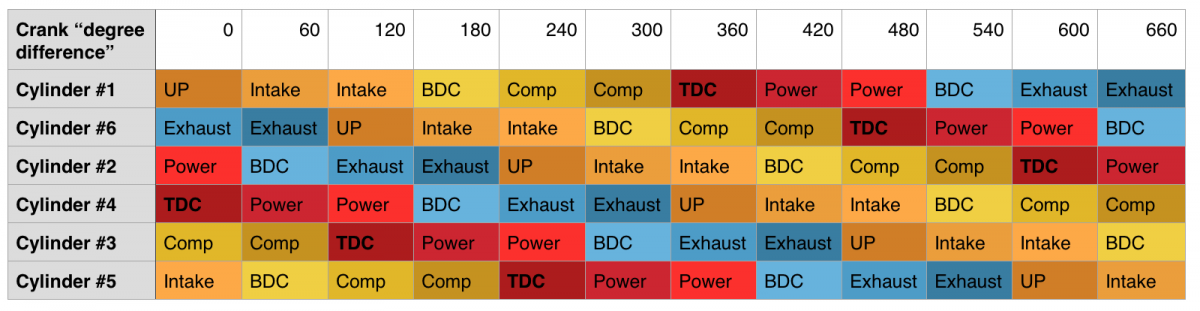
Diagnostic tools for testing and comparing Camshaft Timing on Bank 1 vs. Bank 2 The whistle linked above does not work with the engine in the car while you work solo. It needs a 14mm spark plug adapter+1/4 barb fitting. I made one from a spark plug Anti Fouler and a brass barb adapter + JB Weld. Think about how you will extract it if the hose spins on the barb ! Better is to use an extension/adapter tube. See this thread for a link: The Leakdown Tester works with a few tricks. If the hose for the leakdown tester x spark plug male threads is over 8" it will be tedious to fit. Mine was 18" .I made it work but 8- 12" would have been better. It all takes longer than you may think unless you have 2 long adapter hoses and run them into the passenger seat area. Connect one hose to Cyl 1 and the other to Cyl 4. Now you can bounce back and forth with the leak down tester quickly. You need to rig the gauge via long air hoses to read while you are crunched up like a monkey behind the drivers seat to rotate the engine. http://www.ebay.com/itm/Engine-Cylinder-Compression-Tester-Kit-With-Extension-Bar-Auto-Engine-Diagnostic-/121874241348?hash=item1c60455744:g:XrcAAOSwMmBVxgm8 Caution = if your engine has good compression and you rotate it via the crankshaft nut (24 mm x 12 point) while under high air pressure it will really 'motor' just after TDC ! Ideally you need high volume air and low pressure. Remember to 'set' calibrate your leakdown gauge before you start ! The other thing to remember is the cams rotate at 1/2 crank speed. So for any test you need to rotate the crankshaft 360 degrees X2 ! What you are looking for is the TDC Compression/TDC Overlap situation shown in the color chart in a Post+link earlier in this Thread. To identify a "180 degree out" mistake , what you need to do is this. 1. Set Bank 1 to TDC and lock in the basic timing position with the Bank 1 Intake Cam notch facing outward/toward the Cam Cover/away from the crankshaft. This is TDC Overllap for Cyl 1 (Bank 1) but TDC Compression for Cyl 4 (bank 2). 2. Measure and compare the Leakdown on Cyl 1 & 4 . If your timing is "180 out' both readings will be roughly the same - very high leakage because both cylinders are at TDC overlap(or close to it). 3. If Cyl 1 shows high leakage (TDC Overlap = valves slightly off their seats) but Cyl 4 is TDC compression, it will show much,much lower leakage than Cyl 1. Don't worry if it isn't zero leakage(see later). To get familiar with how the whole system works ,keep the air connected to CYL 1 and keep rotating the crankshaft to observe the change in leakdown rates. You will quickly feel when you are approaching TDC overlap(reduced leakage but fairly stiff to turn) with the next 360 degrees comes TDC compression -very stiff as you approach the TDC mark and it will whip the tool as you go past (power stroke). Use the splendid color chart to turn the engine to TDC compression Cyl 1 . Then test Cyl 3 (mid of exhaust stroke) because it is easily accessible. It will have max leakage if you are doing the test correctly. See Domiac's chart here -April 12, 2014 Where he has written "UP" , he means TDC Overlap. Where he writes TDC, he mean TDC Compression .That difference is the source of much confusion : If you think all this is excessive , tell me how else to test for TDC Compression vs TDC Overlap with the engine assembled and in the car. TDC is easy. It is that pesky Overlap vs Compression part that is the entire confusion ! The tests described would have reduced Domiacs epic thread to a one line answer. Once my engine runs again, I post a simple one page cheat sheet so you can just check both the Intake cam notch and the Exhaust Cam notches to confirm Overlap vs Compression at TDC. Way faster than what I've tediously described above ! But you need the 9612 puck to do that. Baum/LN should send me one for the number of times I have plugged that tool.
-
Cranks but no start -Misfire
Schnell Gelb replied to Schnell Gelb's topic in 986 Series (Boxster, Boxster S)
Thanks JFP. To make matters worse - I have done this xact job succesfully several times. The excuse was - I was working late at night while distracted with unrelated issues. Whoever said this job with the engine in the car was "like building a ship in a bottle" - was a wise man. I could have R&Rd the engine and times many times ...... Yes, you can physically do this job in situ but access and visibility handicaps create many other issues. One other problem recently mentioned elsewhere is using slightly too much (+incorrect type) sealant on the cam covers. The surplus gets squeezed out inside the cover. There it can easily block the oil-return passageways. If you are 'lucky' the blockage is so severe it blows out the green plugs as a warning. If the blockage is only partial you may get oil starvation issues, the cam cover will be half full of oil,will leak, the spark plug tube seals will leak ......... Interesting hidden problem that could be difficult to diagnose ? Any related experiences ? -
Cranks but no start -Misfire
Schnell Gelb replied to Schnell Gelb's topic in 986 Series (Boxster, Boxster S)
I figured out my mistake. When fitting the 4-6 cams on Bank 2 , I did rotate the crankshaft 360 degrees after setting Bank1 . BUT....then I fitted the cams exactly like Bank 1 with the Intake cam notch facing outward(toward the Camshaft Cover).Arrrgh ! It should have faced inward toward the crankshaft. I deleted a previous drawing in this Thread and will post a simpler cheat sheet over the weekend. I won't publish until the engine is running. I now have to dismantle Bank 2 - again .It is the worst of the 2 sides to do. But it seems I need the practice ! I sure won't forget this brutal lesson . -
Rough idle, loss of power on accelleration, IMS?
Schnell Gelb replied to BrianH's topic in 986 Series (Boxster, Boxster S)
Somebody dropped it into the intake system accidentally? Is it magnetic? -
Cranks but no start -Misfire
Schnell Gelb replied to Schnell Gelb's topic in 986 Series (Boxster, Boxster S)
Thank you for your encouragement. I prefer the open source ,collaborative approach and am grateful for the support of this Forum and particularly Ahsai & JFP. The tiny details may seem trivial to some readers - until they also need them ! For our International audience, the diagrams, photos & drawings are even more important. I admire you using a foreign language Forum for your Porsche . Is there a German equivalent to Renntech? -
Cranks but no start -Misfire
Schnell Gelb replied to Schnell Gelb's topic in 986 Series (Boxster, Boxster S)
Here is the simple dwg of the Cam notch positions with the crankshaft rotated 360 from the basic timing starting point shown in a previous Post in this thread. Boxster Bank Two Camshaft Timing.pdf It seems I do not have a timing problem according to the cam notches in the PDF attached.. The next task is to verify with the various TDC tests on each piston position.I'll report how useful the leakdown tester is in distinguishing between TDC Compression and TDC Overlap.I'll do this at the weekend. -
Cranks but no start -Misfire
Schnell Gelb replied to Schnell Gelb's topic in 986 Series (Boxster, Boxster S)
I added the MAF voltage readings in bold type to Ahsai's basic troubleshooting questions in the appropriate Post higher up the page, Doing the Maf test is a good opportunity to remove it,clean it, check that you have the latest part number for your Model Year - yes it varies by year ! Mine is # 986 280 218 055. Some discussions elsewhere mention ECU Doctors found an advantage in using the 996 # if your car is modified.