Welcome to RennTech.org Community, Guest
There are many great features available to you once you register at RennTech.org
You are free to view posts here, but you must log in to reply to existing posts, or to start your own new topic. Like most online communities, there are costs involved to maintain a site like this - so we encourage our members to subscribe or donate. All subscriptions and donations go to the costs operating and maintaining this site. We prefer that guests take part in our community and we offer a lot in return to those willing to join our corner of the Porsche world. This site is 99 percent member supported (less than 1 percent comes from advertising) - so please consider an annual subscription or donation to keep this site running.
Here are some of the features available - once you subscribe RennTech.org
- View Classified Ads
- DIY Tutorials
- Porsche TSB Listings (limited)
- VIN Decoder
- Special Offers
- Paint Codes
- Registry
- Videos System
- View Reviews
- and get rid of this welcome message
It takes just a few minutes to register, and it's quality Porsche information at a low cost.
Contributing Members also get these additional benefits:
(you become a Contributing Member by subscribing or donating money to the operation of this site)
- No ads - advertisements are removed
- Access the Contributors Only Forum
- Contributing Members Only Downloads
- Send attachments with PMs
- All image/file storage limits are substantially increased for all Contributing Members
- Option Codes Lookup
- VIN Option Lookups (limited)

-0001-0001.png.112c13ee97acfad0cb1e70d195cc9a0e.png)
Loren
-
Posts
37,899 -
Joined
-
Days Won
649
Content Type
Profiles
Events
Forums
Exterior Paint Colors
Downloads
Tutorials
Links Directory
Collections
Classifieds
Store
Everything posted by Loren
-
-0001-0001.thumb.png.17f5bb25bf8ec261a17c21e6321c8492.png) part 2
part 2
-
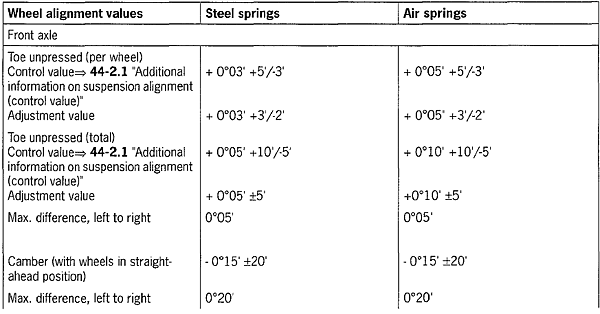
Here is the updated aligment from TSB 13/05 4495 (dated 10/25/2003) (two parts)
-
Fuel Injector Cleaner
Loren replied to Mounty68's topic in 996 Series (Carrera, Carrera 4, Carrera 4S, Targa)
:lol: :lol: :lol: jimmyq is just joking. I use Chevron every 4-6000 miles. -
Done! :D
-
Check Engine Light
Loren replied to Mounty68's topic in 996 Series (Carrera, Carrera 4, Carrera 4S, Targa)
:welcome: A CEL is not an uncommon occurence in today's cars. Some of the most common causes of this (emissions) warning are: a loose gas cap (or bad o-ring on the cap) a loose oil filler cap (or bad o-ring on the cap) These would be the first two things i would check. Make sure both are clean and secure. The CEL light can be reset by anyone with an OBD II scan tool in about 5 secs. Alternately you can disconnect the battery for about two minutes and reset it also - but you will need to re-enter the radio code and stations if you do that. -
New Movies
Loren replied to D_Man's topic in 997-1 Series (Carrera, Carrera 4, Carrera 2S, Carrera 4S)
None of these links work. -
They took my Headlights
Loren replied to cayo71's topic in 996 Series (Carrera, Carrera 4, Carrera 4S, Targa)
Sorry, about your headlights. That sucks! If your car is already wired for Litronics then everything should be plug 'n play with full functionality. -
Yes, those are the factory aerokit side skirts for MY02 and newer cars.
-
Throttle Adjustment
Loren replied to iflyjets4u's topic in 996 Series (Carrera, Carrera 4, Carrera 4S, Targa)
A MY99 C2 has a mechanical throttle cable and can be adjusted. A MY99 C4 has egas and is more difficult to adjust. -
03 C4S Exhaust
Loren replied to C4S Surgeon's topic in 996 Series (Carrera, Carrera 4, Carrera 4S, Targa)
I don't think the C4S standard exhaust is any "upgrade" over the standard 996 exhaust. The muffler outlet is just at a slightly different angle and length to fit the C4S rear bumper cut outs. The PSE for C4S is the same slightly different to fit the bumper cutouts. -
Other Porsche models covered here?
Loren replied to Loren's topic in Forum Comments/Suggestions/Bugs
Just add a post here for 2nd and 3rd choices. The current version of "Poll" does not support mutiple choice. -
Even though you can only vote for one please feel free to add comments/suggestions here...
-
Did you look at the Oil Change DIY? The most common ones are listed there.
-
99 996 Aero kit option code
Loren replied to airkewl's topic in 996 Series (Carrera, Carrera 4, Carrera 4S, Targa)
XAA - Aerokit, Front and Rear Spoiler and Rocker Panel covers Left and Right C02 - Equipped with catalytic converter 236 - 18" Tires XRR - maybe XRB - 18 inch sport/classic wheels/tires -
If you want to use the GT3 adjustable sway bars then you will need to have the mounting points welded on. Several companies sell the parts including The Racers Group. Wheels - I would really recommend 8" (or wider) in the front. If your 7.5" wheels are in good shape companies like Wheel Enhancement will give you a trade in on the old wheels. That is what I did.
-
I would check the bulb and socket first. It is a spring action that holds the bulb in place and sometimes bulbs that are about to fail will go on and off. If everything there is okay there, then it is likely the trunk microswitch (there was a TSB for bad switches back in 2000).
-
If you are going to go over 225 in the front you will need an 8" or 8.5 " wheel. Doing so will also reduce the understeer somewhat. If you want you can also go to an 285 rear with a 235 or 245 front and get a really good handling improvement - with just a slight increase in understeer.
-
PSE (Porsche Sport Exhaust) Install
Loren replied to Loren's topic in DIY Articles - Carrera (996) - Mods
I edited my first post and added the metric Nm values so you can go back and check it now. You can also convert and foot pound setting with: 0.7376 * NM = FT/LBS. -
The default position for the PSE is open. That is, the vacuum valve is used to close the valve and send the exhaust through the muffler (quiet mode). If your vacuum is not connected - then the PSE would always be loud.
-
996 Brake Rotor replacment.
Loren replied to D_Man's topic in 996 Series (Carrera, Carrera 4, Carrera 4S, Targa)
63 ftlbs. for the caliper bolts and Porsche recommends new ones. 7.5 ftlbs. for the rotor to hub screws. -
MY 05 Boxster (987) and Boxster S Order Guides are now available here
-
Rim touch-up paint
Loren replied to ADias's topic in 996 Series (Carrera, Carrera 4, Carrera 4S, Targa)
Have you looked at the Curb Rash Repair here? -
I'll keep my eyes open...
-
Leaking Axle Seals?
Loren replied to Rob in WA's topic in 996 Series (Carrera, Carrera 4, Carrera 4S, Targa)
IMHO the most likely cause of your axle seal leaks is that they were damaged when they removed the transmission to replace the RMS. THEY should pay for that part. -
Removal of the 996 Articulated Spoiler
Loren replied to M A $ E's topic in 996 Series (Carrera, Carrera 4, Carrera 4S, Targa)
I doubt it uses anything from the stock spoiler. You need to see or talk to the aftermarket spoiler company. Obviously you don't want it coming off at 150 MPH! I wouldn't use an aftermarket spoiler unless I was very sure of the quality - on Porsche's they are not "just for looks".