Welcome to RennTech.org Community, Guest
There are many great features available to you once you register at RennTech.org
You are free to view posts here, but you must log in to reply to existing posts, or to start your own new topic. Like most online communities, there are costs involved to maintain a site like this - so we encourage our members to subscribe or donate. All subscriptions and donations go to the costs operating and maintaining this site. We prefer that guests take part in our community and we offer a lot in return to those willing to join our corner of the Porsche world. This site is 99 percent member supported (less than 1 percent comes from advertising) - so please consider an annual subscription or donation to keep this site running.
Here are some of the features available - once you subscribe RennTech.org
- View Classified Ads
- DIY Tutorials
- Porsche TSB Listings (limited)
- VIN Decoder
- Special Offers
- Paint Codes
- Registry
- Videos System
- View Reviews
- and get rid of this welcome message
It takes just a few minutes to register, and it's quality Porsche information at a low cost.
Contributing Members also get these additional benefits:
(you become a Contributing Member by subscribing or donating money to the operation of this site)
- No ads - advertisements are removed
- Access the Contributors Only Forum
- Contributing Members Only Downloads
- Send attachments with PMs
- All image/file storage limits are substantially increased for all Contributing Members
- Option Codes Lookup
- VIN Option Lookups (limited)

-0001-0001.png.112c13ee97acfad0cb1e70d195cc9a0e.png)
Loren
-
Posts
37,845 -
Joined
-
Days Won
637
Content Type
Profiles
Events
Forums
External Paint Colors
Downloads
Tutorials
Links Directory
Collections
Classifieds
Store
Everything posted by Loren
-
-0001-0001.thumb.png.17f5bb25bf8ec261a17c21e6321c8492.png) http://www.autonews.com/article/20151030/OEM11/151039984/porsche-recalls-58881-macan-crossovers-for-possible-fuel-leak
http://www.autonews.com/article/20151030/OEM11/151039984/porsche-recalls-58881-macan-crossovers-for-possible-fuel-leak -
Try 0979 Oh sorry I did another comment, just to let you know that it didn't worked, the 0979 code Did you follow the procedure to get your serial number in the Lost Radio Code FAQ? Please do so and re-submit. Try 0979 Oh sorry I did another comment, just to let you know that it didn't worked, the 0979 code Did you follow the procedure to get your serial number in the Lost Radio Code FAQ? Please do so and re-submit. Hi Loren the SN: T5002155 I will thank you a lot for you help for the code Thank you So just to make sure you have the info the instructions require : It is a Porsche Boxster 986, 1997 Becker PR-VERS: R 1996 SERIAL N.: T5002155 Thank you very much, and sorry for the amount of comments! Try 5454
-
Try 0979 Oh sorry I did another comment, just to let you know that it didn't worked, the 0979 code Did you follow the procedure to get your serial number in the Lost Radio Code FAQ? Please do so and re-submit.
-
Try 0979
-
On Board Charger for 2016 S e-Hybrid
Loren replied to jhbrennan's topic in 92A (Cayenne) Part Number Requests
7PP 971 675 C -- Electronic Unit Charger Universal 7.2kw -- US MSRP $1643.31 -
(click to enlarge images)

-
:welcome: Get the fault codes read using Durametric or a Porsche tool and post them here. Many after market scanners do not pickup Porsche specific codes or pending codes. Clear the codes - drive the car and re-test.
-
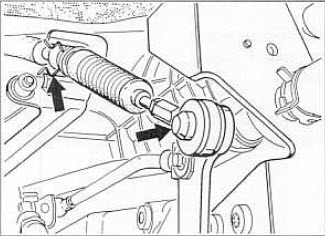
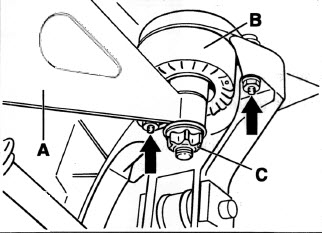
It is on the front suspension upper wishbone.
-
DRL hack/mod?
Loren replied to RRocket's topic in 996 Series (Carrera, Carrera 4, Carrera 4S, Targa)
It is remove fuse A9 -- if you do NOT have seat heaters and remove fuse A9 AND fuse A6 if you DO have seat heaters. So you only remove fuse A9 (per the instructions). -
Try 0578
-
DRL hack/mod?
Loren replied to RRocket's topic in 996 Series (Carrera, Carrera 4, Carrera 4S, Targa)
https://web.archive.org/web/20080729234625/http://www.whiteson.org/boxster/mods/drl/ -
Headlight (only) level sensor is used on cars with standard suspension. For your 2004 Cayenne S with standard suspension: 955 341 371 01 Headlight leveling sensor -- US MSRP $18.13
-
Try 3219
-
To add to what JFP said this is a minimum 3 hour job (more like 5 hours if you have never done it before) that requires draining the coolant and refilling as well as drive belt, and several engine/wheel covers. Draining and refilling the coolant requires a vacuum tool to remove air from the system. If you do not have the tools and time then have a good Porsche shop quote you price. So make sure you have a bad alternator before tackling this.
-
It would be helpful if you would tell us the exact model and year of your car please.
-
Try 7372
-
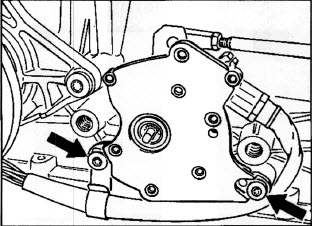
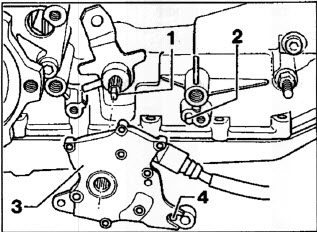
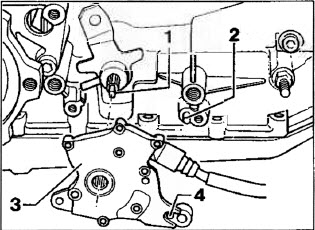
The following procedure is for Boxster only. Removing and installing multi-function switch Removal 1. Hold engine by transport shackle in installed position with special tools 10 -222A and 9591/1 2. Remove the left catalytic converter. 3. Detach selector lever cable from deflection lever and transmission support. 4. Place transmission jack under the transmission. 5. Remove the left transmission support with hydraulic mount. Note: The fastening nut M12 © must not be loosened. The transmission support will otherwise be damaged. A -Transmission support B -Hydraulic mount C -fastening nut M12 6. Release and disconnect cable connection to multi-function switch. 7. Unscrew fastening screws and pull switch off the selector shaft. Installation Install in the reverse order. Put multi-function switch on the selector shaft. The flat point on the serrations in the switch (3) must lie against the flat point on the selector shaft (1). Note: Place multi-function switch on the selector shaft. Do not tilt or use force: you may damage the switch contacts. 2. Turn switch until the fitting bore (4) can be put on the dowel pin (2) on the transmission housing. Tightening torques Multi-functions witch to transmission housing -- (M6) = 8 Nm (6 ftlb.) Transmission prop to transmission housing -- (MID) = 65 Nm (48 ftlb.) Hydraulic mount to carrier side section -- (M8) = 23 Nm (17 ftlb.)
-
Try 8793
-
Try 8576
-
Do you mean the multi-function switch on the side of the transmission?
-
Try 7148
-
Try 0362
-
Value of a running 996 motor?
Loren replied to Ryan...'s topic in 996 Series (Carrera, Carrera 4, Carrera 4S, Targa)
:welcome: The guy you want to talk to is Contributing Member Creekman. Start with his DIY here