Welcome to RennTech.org Community, Guest
There are many great features available to you once you register at RennTech.org
You are free to view posts here, but you must log in to reply to existing posts, or to start your own new topic. Like most online communities, there are costs involved to maintain a site like this - so we encourage our members to donate. All donations go to the costs operating and maintaining this site. We prefer that guests take part in our community and we offer a lot in return to those willing to join our corner of the Porsche world. This site is 99 percent member supported (less than 1 percent comes from advertising) - so please consider an annual donation to keep this site running.
Here are some of the features available - once you register at RennTech.org
- View Classified Ads
- DIY Tutorials
- Porsche TSB Listings (limited)
- VIN Decoder
- Special Offers
-
OBD II P-Codes - Paint Codes
- Registry
- Videos System
- View Reviews
- and get rid of this welcome message
It takes just a few minutes to register, and it's FREE
Contributing Members also get these additional benefits:
(you become a Contributing Member by donating money to the operation of this site)
- No ads - advertisements are removed
- Access the Contributors Only Forum
- Contributing Members Only Downloads
- Send attachments with PMs
- All image/file storage limits are substantially increased for all Contributing Members
- Option Codes Lookup
- VIN Option Lookups (limited)

-0001-0001.png.112c13ee97acfad0cb1e70d195cc9a0e.png)
Loren
-
Posts
37,693 -
Joined
-
Days Won
605
Content Type
Profiles
Events
Forums
External Paint Colors
Downloads
Tutorials
Links Directory
Collections
Classifieds
Store
Everything posted by Loren
-
-0001-0001.thumb.png.17f5bb25bf8ec261a17c21e6321c8492.png) Well, if you wanted to go with the Mk1 GT3 brakes there are kits available for around $4000 (US) uninstalled. The kits include front & rear red calipers, 13" rotors, OEM brake pads (you could always use Pagids), wheel carriers, adapters, hubs, shims and the rest of the nuts and bolts hardware. If you want the MY04 GT3 or GT2 (the GT2 and new GT3 share the same brakes) then you first have to decide on cast iron or ceramics. The ceramics are around $11,000 (without the wheel carriers, adapters or hubs). Maybe Gert can get a better price? I don't know of anyone offering a cast iron GT3/GT2 brake upgrade kit (yet). But I would guess it to be in the $5-6000 range. Again you will need adapters, wheel carriers, etc., etc.. If you want the cast iron TT brakes (same as above you'll need adapters, wheel carriers, etc.) they a should be about $4-5000. If someone knows of better pricing please say so... One more thing... since your car is an 03 the master cylinder and ABS should both work fine with the larger brakes -- this may not be true for older cars.
Well, if you wanted to go with the Mk1 GT3 brakes there are kits available for around $4000 (US) uninstalled. The kits include front & rear red calipers, 13" rotors, OEM brake pads (you could always use Pagids), wheel carriers, adapters, hubs, shims and the rest of the nuts and bolts hardware. If you want the MY04 GT3 or GT2 (the GT2 and new GT3 share the same brakes) then you first have to decide on cast iron or ceramics. The ceramics are around $11,000 (without the wheel carriers, adapters or hubs). Maybe Gert can get a better price? I don't know of anyone offering a cast iron GT3/GT2 brake upgrade kit (yet). But I would guess it to be in the $5-6000 range. Again you will need adapters, wheel carriers, etc., etc.. If you want the cast iron TT brakes (same as above you'll need adapters, wheel carriers, etc.) they a should be about $4-5000. If someone knows of better pricing please say so... One more thing... since your car is an 03 the master cylinder and ABS should both work fine with the larger brakes -- this may not be true for older cars. -
cigarette lighter light
Loren replied to netrophile's topic in 996 Series (Carrera, Carrera 4, Carrera 4S, Targa)
The ones that are shaped like a switch are part number: 986 613 425 00 A01 Those will be gloss black to match your interior. MY02 and newer cars got a mat black finish. -
That's it with the cassette!
Loren replied to lap's topic in 996 Series (Carrera, Carrera 4, Carrera 4S, Targa)
I have the parts diagrams for an 89 Speedster but no instructions. Let me know if you want the parts diagrams. -
It's about 900K. I sent it to your private email address.
-
Gary, You've got mail...
-
Congrats to Rob in WA for having the first Featured Porsche of the Month in the Garage. Check out his car and all the cars in the Garage! :thumbup: :thumbup: :thumbup:
-
Wheel Scratches
Loren replied to PDL996's topic in 996 Series (Carrera, Carrera 4, Carrera 4S, Targa)
Enjoy... you can always use the search feature. It works pretty well. -
'04 CD Changer/Radio Malfunction
Loren replied to Poursha's topic in 996 Series (Carrera, Carrera 4, Carrera 4S, Targa)
Interesting.... software bug :rolleyes: -
That's it with the cassette!
Loren replied to lap's topic in 996 Series (Carrera, Carrera 4, Carrera 4S, Targa)
2. I don't think anyone makes a harness -- I think they are all custom (not that many 996s around). Most aftermarket radios will plug and play. If you want an amp, larger speakers, DVD or anything else it will likely be custom from the ground up. Much easier on MY02 and older cars before the MOST bus stuff. 3. You will need to tape the alarm wire from the stock radio since your aftermarket radio won't have the same feature. This will not hurt anything -- just keep the alarm from chirping (open zone). -
There isn't a DIY per se. You will need some special tools like a spring compressor and lower ball joint tool (pulling tool not a fork tool). This is about a 5-8 hour job for even for folks that know what they are doing -- and you will still need an alignment at the end. If you've got the tools and want to tackle this let me know and I'll see if I can find other tips.
-
There is a 14 page TSB with fixes for a number of hardtop noises. I can email you this if you want or you could make your dealer fix it (since you are under warranty).
-
Vibration(?) Noise in 2003 C4S
Loren replied to John S's topic in 996 Series (Carrera, Carrera 4, Carrera 4S, Targa)
You are likely going to have to try more things to narrow it down. Do you the hear vibration when you rev the engine? The fluttering metal sound has sometimes been a broken weld inside a muffler. Try putting the clutch in and turning left (at a reasonable speed) and see if you hear the noise (if so it's likely in the suspension i.e. loose sway bar). Of course you could crawl under the car and look for something loose too. -
'04 CD Changer/Radio Malfunction
Loren replied to Poursha's topic in 996 Series (Carrera, Carrera 4, Carrera 4S, Targa)
I don't suppose they put the PST2 on your car to check for MOST error codes? I just got supplement 76 for the service manuals and it includes 368 pages of MOST diagnostics and error codes. There are lots of MOST error codes -- all readable by PST2. -
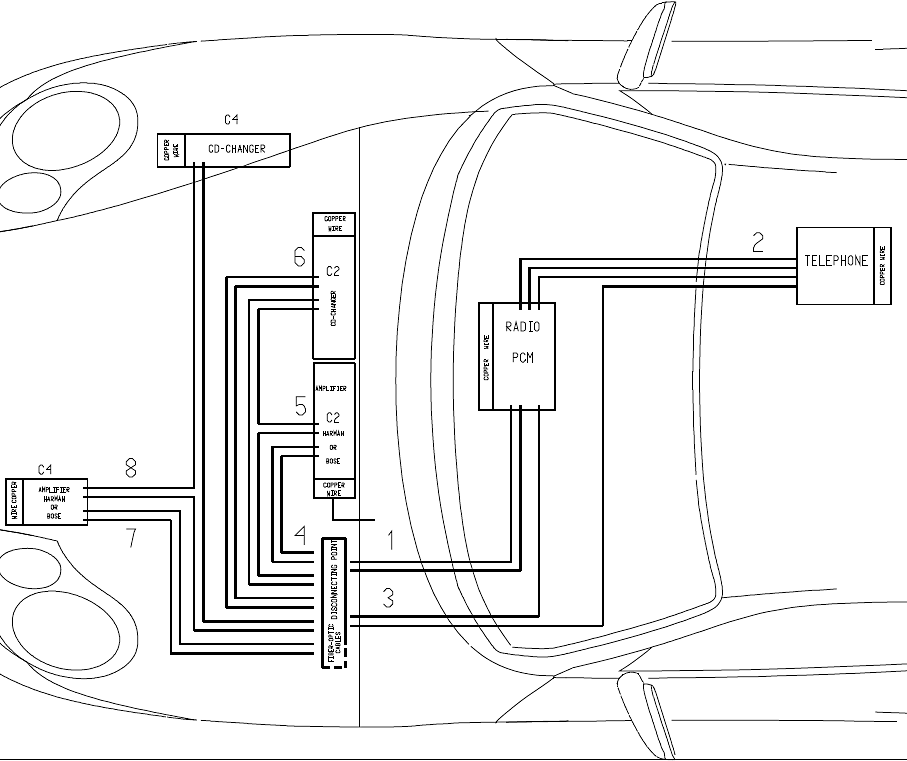
MOST CD Changer Kit Part Numbers (996)
Loren replied to Loren's topic in 996 Series Part Number Requests
Gert, These comes from the MY03 schematics in Service Manual Supplement 73. I have two lists. One labeled for LHD (above) and one for RHD. There is only one schematic that is labeled RoW or US/Canada and that is Lights. The RHD list starts with: 996.622.724.00 996.622.721.00 996.622.725.00... etc. -
Newbie with Questions.
Loren replied to Curves4S's topic in 996 Series (Carrera, Carrera 4, Carrera 4S, Targa)
I change my oil at half the recommended mileage (about 7,500 miles) or annually. My theory has always been -- oil is cheap engine wear and damage is not. -
Wheel Scratches
Loren replied to PDL996's topic in 996 Series (Carrera, Carrera 4, Carrera 4S, Targa)
Have a look at this DIY... http://www.renntech.org/forums/index.php?showtopic=80 -
Thanks Lou! I added a "moved" link so folks can find this in either the Carrera or DIY forum.
-
Here is the table of kits for MOST bus optioned cars (Left Hand Drive ONLY). You will need to check what options you already have in order to get the right kit. See the additional table legends below. (If someone needs RHD cars let me know). 000 044 900 72 CD changer retrofit kit (contains changer, cartridge, brackets, electrical harness, bolts, etc.) plus one of the following kits...

-
'04 Carrera CD Changer Install
Loren replied to Poursha's topic in 996 Series (Carrera, Carrera 4, Carrera 4S, Targa)
I now have all the info on this... let me sort through it all and I'll post it here. A parts list is here -
Newbie with Questions.
Loren replied to Curves4S's topic in 996 Series (Carrera, Carrera 4, Carrera 4S, Targa)
Sometimes there is an air leak if the window does not seal properly -- more noticeable when you add the pressure of the open sunroof. Sometimes it's just cleaning the rubber around the window and sometimes they need to adjust the window. Yes, your gas cap flap (I assume that's what you mean) should stay open when refueling. There is both a hinge and a spring to keep it open. Sounds like your spring is missing or broken. Both items should be fully covered under warranty so I would let the dealer fix them. -
Replacing Coolant Reservoir '99 996
Loren replied to ninerguru's topic in 996 Series (Carrera, Carrera 4, Carrera 4S, Targa)
I have not do it but I have heard it is about 1-2 hours because of all the other stuff you need to remove to get it out. Here is a diagram of the coolant tank assembly. Make sure you get the newest one (996 106 147 56 for a MY99) as there have been several changes. You might also get 1 liter of Porsche coolant (000 043 203 78) which will give 2 liter when mixed properly at 50-50. -
Non-smoker storage tray (by handbrake)
Loren replied to AC 996C2's topic in 996 Series Part Number Requests
I was told it is no longer available (since the option is no longer available)... which means existing stock only for dealers. You might have to call around some to find one. -
Here are the "B" (blue) connector pin outs on a dot matrix for a MY02 Carrera (hopefully this will help)
-
cigarette lighter light
Loren replied to netrophile's topic in 996 Series (Carrera, Carrera 4, Carrera 4S, Targa)
Also... the light only comes on with the headlights. So if it's not on when they are then it's disconnected or burnt out. -
Proper oil pressure
Loren replied to buhin's topic in 996 Series (Carrera, Carrera 4, Carrera 4S, Targa)
As the oil is thicker (cold) you will see higher oil pressures. As the oil warms it should come into normal range. A little high is usually not bad -- low is bad. Your experience looks normal to me.