Welcome to RennTech.org Community, Guest
There are many great features available to you once you register at RennTech.org
You are free to view posts here, but you must log in to reply to existing posts, or to start your own new topic. Like most online communities, there are costs involved to maintain a site like this - so we encourage our members to donate. All donations go to the costs operating and maintaining this site. We prefer that guests take part in our community and we offer a lot in return to those willing to join our corner of the Porsche world. This site is 99 percent member supported (less than 1 percent comes from advertising) - so please consider an annual donation to keep this site running.
Here are some of the features available - once you register at RennTech.org
- View Classified Ads
- DIY Tutorials
- Porsche TSB Listings (limited)
- VIN Decoder
- Special Offers
-
OBD II P-Codes - Paint Codes
- Registry
- Videos System
- View Reviews
- and get rid of this welcome message
It takes just a few minutes to register, and it's FREE
Contributing Members also get these additional benefits:
(you become a Contributing Member by donating money to the operation of this site)
- No ads - advertisements are removed
- Access the Contributors Only Forum
- Contributing Members Only Downloads
- Send attachments with PMs
- All image/file storage limits are substantially increased for all Contributing Members
- Option Codes Lookup
- VIN Option Lookups (limited)

jchapura
-
Posts
101 -
Joined
-
Last visited
Content Type
Profiles
Events
Forums
External Paint Colors
Downloads
Tutorials
Links Directory
Collections
Classifieds
Store
Everything posted by jchapura
-
 Maybe this isn't the dealer to ask but...what is this Porsche phenom where a dead battery can do harm (beyond needing a jump)? Hopefully I'll get a little warning when mine's about to go...has anyone used those 9v battery temp hookups through the cigarette lighter to try to keep the electronics alive while the battery is disconnected just awaiting the new battery to be hooked up (the disconnection time around 5-10 minutes)?
 -
I'm a little leery too. That seems like a lot of water to see no other symptoms (like the white gooey stuff on the oil cap; or to be seen in the oil filter/cannister at oil change time). Couple that with your state-side driving habit and it really makes it hard to believe (your "at temp time" seem like enough to me). It's probably not all emulsified but being entrained by agitation - separating out quickly when left to stand - probably not a good thing if it's in oiling passageway. I've owned a lot of cars over the years in Texas and upstate NY (think cold in the winter time) and I do not recall ever even thinking about the build up of condensation or blow by water (a byproduct of combustion) in the crankcase. What's the deal with the M9X that it seems to be a water magnet - even to the point of it being called out in the owner's manual - even to the point of influencing the oil level - never seen that before. I guess others have experienced so I've got to get on board with preventing it but sure would like to know even one other make where the issue is as "explicit" as the Porsche M9X. BTW, are your tailpipes even a little bit black beyond "normal"?
-
In trying to explore the water burn off theory, can you tell us more about your typical trips? Time on the road, time on the road when oil temp was above 200 deg F, trips per week, average ambient temp, etc. 0.5 liter of water seems like a lot if you have a non-trivial commute that should be burning it off.
-
Howdy floatingkiwi, is it possible you're mixing up the engine bay purge fan operation with my need for information about the coolant/radiator/evaporator fan control? I'm needing info or a technique to be able to manually turn on the fan with a switch.
-
Thanks jl-c. That's a great idea. Here's a different possible approach. How could I fake out the controller to think that the coolant temperature is "too high"? Could I not feed that voltage (or signal? or resistance?) into the controller and then the fans would run on high? Does anyone have some specifics on the voltage and controller terminal for the coolant temp sensor?
-
Thanks RFM. Since PWM is meant to (electrically) safely give the device effectively "less" voltage, or more precisely, less "time" at the nominal voltage, to get the fan the run "wide open", one could just supply it with straight/unmodulated nominal voltage - does that seem right? To do this, I could tap into the 12v that's supplying (because it's got the proper current carrying capacity) (in other words, on the input side of the controller) the controller, and add my dash switch in between this tap-in point and the termination at the fan. This effectively gives the fan 12v 100% of the time, whereas the normal circuit gives it 12v between 0% and 100% of the time depending on what the controller is commanding it to do.
-
I'm trying to understand the outputs of the 997.1 cooling fan control unit. I understand that the fans are a continuously variable type and run in proportion to the cooling water temperature. How is the fan speed adjusted? For example, is the voltage adjusted by the control unit? Maybe 0v to get 0 RPM, to 12v to get max RPM. Or, PWM? I'm interested in using this info to add a manual override to be able to run the fan at max speed by a dash switch (but maybe needing some "smarts" if PWM is involved).
-
Actually, I want to be surprised (that might explain why even a little bit of spirited driving seemingly spikes the oil temperature, especially during warmer ambient temps). :) Mine look less dirty on the outside compared to your pic but I'm worried what will be trapped between the condenser and radiator. BTW, do you know what (sensor) criteria is used for the computer to turn on the engine compartment exhaust fan? Is it as simple as an ambient temperature greater than 80 deg F? I noticed today when I came to the car after work - I park in an underground parking garage - the dash temp was reading 81 and the exhaust fan immediately started up when the I started the car.
-
I'm not sure about their cleanliness. I suspect they are dirty because of the much better temperature control when the ambient temperature is cooler (and less air flow is needed because of the delta T). I hope to clean them this weekend and avoid any mods.
-
Is there a way to fake the system? Pre-heat it, or more precisely, supplement heat it, perhaps? Or change out the sender/sensor? Where is the temp sensor that it reads for the control temperature? Maybe a resistor or active component could be added to the sensors lead, depending on the type of signal (if it's PID, for example)? Or maybe, I could just put add my own manual/toggle switch and power feed? How hard might that be? It seems that a low temperature thermostat couldn't be fully taken advantage of, in stop-and-go traffic, in hot ambient conditions, because the air may only be flowing when the system hits the factory-set temp of 200, 205 or something like that...
-
I'd like to turn on the radiator fans at about a temperature that's 10 degrees cooler than what they currently turn on at. Is there a way to do that? Different temp switch? Reprogramming one of the computers? If reprogramming, can the Durametric Enthusiast do the job or is the Pro needed? Or some other available tool?
-
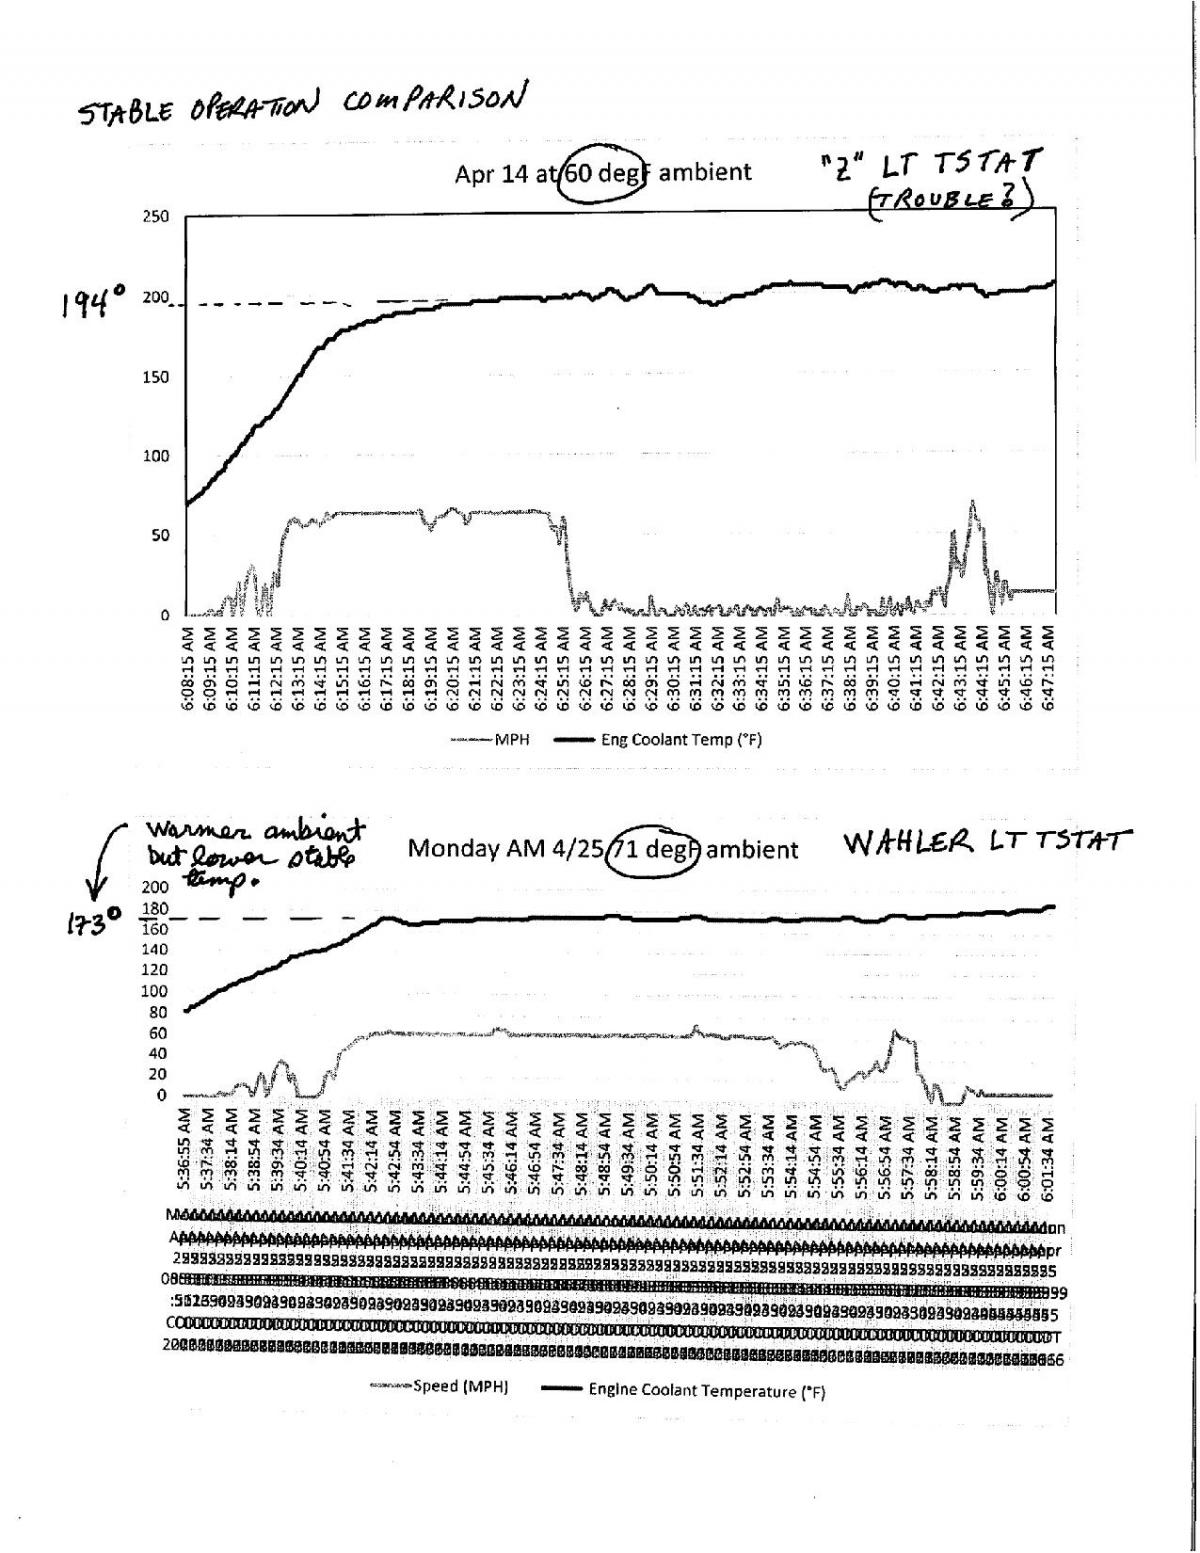
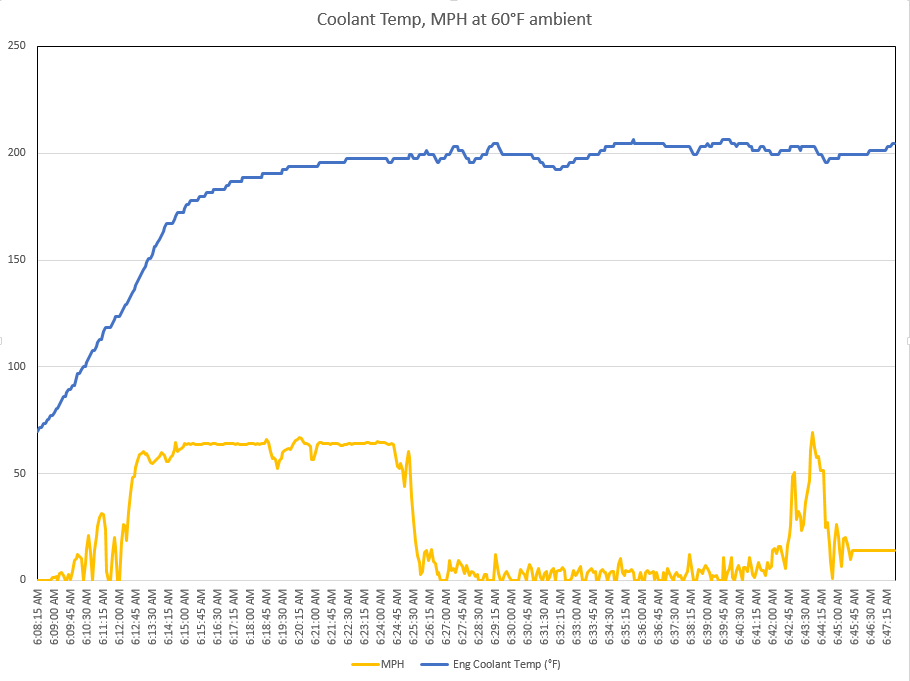
This past weekend I changed out the new thermostat that was giving me even warmer oil temperatures than the original regular temp thermostat. The new low temperature thermostat acted like I expected to. It gave me oil temps about 8 deg F cooler than the original regular temp tstat. The first low temperature thermostat must have been a dud. Attached is an image of the old and new tstat coolant temp graphs clearly showing the approximate 20 degree difference in the temperature at the plateau (after warmup). I did boil all the tstats - they did open pretty close to what I read should be expected. I'm happy it's resolved. I hated to have to spend another half-day to change it out again. I'm hoping it does its job to protect the engine just that little bit more. Thanks everyone for chiming in.

-
My ambient was about 65 deg F for yesterday's run. Here's this morning's chart (60 deg F ambient; same route; but one longer episode of stop-n-go traffic) with car speed (to suggest that there is sufficient radiator air flow). I'm not convinced the tstat is the low temp variety or not defective. Of course, i'm trying to avoid cracking open the coolant system again to replace it - hence my dilemma. But I will because I want the added engine protection of the lower tstat set point. Is there a "poor man's" way to check the density of my coolant mix? Hydrometer's are not that expensive but was wondering it there's way to compare perfectly mixed brand new 50/50 with a sample from the car...
-
Does this coolant heat up chart look like it's from a car with a low temperature thermostat?
-
Thanks JFP. I wish I had known about the "pre-mix" rule. Mea culpa. When you say "much longer", how many operational minutes or hours are we talking about? Tell me though, what might explain the change in relatively steady state oil temperature of 205 (pre) to 215 (post)? I definitely have heard of the radiators getting "trashed in" but mine are the same trashiness (from before the new pump and tstat, and after)?
-
I will look up how to "burp" with Porsche system - not really sure what that entails. (Was really hoping that the Airlift would have eliminated this burping step. Oh well.) According to the source of the Audi G12 I bought, they are compatible and essentially the same chemically, just different colors.
-
2005 C2S ~52k miles For the record, for multiple months prior to these maintenance procedures, I noted an oil temperature of about 205 deg F, whether the ambient temperature was warm or cold. I could get the temp to go up by keeping the RPMs above 3000 for an extended time. Most of the time the needle just stayed pretty steady at 205. The one day, saw leaking coolant from underneath the water pump. Decided to change the water pump and thermostat myself. I also changed some of the hoses that touch other about-to-be-changed-out parts. I changed the reservoir cap. The new thermostat was labelled as "71" and marked Motorad. I have no history of whether any prior coolant system work had been done by others. When initially draining the coolant, I used the AirLift three additional times to pull fluid to the back end of the car to get a more empty system. Then I did the parts change out. Put everything back together. The system held its vacuum for at least five minutes. I then refilled with straight distilled water, intending to "flush" out the old, yellow-ish coolant since my new coolant was Audi G12 anti-gel "red". I took it for a 15 minute spin to mix up, and heat up, everything. I drained the diluted coolant three time with AirLifts in between. It held vacuum again. Proceeded to add 3.3 gallons of straight G12 since that's what I calculated I needed (for appropriately 50/50 against a total capacity of 8.6 gallons). Finished/topped off with distilled water. To try to get any potentially trapped air pockets out, I turned the heater on HI and fan on high. I'm now getting about 212-215 oil temperature and the needle seems to move (up and down) more often compared to the pre-change state. I was really hoping for a reduction in oil temperature after the change-out because of the low temperature thermostat. What might explain why the "reduction" seems to have gone the other way? Thanks for any insights you might provide. PS: The bright side - there's no more leaking coolant. [Although I didn't hear much noise from the old water pump - when I had it on the bench I could tell the bearing was shot.]
-
My two cents probably aren't worth two cents but I think this might be just coincidence. Or, a very subtle cause and effect. It sounds like the pressure plate is no good. Would love to have you report back when you do learn the cause. For what it's worth, I did this same fluid changeout a few months ago on my garage floor and did not experience what you have. I can understand your frustration.
-
I did the mod. I decided to light-up both lights. Here's the mark-up for the mod. The wing brake light harness is readily exposed in the engine bay (a cut and tie-in are there). The main engine lid harness is on the passenger side near the lid hinge and was easily exposed more for its cuts and tie-ins. So, I did not have to demount the wing to access anything in the area into which the old spoiler retracted. I haven't figured out how to embed an image here so here's link to another forum with marked-up wiring diagram: http://rennlist.com/forums/997-forum/918989-need-help-with-spoiler-harness-wiring-diagram-for-third-brake-light.html#post13031713
-
Thank you very much. This should do the trick to design the mod.
-
The cost and the likelihood I'll still need to have the car recoded by piwis. I've already spent too much on this wing. The wing's design allows the lifts to go up and down to no effect so I'm not worried about deleting that function. I just want to enable using the third brake light. Another option I have is just to press the spoiler up button on the console. But that's a bit of a pain to remember. I was hoping to learn I could just cut one wire and short-out two others.
-
I need a wiring diagram and physical locations for connectors for the wire harness associated with the rear spoiler lift mechanism. I want to "fake out" the electronics such that the computer (really the rear spoiler's third brake light) to think that the spoiler is always in the raised position. It's my understanding that there is a upper limit switch on the lift mechanism and a lower limit switch. If the upper spoiler position is "tripped" then the spoiler's third brake light is energized. If the spoiler is parked (or in the lower position) then the fixed back windshield third brake is energized. Presumably, by opening or shorting some wires, I can mimic the natural positions of the spoiler, and get the effect I want. I could also accept having both third brake lights energized - if someone has a technique for that. Why? Because I've replaced the original spoiler with a fixed wing, and transferred the spoiler's third brake light to the wing. Would someone be able to post a wiring diagram of the harness wires I'd need to test and modify? I'd like to do the wire modifications near a connector, probably near the non-spoiler end of the harness - would you be able to suggest where the spoilers lifting mechanism harness terminates in the body or engine compartment? A picture would be great.
-
I installed a Tranzlt BLU in my 2005 C2S that has the Nav system and PCM 2.1. This picture is just how my car was (the picture is from ilko on Rennlist - thank you ilko). http://rennlist.com/forums/997-turbo-forum/808080-tranzit-blu-hf-install-in-a-997-1tt-pcm-2-1-a.html
-
Thanks Hilux2400. I did swap ends on the long mounting bolts you described. Did you make a spanner wrench for that (I think) 13 mm bolt? If I remember right it was very tight on the backside of that bracket. But maybe I have a cheapie spanner wrench from my bicycle maintenance (cone nuts and locking nuts).
-
I swapped out my 997 C2S mufflers for Gundo-hacked mufflers but in doing so I broke off one stud of three that's on the exhaust bracket (just too corroded I guess). I buttoned everything back up because I didn't have another bracket but was wondering if I should preemptively order a new bracket before something worse happens. The bracket part number is 996.111.238.03. I'll certainly listen for squeaks and vibrations...