Welcome to RennTech.org Community, Guest
There are many great features available to you once you register at RennTech.org
You are free to view posts here, but you must log in to reply to existing posts, or to start your own new topic. Like most online communities, there are costs involved to maintain a site like this - so we encourage our members to donate. All donations go to the costs operating and maintaining this site. We prefer that guests take part in our community and we offer a lot in return to those willing to join our corner of the Porsche world. This site is 99 percent member supported (less than 1 percent comes from advertising) - so please consider an annual donation to keep this site running.
Here are some of the features available - once you register at RennTech.org
- View Classified Ads
- DIY Tutorials
- Porsche TSB Listings (limited)
- VIN Decoder
- Special Offers
-
OBD II P-Codes - Paint Codes
- Registry
- Videos System
- View Reviews
- and get rid of this welcome message
It takes just a few minutes to register, and it's FREE
Contributing Members also get these additional benefits:
(you become a Contributing Member by donating money to the operation of this site)
- No ads - advertisements are removed
- Access the Contributors Only Forum
- Contributing Members Only Downloads
- Send attachments with PMs
- All image/file storage limits are substantially increased for all Contributing Members
- Option Codes Lookup
- VIN Option Lookups (limited)
.jpeg.8abfc8e875ce0132dea3e684906a6743.jpeg)

hardtailer
-
Posts
42 -
Joined
-
Last visited
Content Type
Profiles
Events
Forums
External Paint Colors
Downloads
Tutorials
Links Directory
Collections
Store
Everything posted by hardtailer
-
Taillamp bolts
hardtailer replied to RatboneRanch's topic in 996 Series (Carrera, Carrera 4, Carrera 4S, Targa)
What do you mean by a reverse torx bolt? The tail light is held with one single M6 bolt (hexagonal head) per side. Only removing the bracket requires removing the 2 per side torx studs. Spray the remaining studs with penetrating oil from from behind after pulling the light clusters away -
Easy workaround: shift into N
-
Idle not dropping when I clutch
hardtailer replied to JeTexas's topic in 996 Series (Carrera, Carrera 4, Carrera 4S, Targa)
Raising this topic as I had the same symptoms. The TC actually does work as described when it tries to reduce engine braking torque. See here for more info switching off the TC or changing the rear tyres to the right size (285/30R18 or 295/30R18) stopped this behaviour. -
Short version: not advisable. Long version: I have that exact combo (Continental Sportcontact2 225/45R18 & 285/35R18) on my 99 Carrera (cable throttle and TC only) since I bought it. When coasting off-throttle from 50-60mph the bigger rear tyre circumference results in lower rotational speeds compared to the front wheels which trips the traction control into preventing engine braking by opening the iacv (and adding fuel & advancing the ignition most probably) as the difference in wheel speeds front to rear is normally indicative of impending rear axle instability (oversteer). Only when I tap the brake pedal (which closes the brake light switch) the TC intervention stops and engine braking is normal. Pressing the clutch before tapping the brake pedal results in an idle speed of about 2100-2500 rpm. Disconnecting the iacv results in pops and bangs on decel which stops also as soon as the brake pedal is tapped. First I thought it was a sticking Iacv that wouldn't close to the appropriate idle position when releasing the throttle pedal from something close to WOT (BOSCH motronic 1.1 from the 80s opens up the iacv at WOT that's what made me think 5.2 'does that too) but the exhaust crackle on decel after disconnecting the iacv when the car was idling normally indicated that something else had to be going on. It was this thread in fact the post by flatsix36 that gave the actual cause of my symptoms: PSM/ESP equipped vehicles will respond similarly.
-
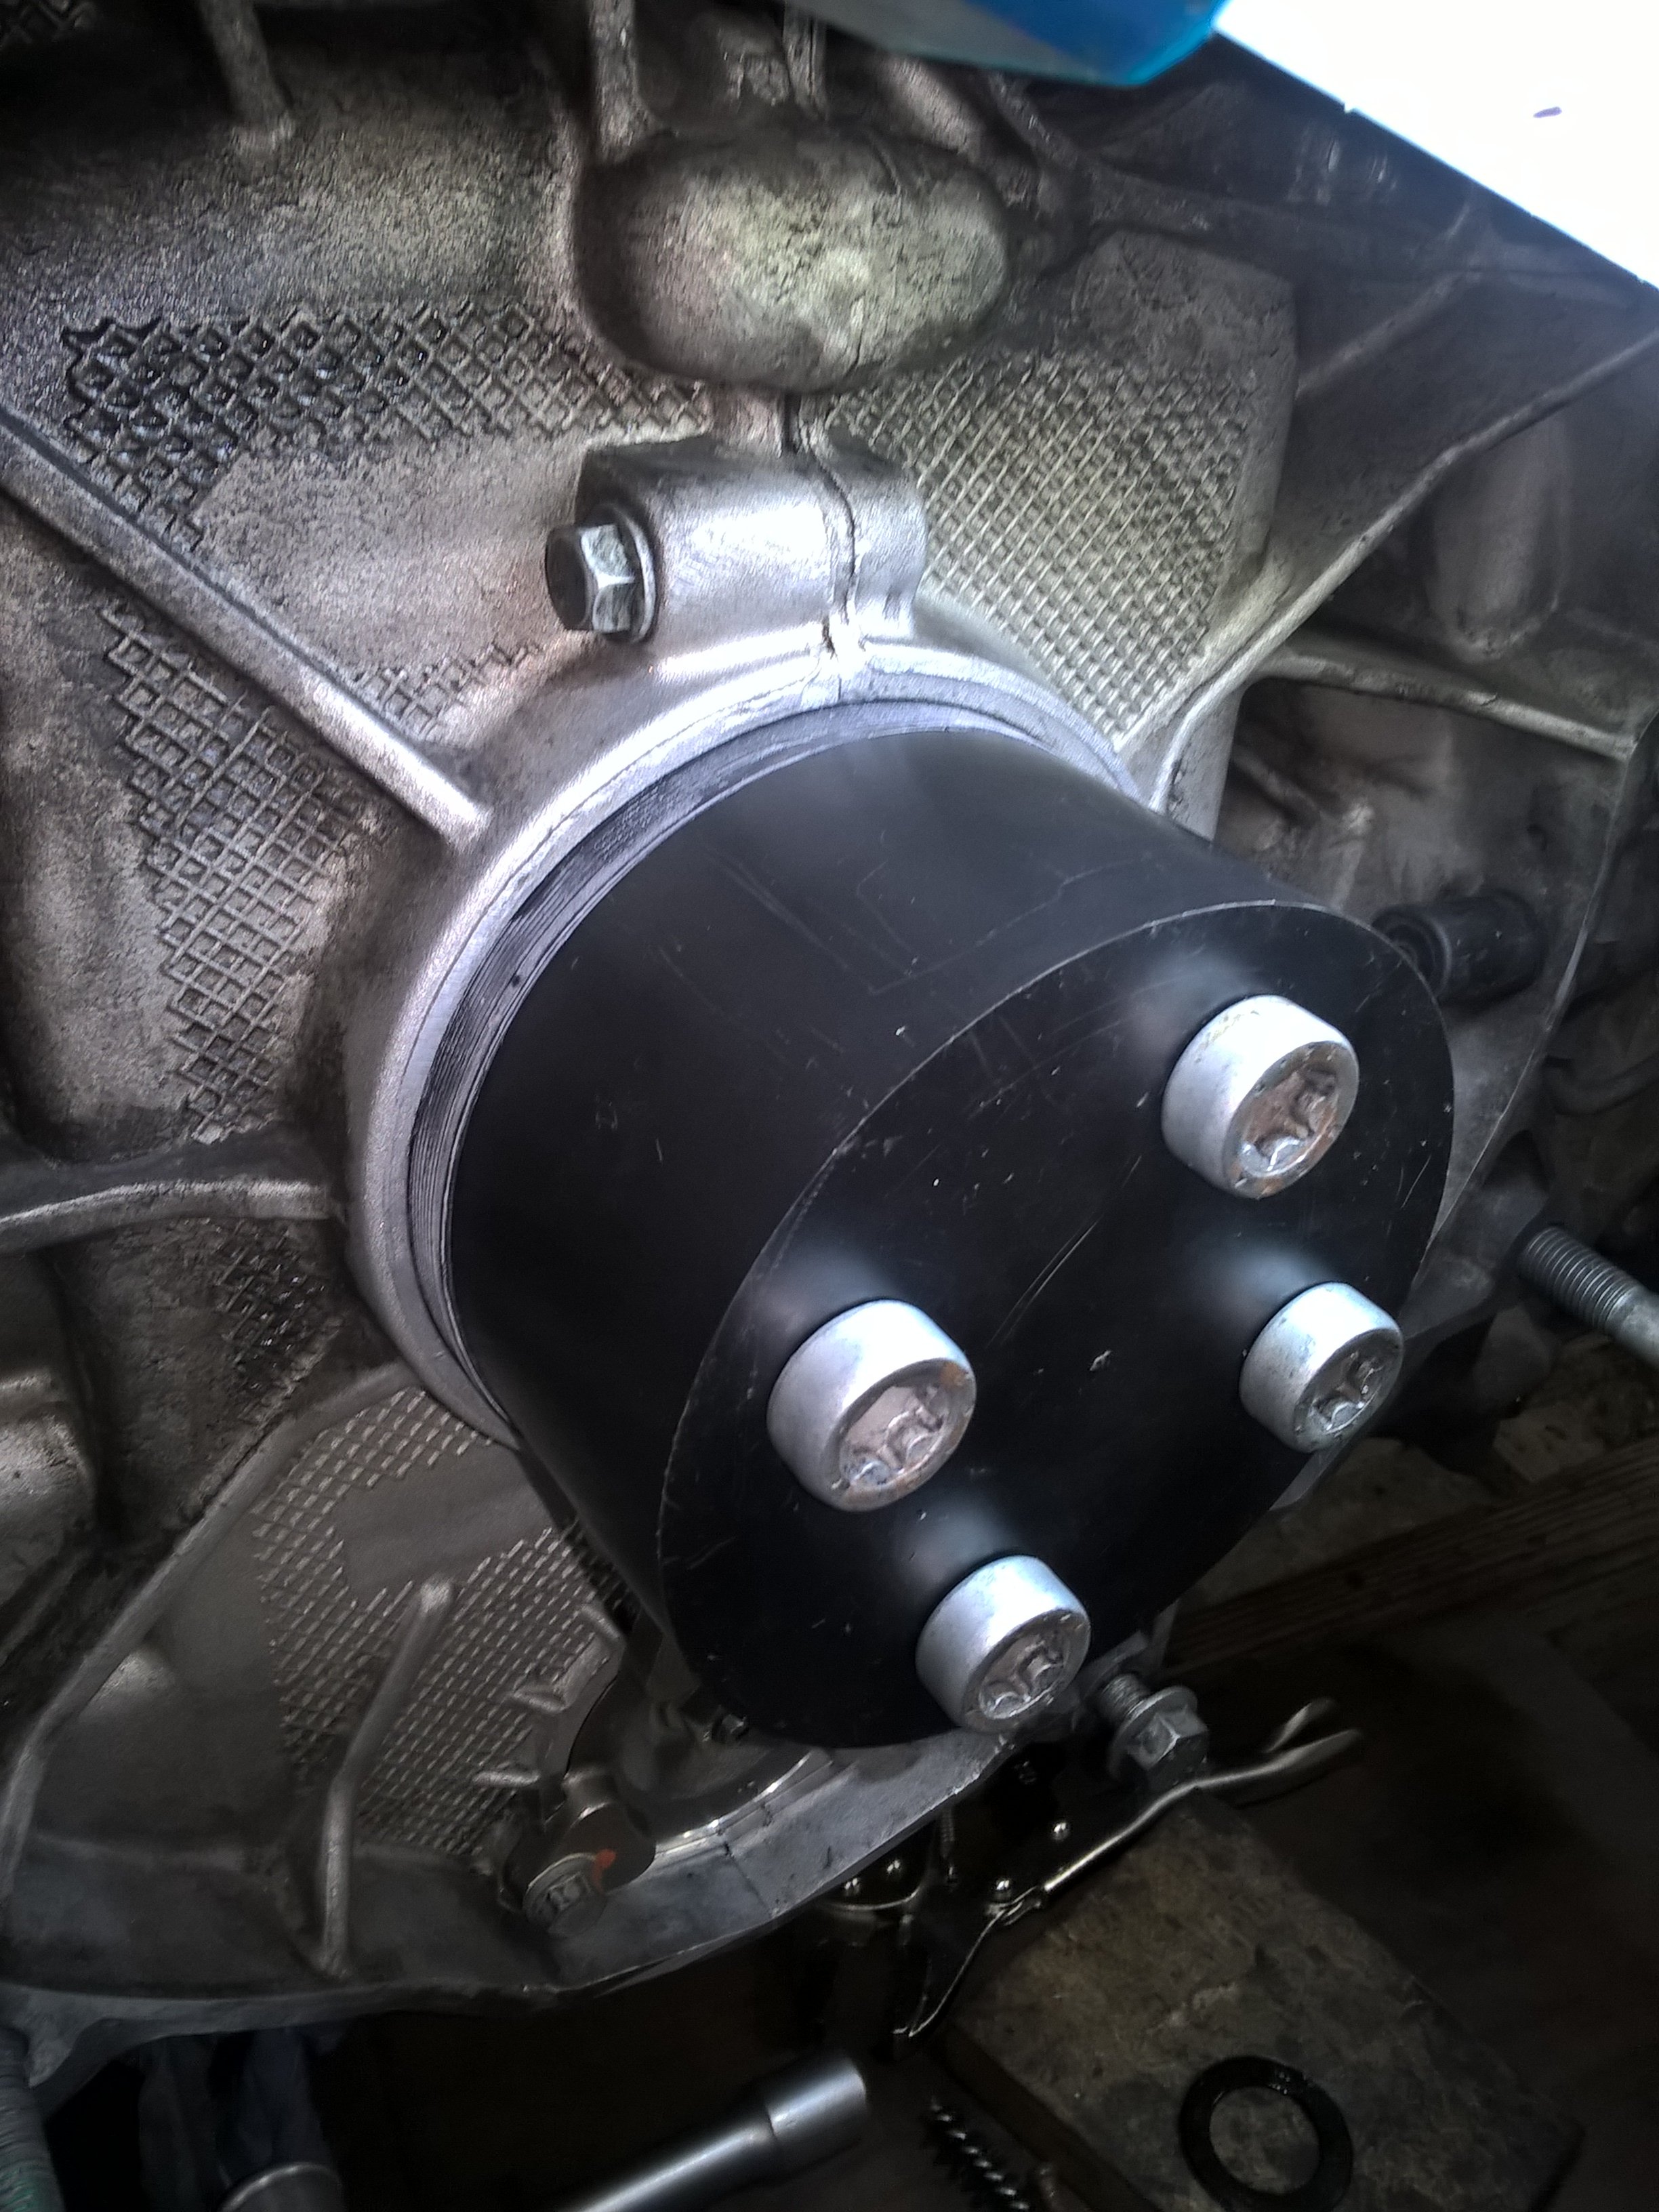
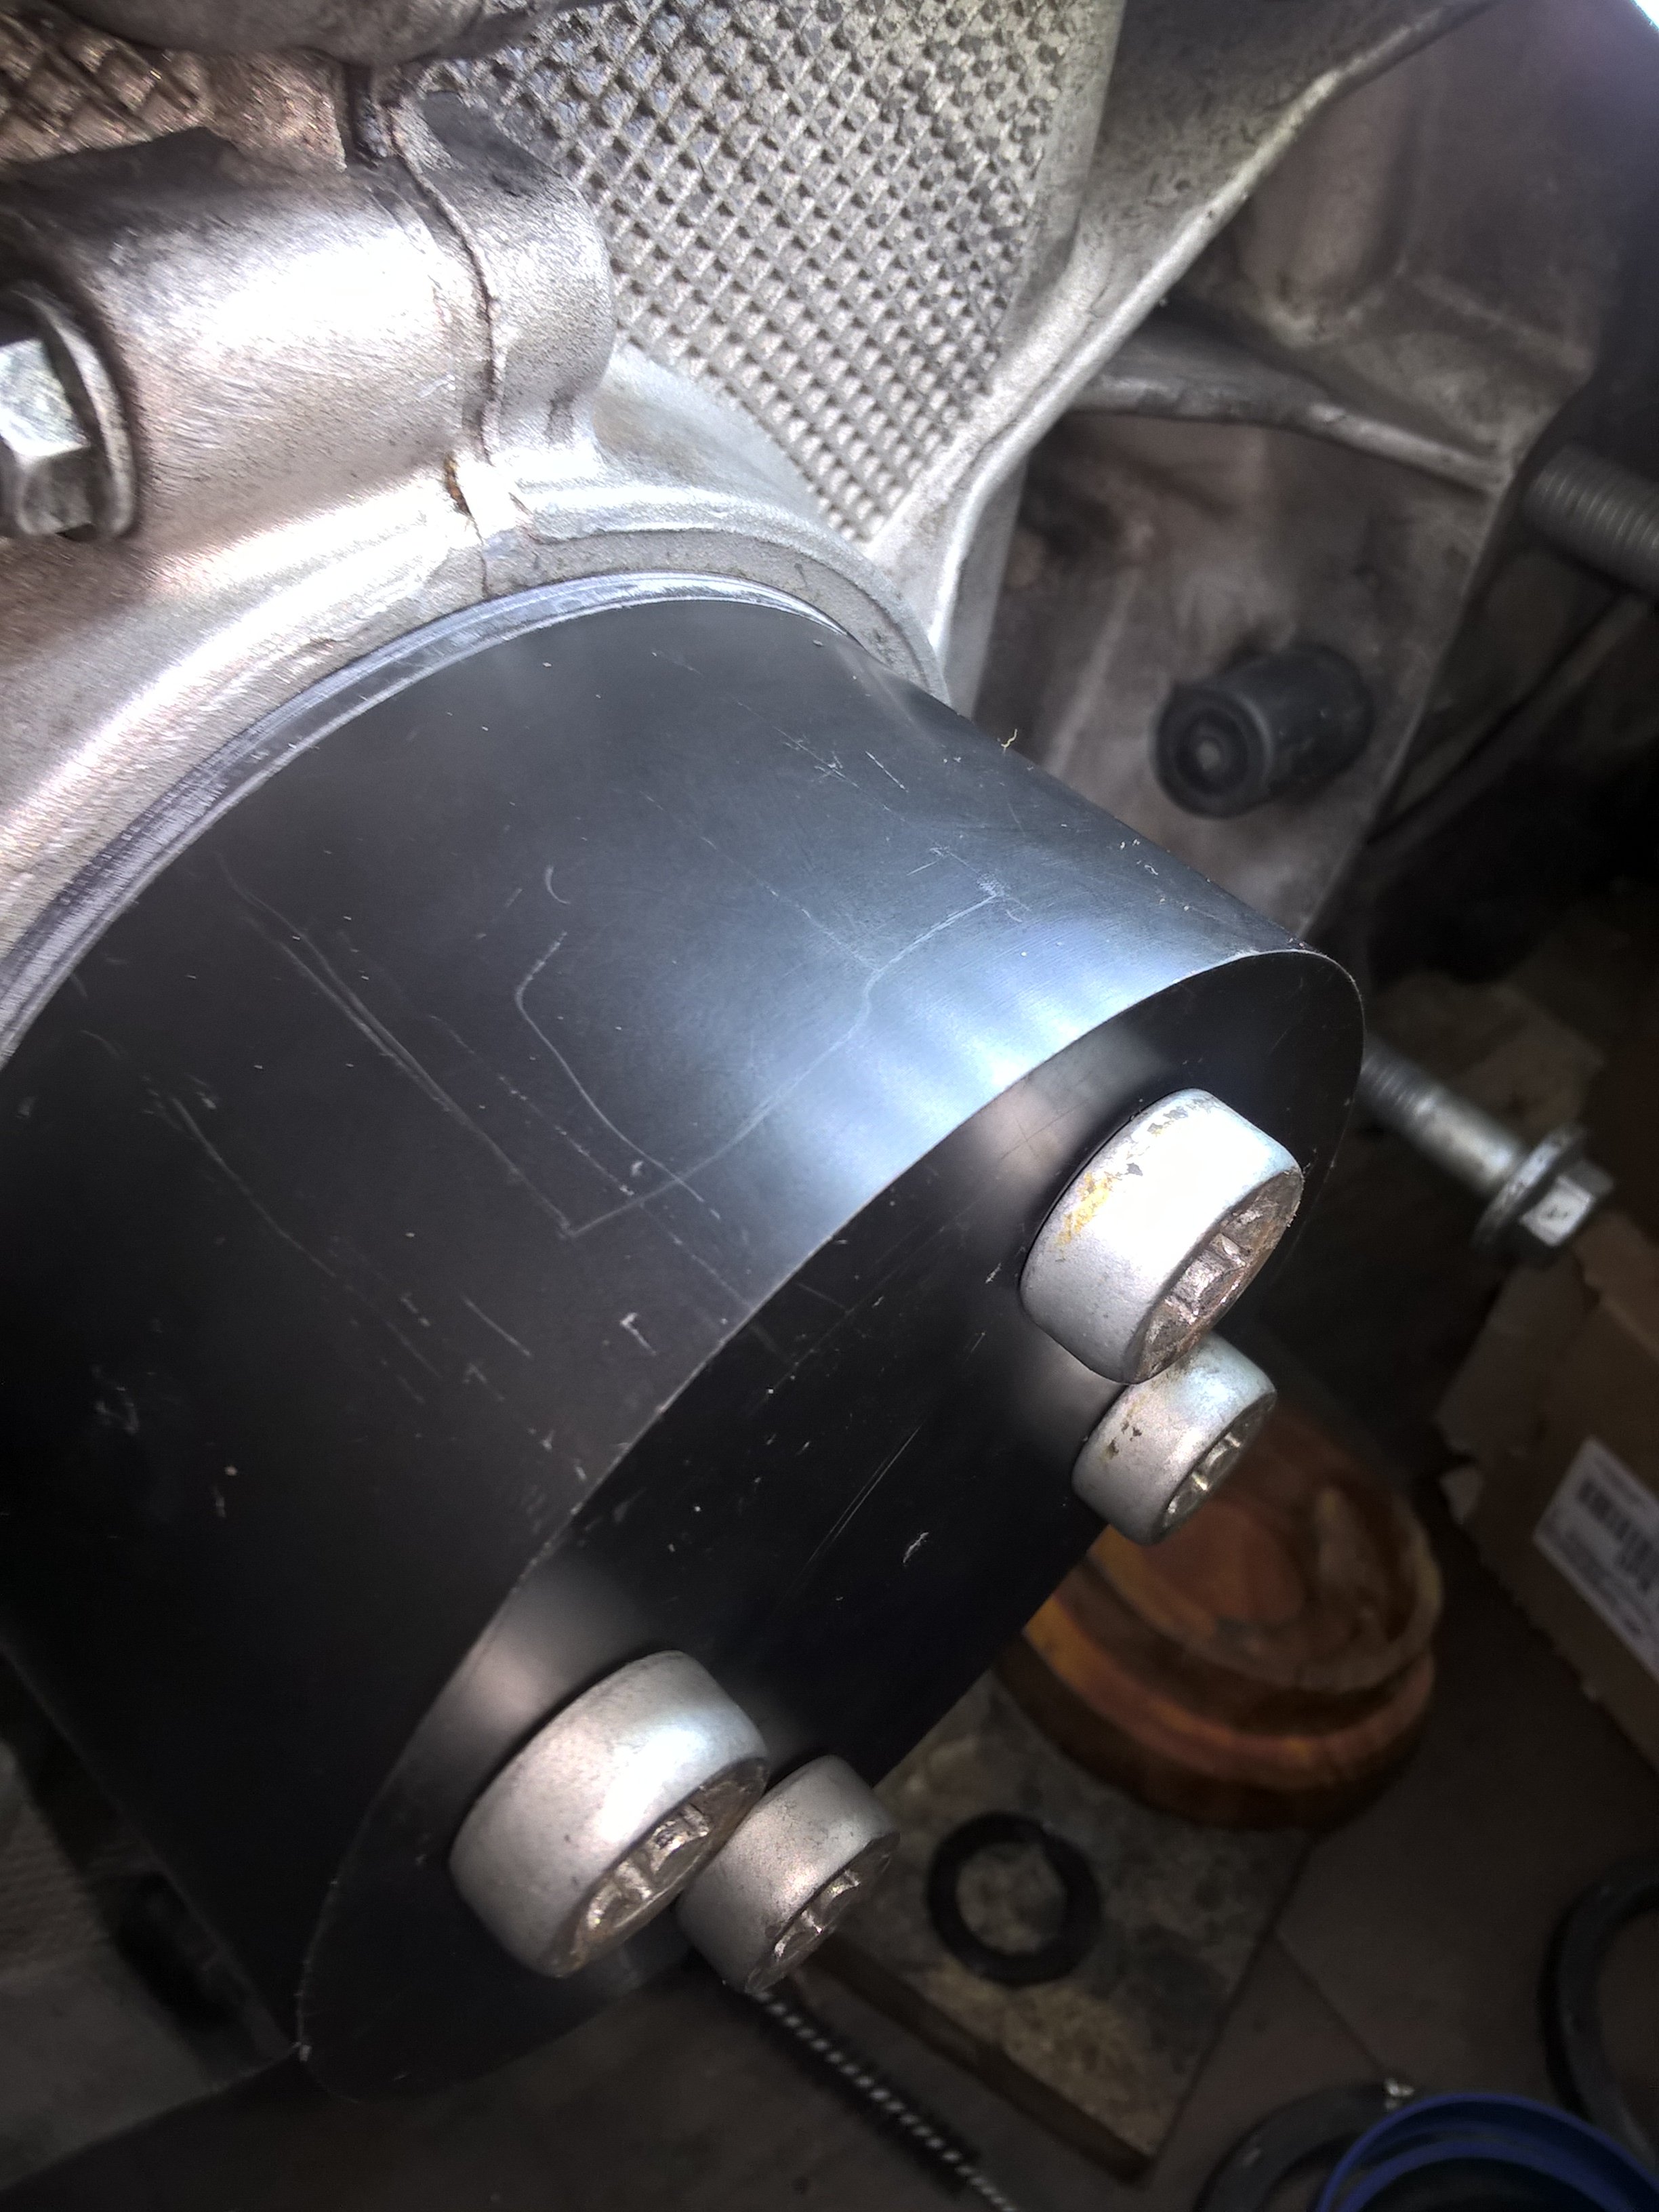
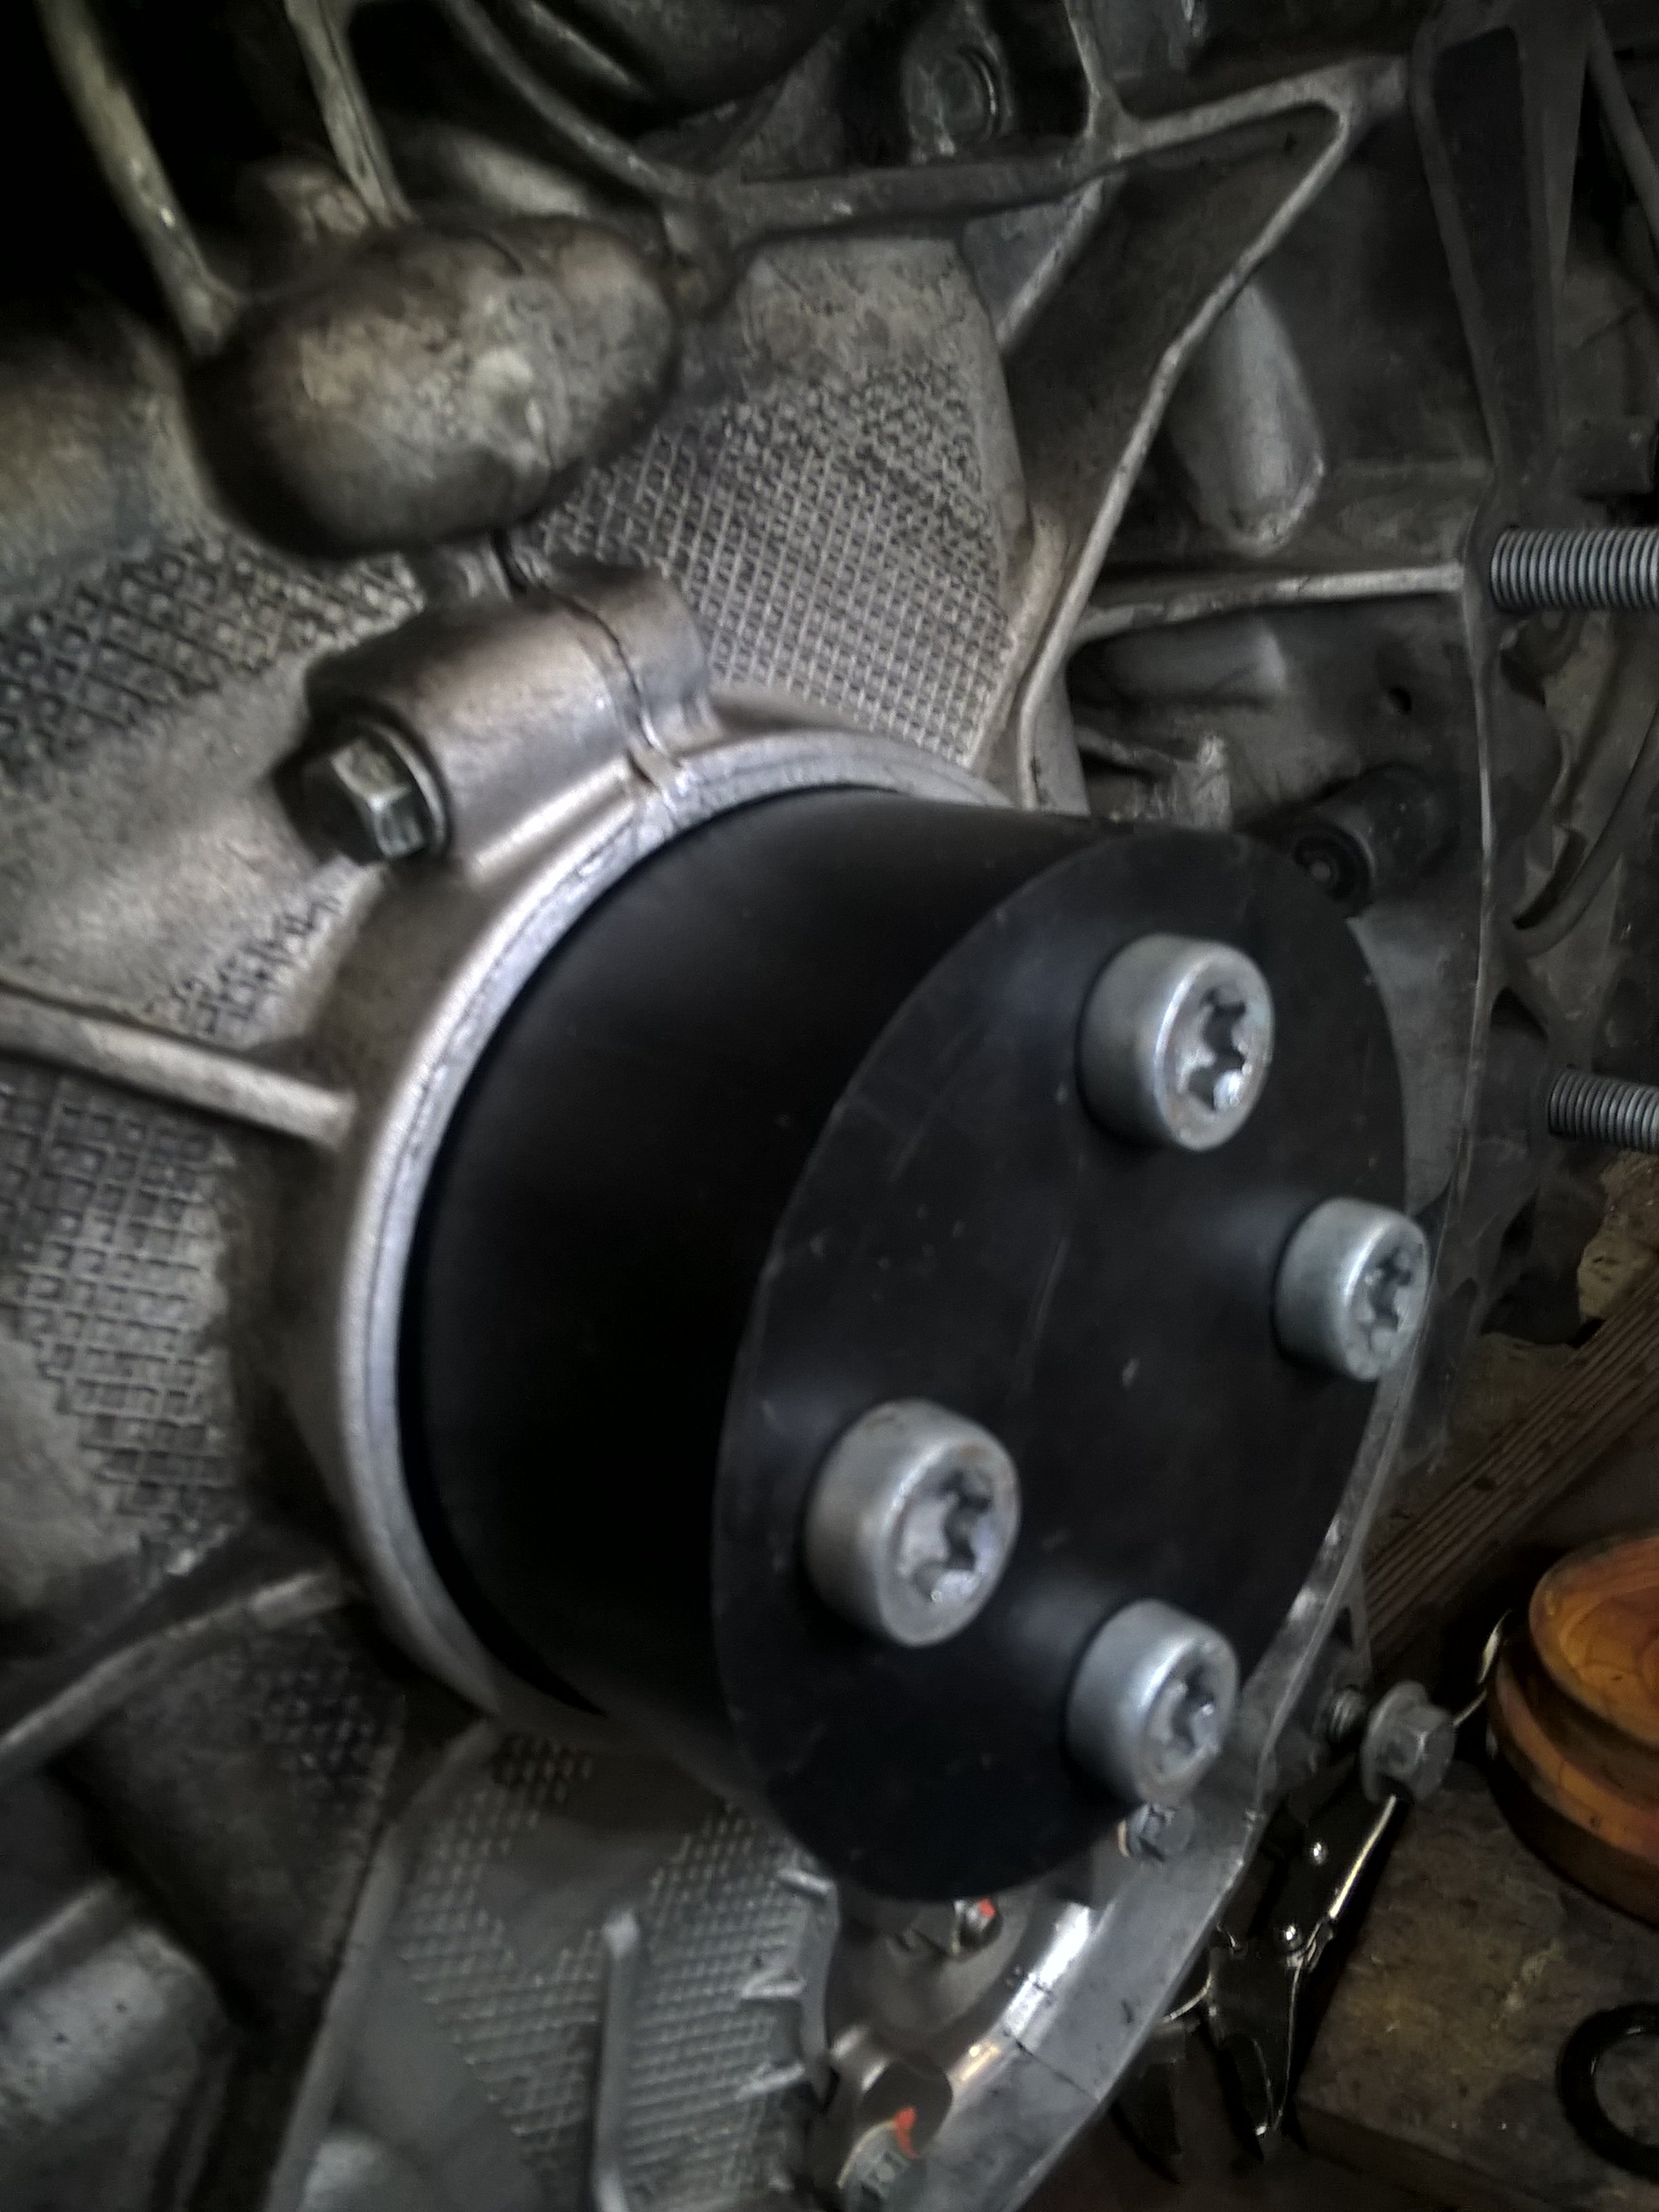
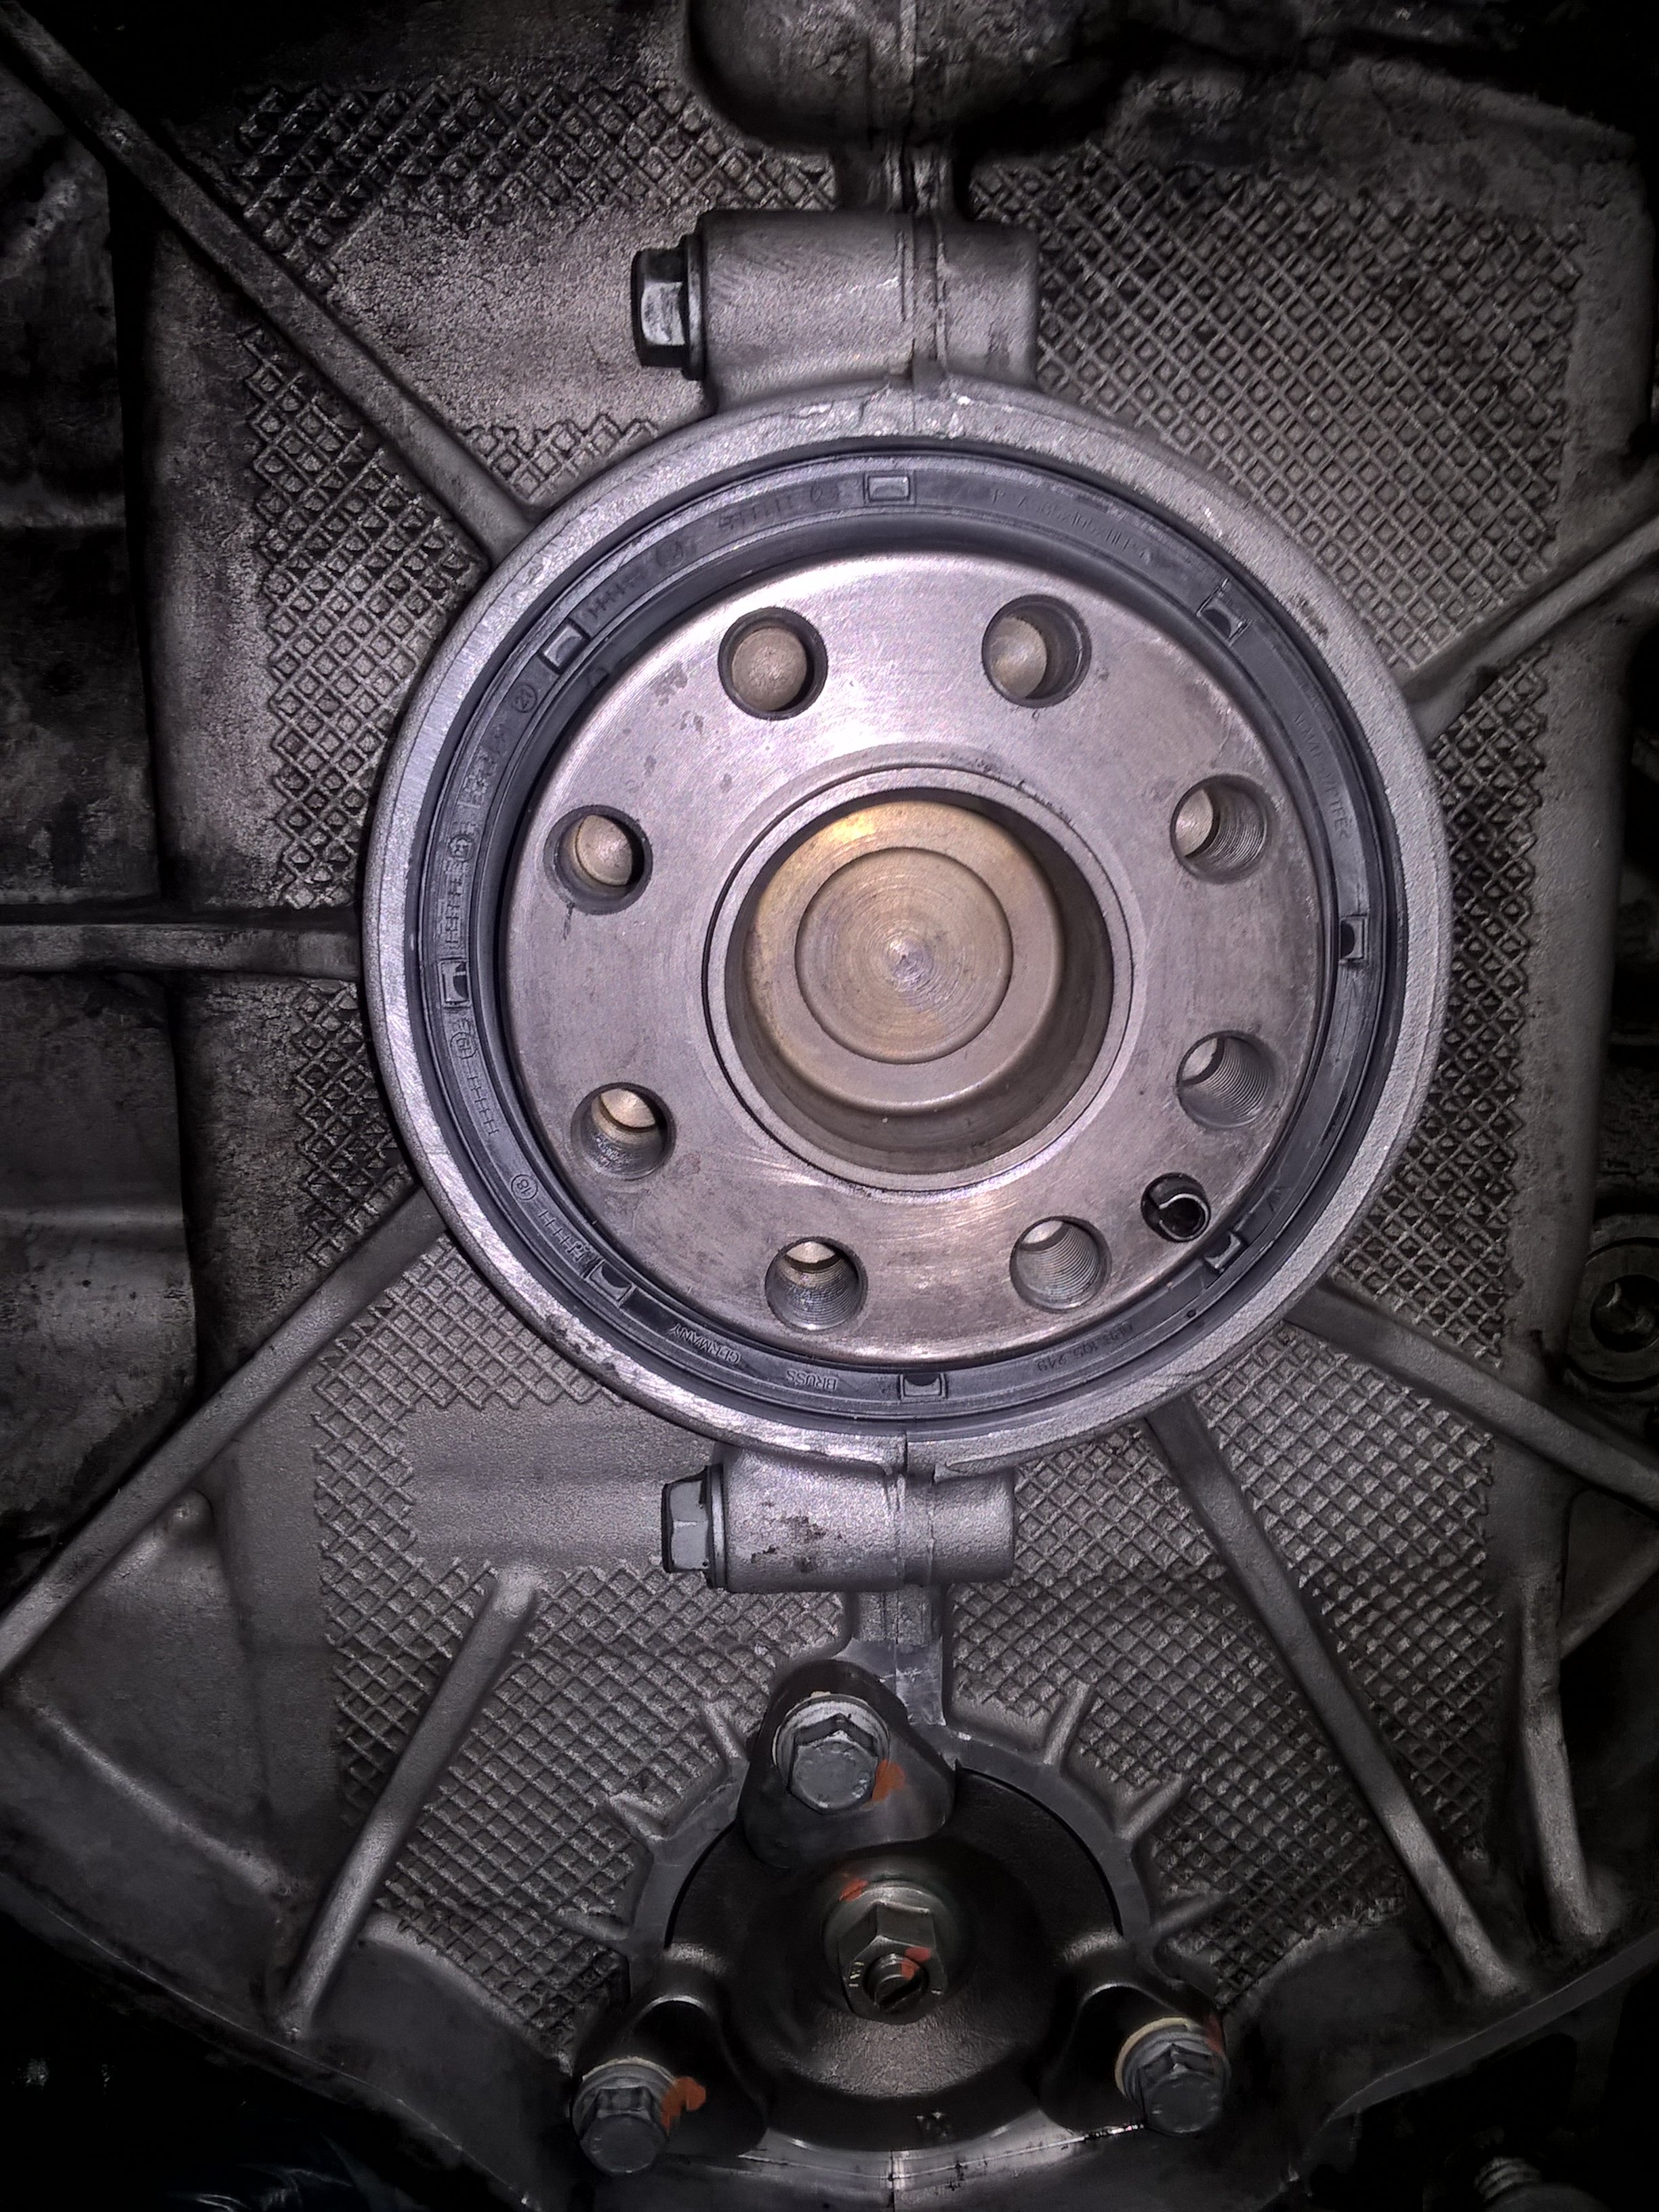
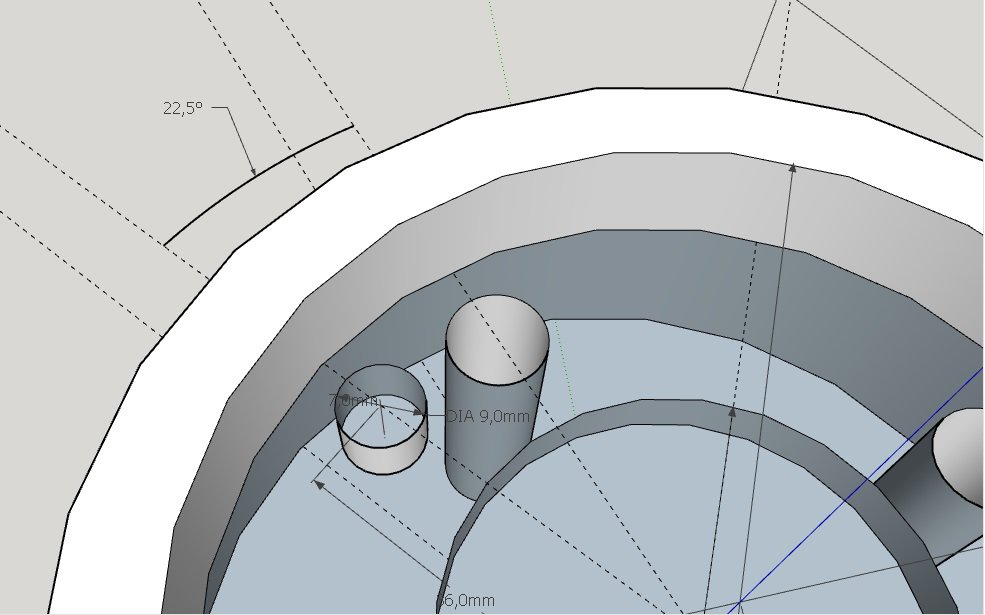
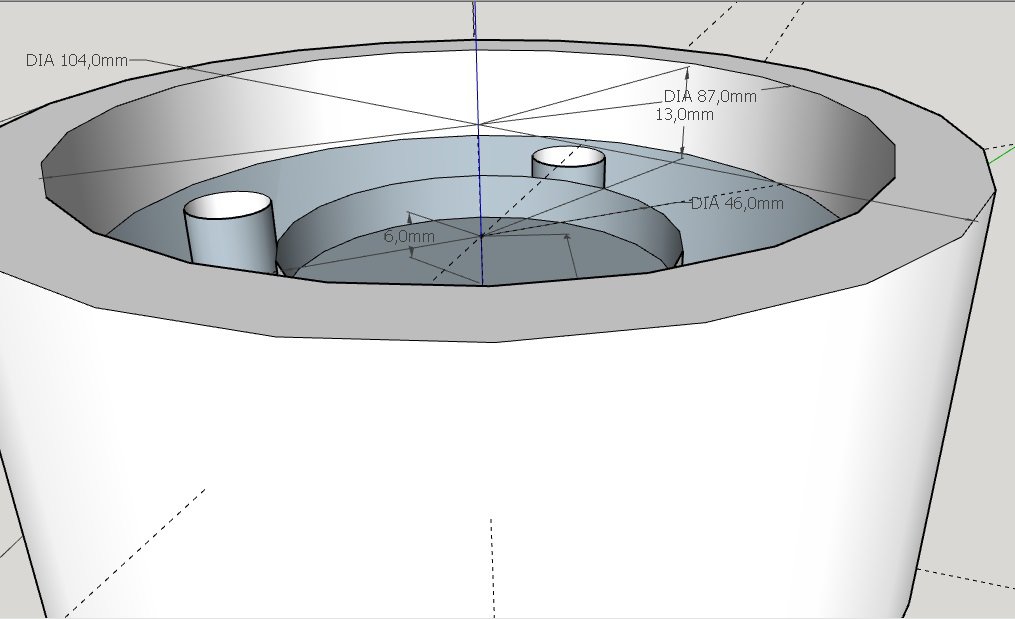
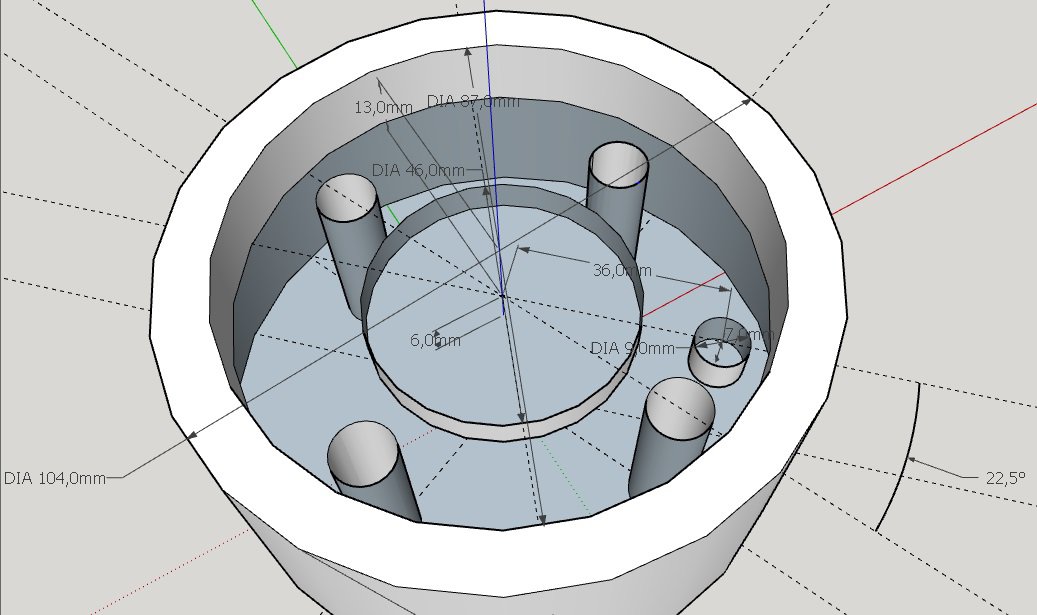
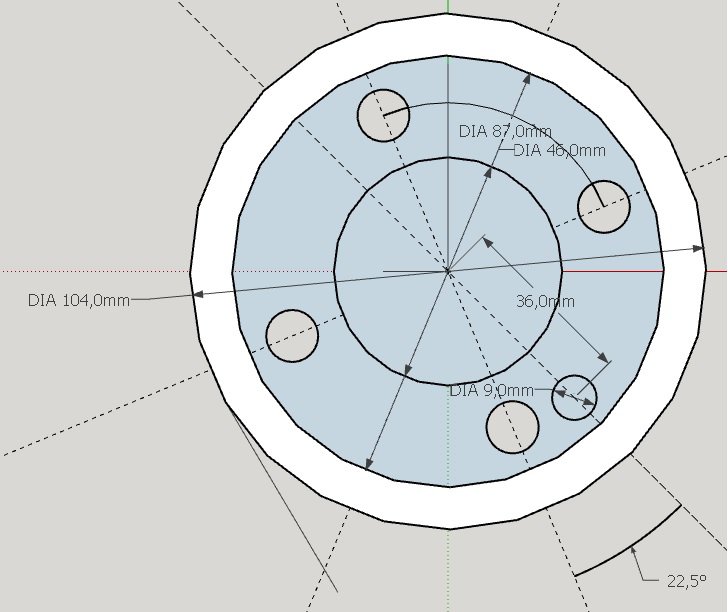
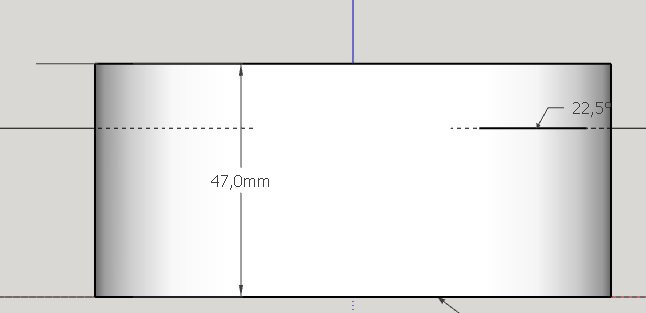
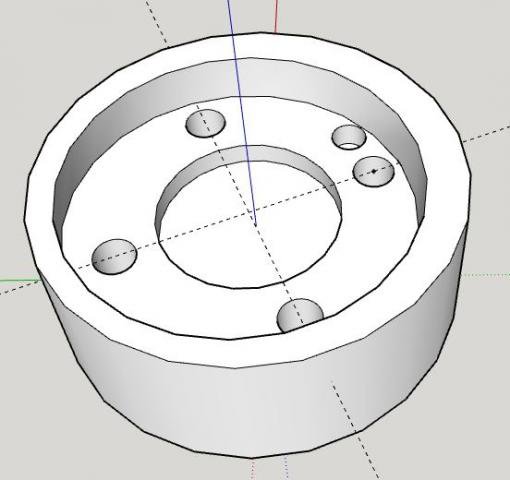
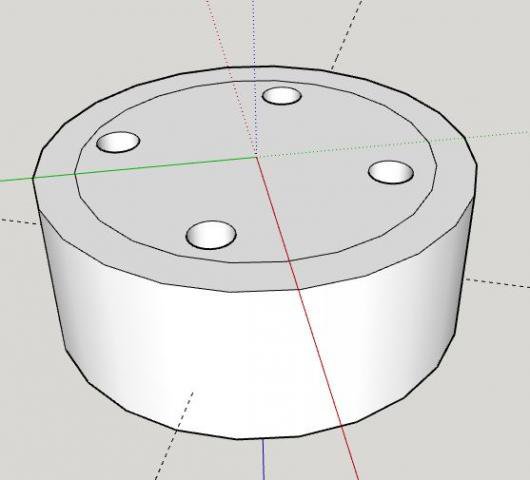
It worked. I was able to fit the seal to the correct depth and without it canting over in the process. Something I had not managed two times earlier so I call this installation (using yet another new seal, original Porsche part) a succes. However, yesterday I had the car up on the lift to bleed the clutch hydraulics and noticed a drop of oil hanging right below the seal... I have replaced the IMS seal too (already has the updated design with the brown double ribbed seal) and used blue loctite on the threads and thread sealant below the heads on the three bolts that mount it to the case and on the thread of the bearing carrier itself before I tightened the nut. So I don't think it's leaking there. The engine (MY99 original engine with 110k miles and manual gearbox) was of the leaking ims seal variety and the seal I took out seemed to be the one installed by the factory. Seal was installed without touching the sealing surface and no additional sealant on the outside. Bore and crank surface were cleaned prior to fitment. Checked the installed depth and it was correct. Any hints or advice for the (far) future? Edit: just read one of the listed 'similar contents' where Loren mentioned 'out of round bore' for which the beefier GT3 seal would be suited for. I didn't check the bore for this but based on the result I guess the nore is out of round. Is the gt3 seal still the solution for these cases by general consensus today? The dimensions are in the pictures below and in the SketchUp file attached. Stempel_v02.skp

-
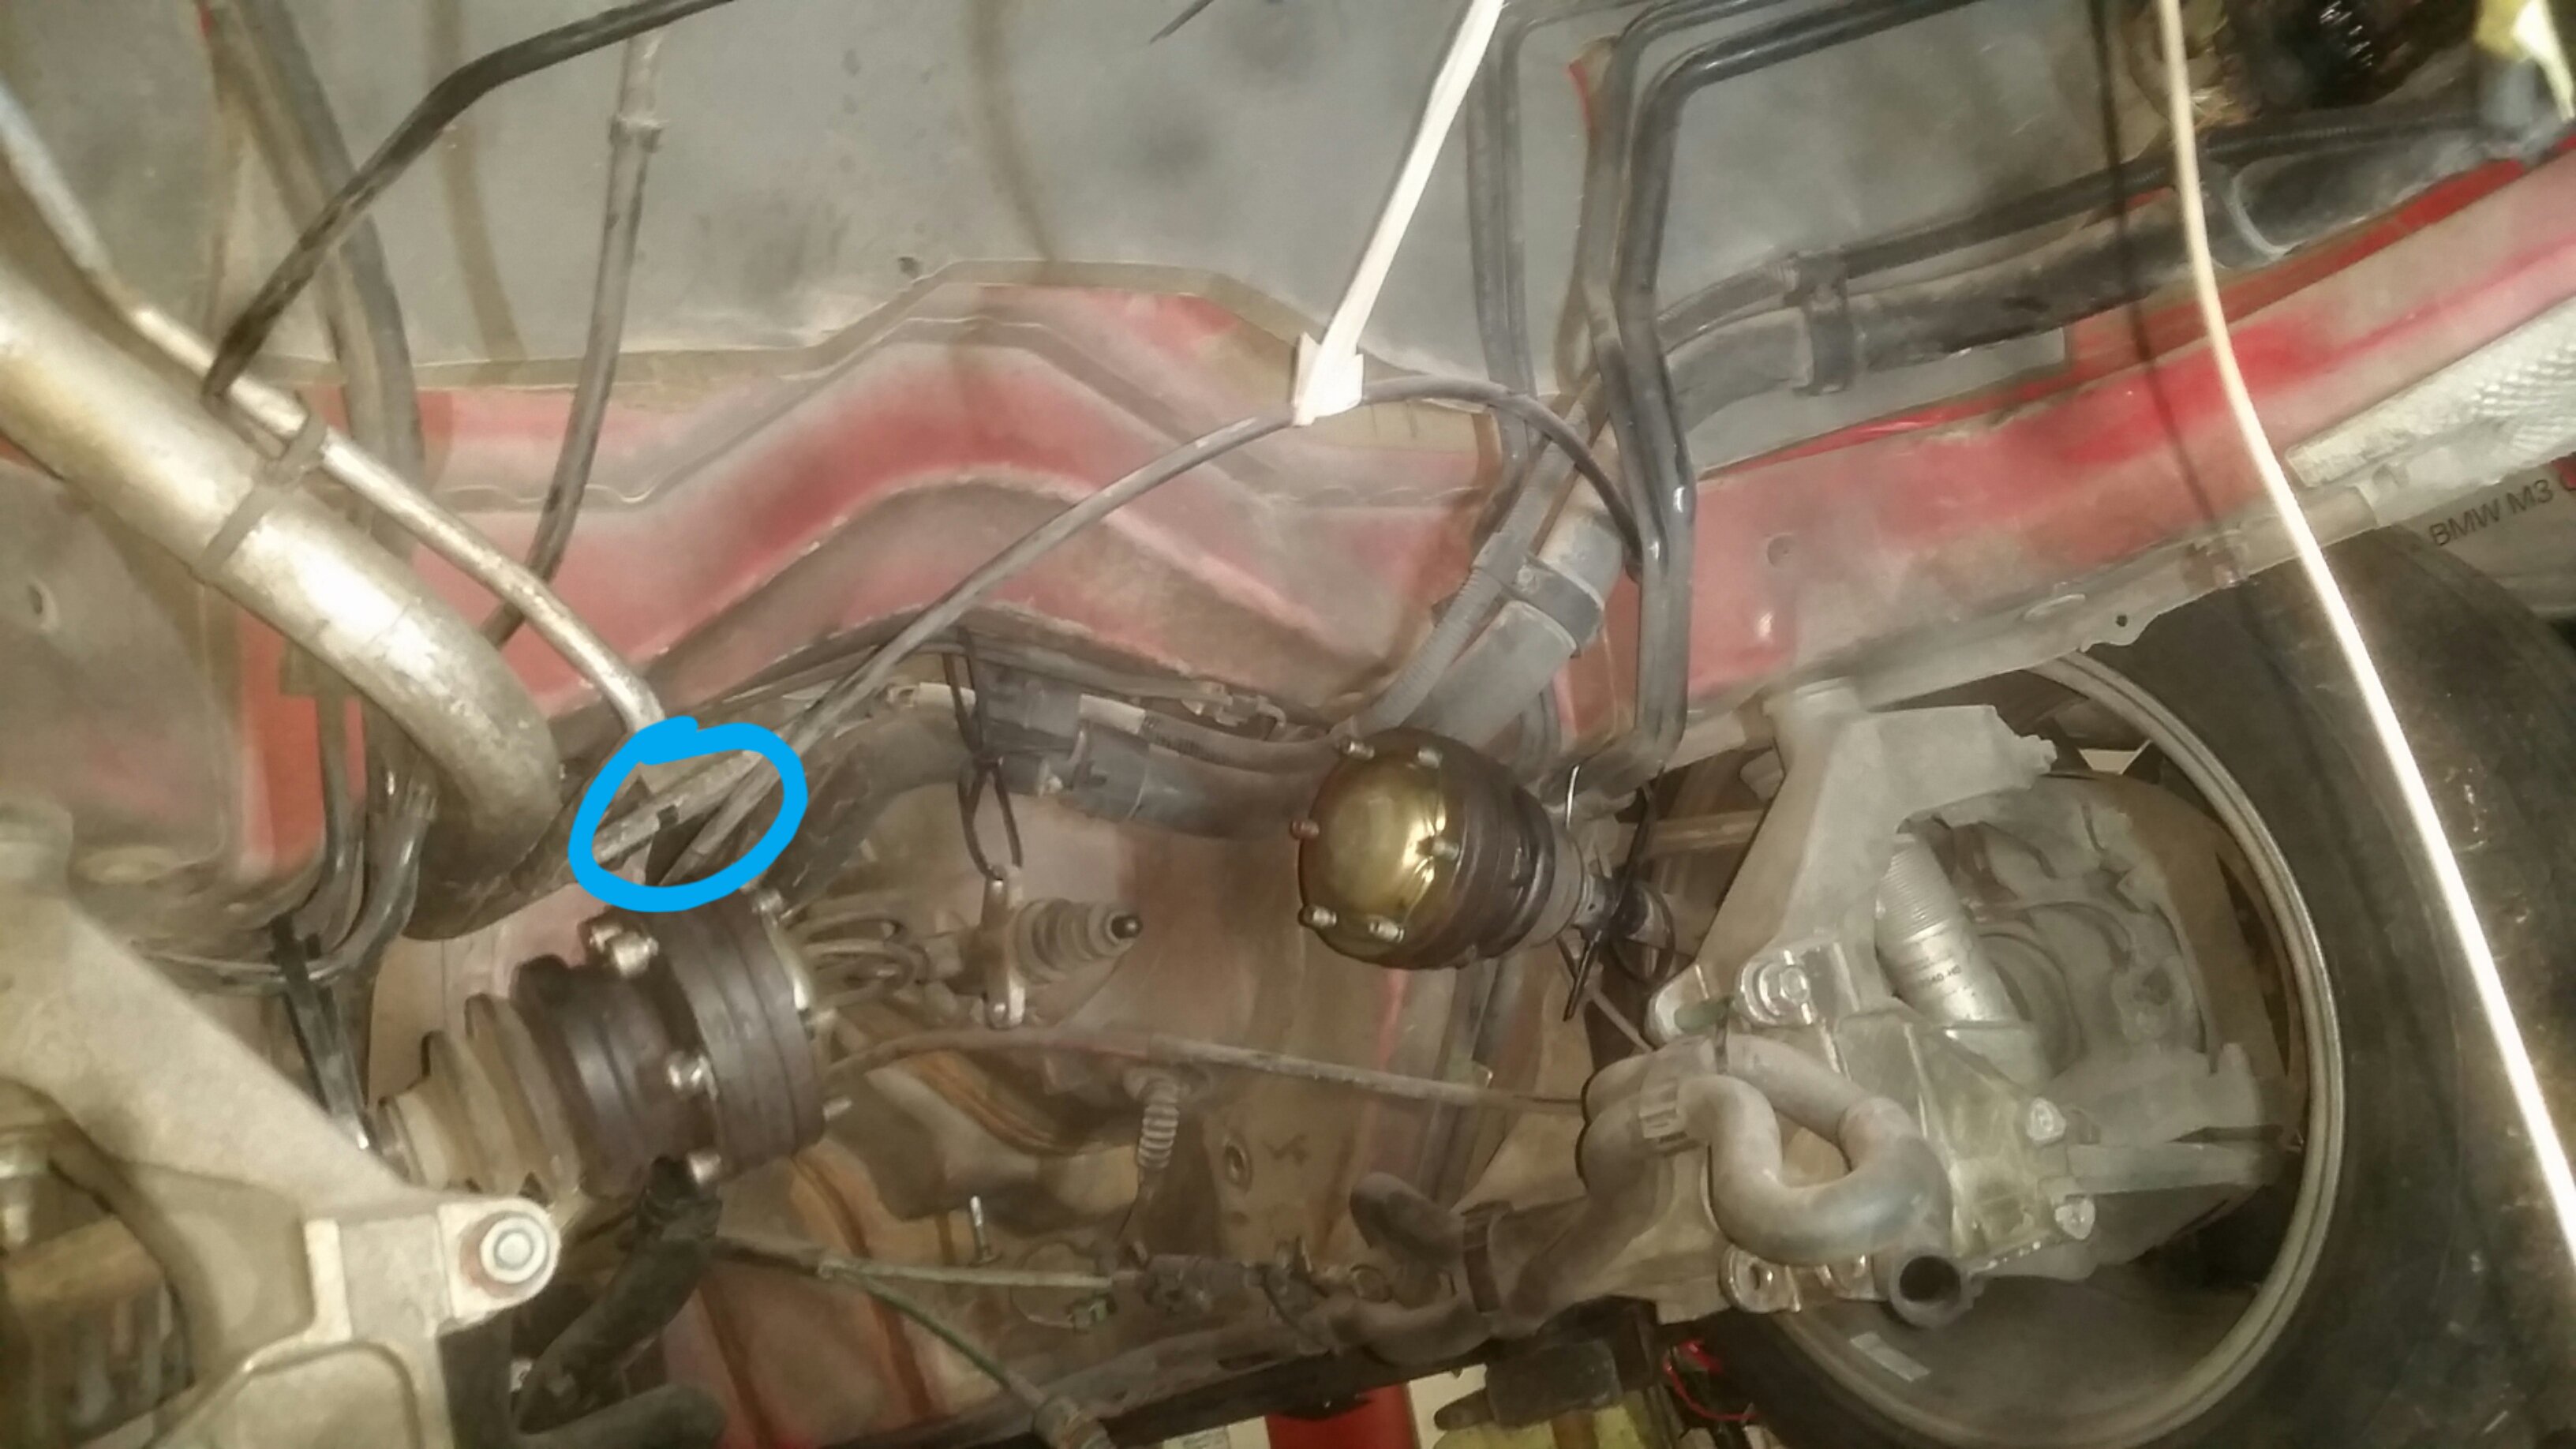
I am having the same 3000rpm idle after having dropped the engine. The info that the throttle cable is routed through the coil is very helpful, thanks for that. I can add that the 3 clips in the picture above are located here: -clip closest to the throttle body is clipped onto one of the fuel hoses crossing the banks at the back of the engine near the firewall, circled in blue in the attached picture -the middle one is clipped onto the brake pipe crossing left to right above the clutch slave cylinder -the first one (nearest to the rotary sleeve) is clipped onto the handbrake cable guide tube
-
Based on the dimensions by Domiac and Coloradocurt (thank you!) I came up with a version of the tool that uses the DMF bolts to push it and the RMS into its position by turning the bolts little by little in a cross-wise pattern. Reason being that I managed to destroy a brand new seal by tapping it in using a tool as described above as it canted over. Thickness of the tool is such that it bottoms out against the crank flange before the DMS bolts bottom out in their thread holes. I'll post up my dimensions as soon as I have verified them to work as intended. One in alloy, one in (engineering) plastic.
-
Foam in those places will indeed degrade too an get blown out the vents. I have seen this on my BMW E30. If owners experience no issue with either heat and cold blending or regulating which vents the air exits but have foam coming out then it is as they say. If they do, however then it must be the foam covering the holes. Lousy design btw. No need to make those flaps out of metal as shown by many other car makers and their HVAC suppliers...
-
Clever! Thanks for posting. I'm curious whether the original Porsche filter cartridge will show signs of collapsed pleats too when the time of your next oil change has come. Please report on that if you don't mind.
-
Holy thread ressurection baTman! -->It does begg the question how to 'unseal' the system and prevent coolant spewing out of the expansion tank since the system will no longer be pressurised and hence the hot coolant will start boiling.
-
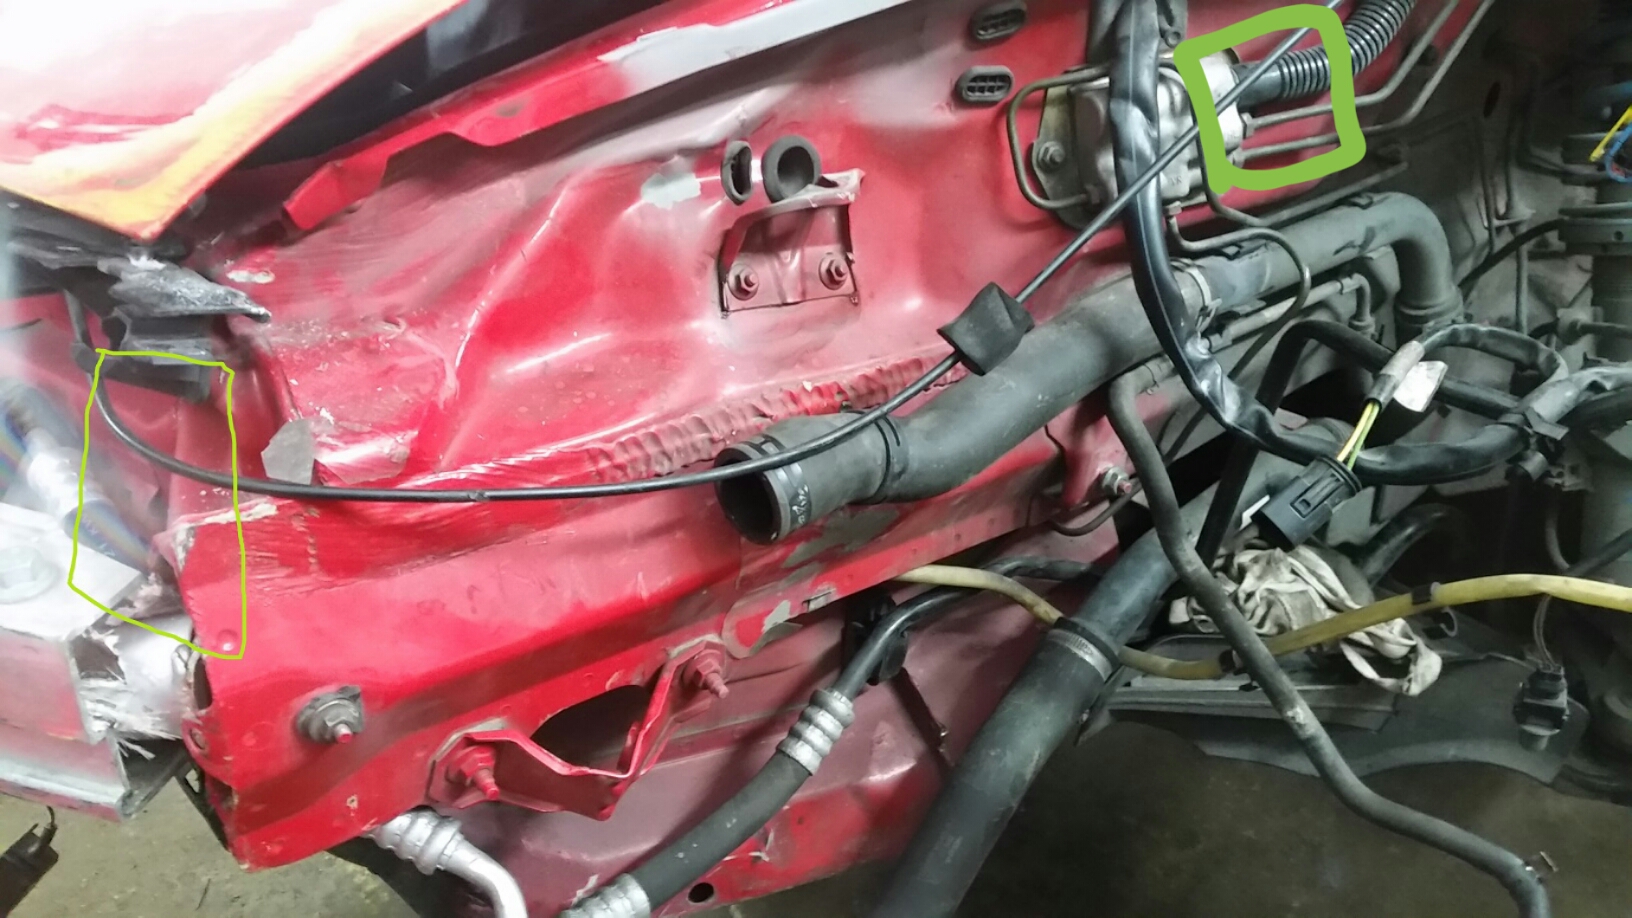
Any hints on how to remove the black corrugated tubing from the alloy connection block highlighted by the bold green rectangle?
-
Be aware the unit is km not miles. 60,000 km = 40k miles.
-
I searched but couldn't find the required info so here goes: How do I disconnect the brake booster vacuum line from the alloy connection block in the front wheel housing (frunk sidewall to which the brake lines brake booster/servo connects)? I want to disconnect the vacuum line on the wheel housing side. I noticed that I can pull back what seems to be a locking ring but the line won't release/disconnect from the connection block. The model concerned is a MY1999 manual carrera2, LHD.
-
996 Carrera Limp Mode
hardtailer replied to Ravi Matharu's topic in 996 Series (Carrera, Carrera 4, Carrera 4S, Targa)
Late to the party but as mentioned above : change transmission fluid and filter (and/or flush it). -
I can't think of a fault in the MAF that would lead to such behaviour. I'd say the reason for a normal idle rpm with MAF disconnected is that instead of actual air mass provided by the MAF the motronic then uses a stored/model based value for air mass at idle. I hazard a guess that the engine is actually running very lean as the actual air mass into the engine is greater than the stored value. I.e. you have more air coming in than is required for idle rpm. Either further vacuum leaks, the icv further open than necessary or the butterfly cracked open ever so slightly. Another thing to check is the throttle position sensor. Make sure it is mounted such that it signals idle and not off-idle when the throttle is shut.
-
Airbag failure
hardtailer replied to Samomma's topic in 996 Series (Carrera, Carrera 4, Carrera 4S, Targa)
I would worry that a dealer would do what they consider best for them or the manufacturer they represent which may not necessarily be best for the customer handing them such a vehicle . Depending on the speed the car in front was hit the threshold to deploy the airbag was perhaps not met. Maybe in the crash itself a sensor relevant to the proper functioning of the airbag sensor has been damaged and as a consequence the error message shows. -
07S Strange Issue w/Replacing Front Brake Pads
hardtailer replied to dflohr's topic in 987-1 Series (Boxster, Boxster S)
First post to this great forum to hopefully give a little back to the community after having gathered valuable information prior to my purchasing my first Porsche. I have the exact opposite situation when fitting Pagid S pads at the front of my 99 996 carrera. These pads are the same geometry as the upper ones in above picture, however the car originally has the geometry of the lower ones and thus the longer spring. I searched for the correct part number of the 2.5" spring and identified it as 95535296000. Not willing to pay 45€ for them at Porsche I found alternative suppliers' parts and this is what I want to share with you: Ate 610280 Delphi LX0450 Hella 8DZ355203191 JP Group 1163750219 Textar 82076600 Volkswagen 7L0698269 PAGID: 355203191 TRW: PFK505 BREMBO: A02448 textar 82076600, METZGER: 1091660 Prizes ranging from as little as 8€ to 22€ (Ate). Further reading on the subject http://www.planet-9.com/#/topics/56342?page=1