Jump to content

Welcome to RennTech.org Community, Guest

There are many great features available to you once you register at RennTech.org
You are free to view posts here, but you must log in to reply to existing posts, or to start your own new topic. Like most online communities, there are costs involved to maintain a site like this - so we encourage our members to donate. All donations go to the costs operating and maintaining this site. We prefer that guests take part in our community and we offer a lot in return to those willing to join our corner of the Porsche world. This site is 99 percent member supported (less than 1 percent comes from advertising) - so please consider an annual donation to keep this site running.

Here are some of the features available - once you register at RennTech.org

  • View Classified Ads
  • DIY Tutorials
  • Porsche TSB Listings (limited)
  • VIN Decoder
  • Special Offers
  • OBD II P-Codes
  • Paint Codes
  • Registry
  • Videos System
  • View Reviews
  • and get rid of this welcome message

It takes just a few minutes to register, and it's FREE

Contributing Members also get these additional benefits:
(you become a Contributing Member by donating money to the operation of this site)

  • No ads - advertisements are removed
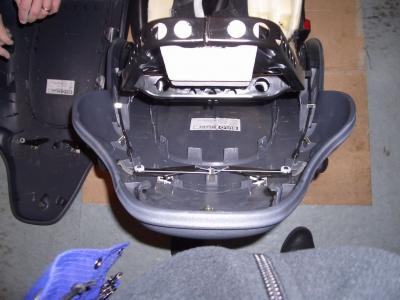
  • Access the Contributors Only Forum
  • Contributing Members Only Downloads
  • Send attachments with PMs
  • All image/file storage limits are substantially increased for all Contributing Members
  • Option Codes Lookup
  • VIN Option Lookups (limited)

Paul Fraser

Contributing Members
  • Posts

    292
  • Joined

  • Last visited

Everything posted by Paul Fraser

  1. It has been suggested that my squeaking front end might be sorted by lubricating the antiroll bar bushes. Anyone have a photo of the underside of a 996 so I can see where these are, please? Couldn't find it on the PET.
  2. Ah yes, I think I remember: the one with the black heating element that goes right to the edge of the glass, unlike the red heating element used in the BAS replacement in Britain? I thought the US one looked better. http://www.gahh.com/boxster/BOXSTER1.jpg
  3. Done today on its minor service. OAT now showing, next step to do the OBC hack. Thanks again, Loren.
  4. Sorry for giving you the wrong information. I must read posts more carefully before opening my mouth! Thanks for sorting this out TP.
  5. First find the socket for the hardtop demister plug. Under the seatbelt below it there is a panel covering the corner of the cockpit. This comes away if you take off a couple of screws. Remove these and gently pull away -- it will still be connected at the top of the panel. The wiring harness should be visible dropping down from behind the socket for the demister plug and running along the side of the car. (See the photo on the thread I posted.) Frankly, I'm not sure you need to do this: if you have a USA car and have the electric mirrors and demist (which I think TP says is standard for US cars) you should have the harness fitted. Why not pop the hardtop on first and test it? (Bowl of hot water on rear shelf should mist up the mirror enough for a test.)
  6. My '97 Boxster goes in for a minor service on Friday and I would like to get both OBC and cruise enabled for possible future upgrades. I've done a bit of digging around and found on Yosief's hack that they need to know: "If your dealer doesn't know how to use the PST2 to enable the OBC, this is the reported screen path: Control Module Search, Instrument Cluster, Country Coding, Boxster USA (several screens), On Board Computer, With On Board Computer, Activate." Can anyone flesh this out a bit (any screen shots I could take in on Friday would be a great help) or will this be enough for them to work out what to do in the event that they don't? Is it a similar procedure for enabling cruise control on the instrument cluster? Thanks. PS Yes I know no '97 cruise upgrade has been done, but if I can get the instrument cluster enabled I'll do the OBC hack with a four stalk switch and see if I can get the switchery working and if that goes ok, I'm going to hunt down some cruise parts from the breakers. Sometime this decade... :)
  7. More here: http://www.boxa.net/forum/index.php?showtopic=13399&hl=
  8. I've been through this already with Toolpants (who kindly provided the information). I think, if you have the electric heated mirrors it works off the same circuit, you just have to plug it in. Can you take off the inner panel and see if there is a wire going down from the socket at the back?
  9. I'm not arguing with anything anyone has said here, but the vendor has a 100% feedback and a rating of 264. I find it amazing that he has only picked up a few neutrals and no negatives if he is as bad as described above...
  10. Look on Boxa.net if you haven't already Richard -- there has been some discussion about pre and post e-gas cruise retrofits. E-gas seems easy to do IIRC.
  11. Have you had any work done to the door or windows recently? When I had some done it needed a membrane replaced inside the door to sort it.
  12. I thought the same as Loren on the rears but it seems ar38070 is right, except, I think, the offset isn't big enough onthe new rear wheels. http://www.1010tires.com/WheelOffsetCalculator.asp? The diagram doesn't seem to work though?
  13. It's almost always the top ball bearings. Well known problem, particularly when it't hot. Re-greasing doesn't really help, they need to be replaced. Problem is that it's not a permanent solution. I'm on my third set (all replaced under warranty and now I've just learned to live with it. <{POST_SNAPBACK}> Forgive my ignorance, but what top ball bearings are these and where are they (I have the same cold-no-squeak, hot-squeak problem)?
  14. What do the oxygen sensors do and where are they situated, please?
  15. There have been another couple of articles about this kind of thing recently. There is one on RMS in Total 911 (which can be found here http://www.porscheforum.nl/album_cat.php?cat_id=11 second row down images 1-4), and also one in this month's 911 & Porsche World about Autofarm (a UK outfit in Oxford) re-engineering engines that have blown with the option of alternative pistons etc. more cheaply than a replacement engine. There are a number of statements in this article I wanted to post on here for reaction (about RMS and other stuff) but I don't have my article to hand at the moment.
  16. www.obd-2.com Cost me about £80-90 IIRC by the time they had posted it. Works on my 1997 (model year 98) 996. Where about in the UK are you?
  17. P0305 Misfire, Cylinder 5, Damaging to Catalytic Converter P0306 Misfire, Cylinder 6, Damaging to Catalytic Converter P0410 Secondary Air Injection System - Signal Implausible (Cylinders 1 - 3) P1124 Oxygen Sensing Adaptation Area 1 (Cylinders 1 - 3) - Rich Threshold P1126 Oxygen Sensing Adaptation Area 1 (Cylinders 4 - 6) - Rich Threshold P1128 Oxygen Sensing Adaptation Area 2 (Cylinders 1 - 3) - Rich Threshold P1130 Oxygen Sensing Adaptation Area 2 (Cylinders 4 - 6) - Rich Threshold P1140 Load Sensing - Signal Implausible P1316 Misfire, Cylinder 4, Emission Relevant P1317 Misfire, Cylinder 5, Emission Relevant P1318 Misfire, Cylinder 5, Emission Relevant P1319 Misfire, Emission Relevant P1411 Secondary Air Injection System - Signal Implausible (Cylinders 4 - 6) Over to the experts...
  18. Yeah, I believe Becker sell new faceoffs but they have 'Becker' on them rather than 'Porsche'.
  19. Possible to order these separately, and, if so, anyone know what the parts numbers are? The PET Tequipment section I have doesn't even list the CDR22 (CDR220 to you guys, Stateside). Thanks.
  20. I've dug out some photos to enhance that thread. Hope they make it clearer and not more complicated. :)
  21. And that is about it. Any questions please ask and I'll try to answer but you have the best of the photos. When reassemblng it is all in reverse order but when you put the outer stole on, remember to clip it onto the bottom of the chair and then hook over the hood at the top of the seat before reattaching the inner clips and then tucking in the outer rim working from the top downwards. It goes in easier than you would think -- good piece of design. I didn't do it this way and the leather was not tight and I thought I had wrecked my seats. Good luck.
  22. Next, undo the cabling. DO NOT break the small grey tab in the centre that both the cables pass through. A new seat back will cost you £380 (probably $600, although things seem to be cheaper your side of the pond -- if anyone can give me a price I'd be interested). Note when you put this back together that the top of the black wire holders actually fit into the grey U sections at the top of the seat (the ones above where the metal clips have partially popped out). The black cable popped out as the seat back was tilted away from the frame.
×
×
  • Create New...

Important Information

We have placed cookies on your device to help make this website better. You can adjust your cookie settings, otherwise we'll assume you're okay to continue.