Welcome to RennTech.org Community, Guest
There are many great features available to you once you register at RennTech.org
You are free to view posts here, but you must log in to reply to existing posts, or to start your own new topic. Like most online communities, there are costs involved to maintain a site like this - so we encourage our members to subscribe or donate. All subscriptions and donations go to the costs operating and maintaining this site. We prefer that guests take part in our community and we offer a lot in return to those willing to join our corner of the Porsche world. This site is 99 percent member supported (less than 1 percent comes from advertising) - so please consider an annual subscription or donation to keep this site running.
Here are some of the features available - once you subscribe RennTech.org
- View Classified Ads
- DIY Tutorials
- Porsche TSB Listings (limited)
- VIN Decoder
- Special Offers
- Paint Codes
- Registry
- Videos System
- View Reviews
- and get rid of this welcome message
It takes just a few minutes to register, and it's quality Porsche information at a low cost.
Contributing Members also get these additional benefits:
(you become a Contributing Member by subscribing or donating money to the operation of this site)
- No ads - advertisements are removed
- Access the Contributors Only Forum
- Contributing Members Only Downloads
- Send attachments with PMs
- All image/file storage limits are substantially increased for all Contributing Members
- Option Codes Lookup
- VIN Option Lookups (limited)


crwarren11
-
Posts
239 -
Joined
-
Last visited
-
Days Won
1
Content Type
Profiles
Events
Forums
Exterior Paint Colors
Downloads
Tutorials
Links Directory
Collections
Classifieds
Store
Everything posted by crwarren11
-
 I similarly replaced my dash speakers about three years ago with Polk audio DB401 and metra 71-017C wires. Retained stock baskets etc. as ttocs explained. $70 for everything at crutchfield. If you don’t have already, a set of torx Allen keys is helpful to remove the screws from the speaker covers.
 -
Crankshaft Position Sensor on a Tiptronic
crwarren11 replied to crwarren11's topic in 986 Series (Boxster, Boxster S)
Hi guys, Anyone have a good guide for tiptronic removal? Of course there are plenty for manual trans. I had a friend help me with this about ten years ago who knew all the tricks but he has since relocated. My Porsche manual isn’t very specific and references several special Porsche tools for locking torque converter position and several other things. I don’t specifically remember doing this last time but he was the one running the show that time around. I have everything out of the way and ready to disconnect trans from engine but don’t want to continue until I know everything else that needs to be done in advance. Thanks for your help! -
Crankshaft Position Sensor on a Tiptronic
crwarren11 replied to crwarren11's topic in 986 Series (Boxster, Boxster S)
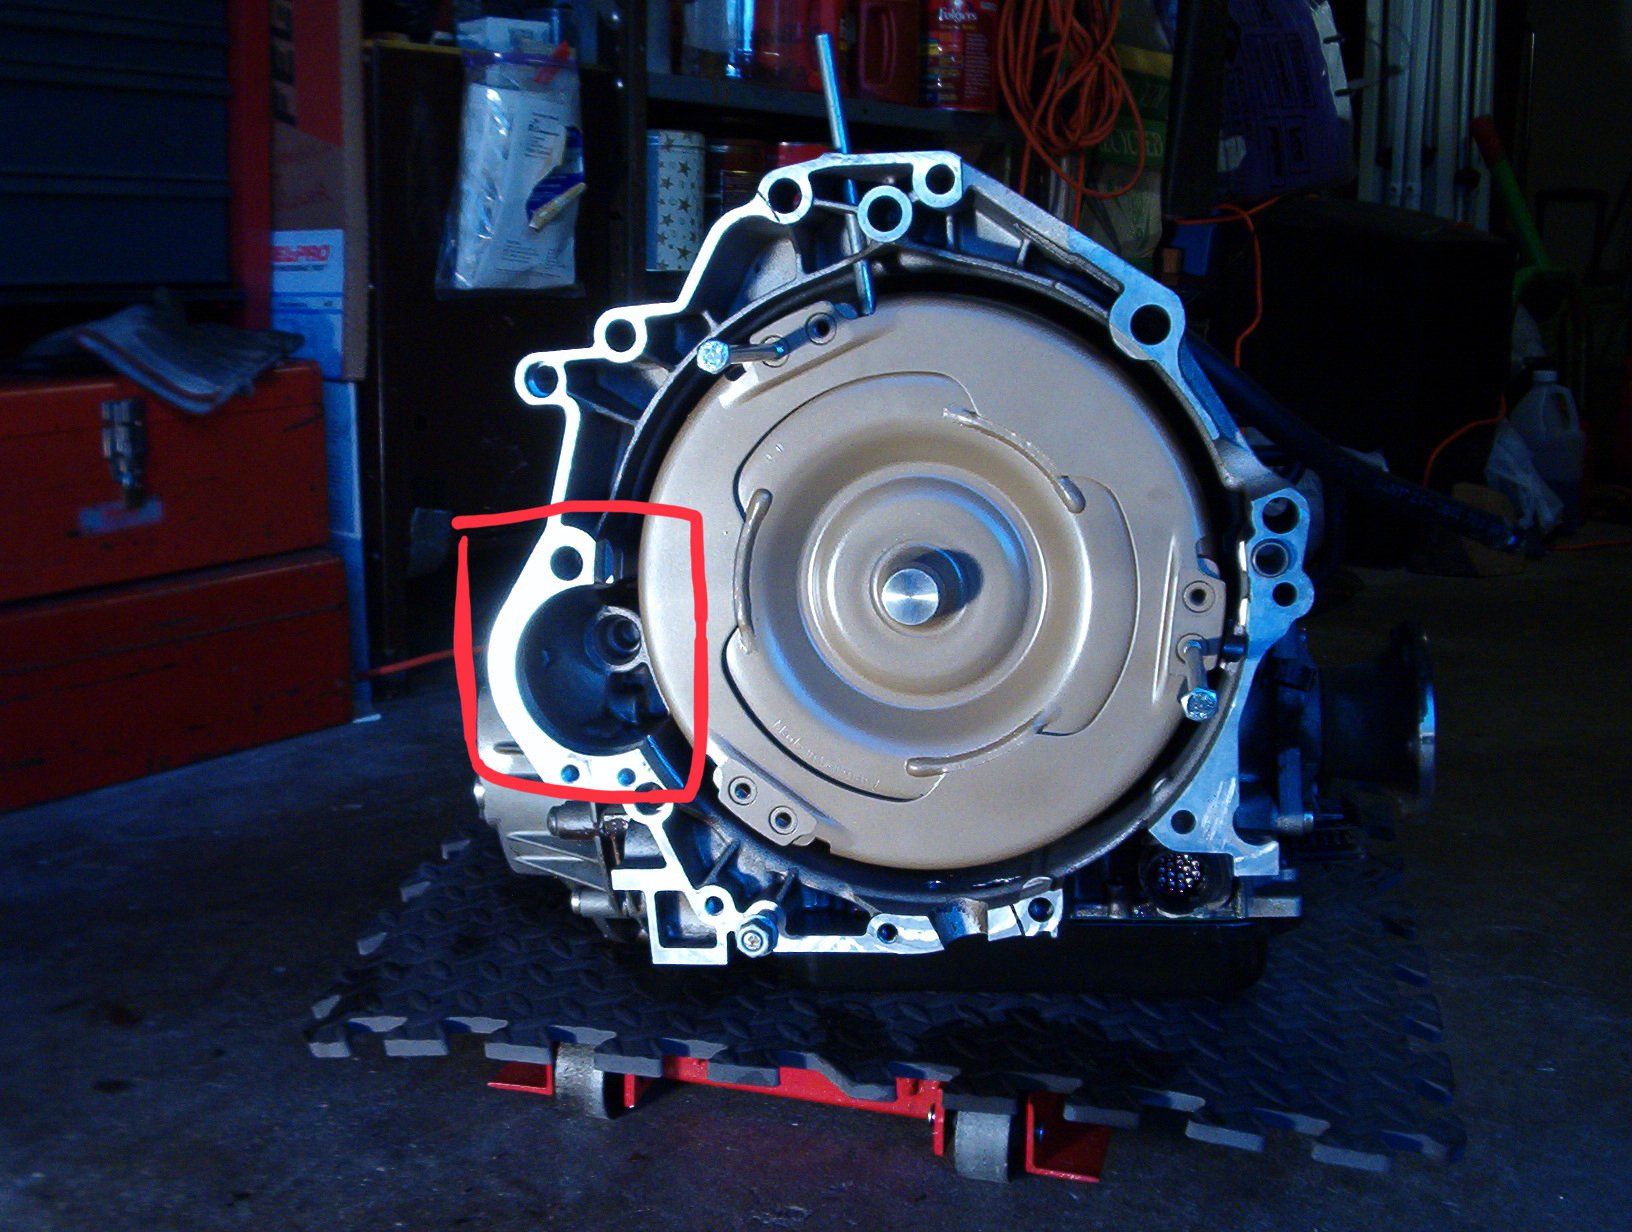
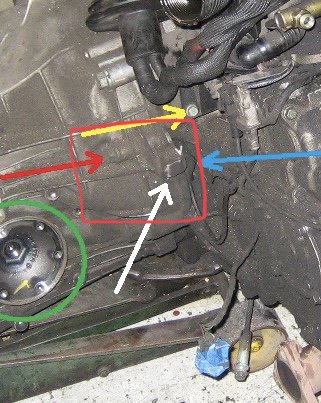
Finally got some time to work on this after replacing the fuel pump. There are really only two options. One is that the bolt fell forward and is lost on a rail or against a hose or something. The other is that is went backwards and there is only one possible location for it to end up based on the webbing on the engine side...See red boxes in the following images of the semi-circular cavity that goes directly into the area of flywheel and TC. In the image with the arrows I added a small “v” indicating the location of the bolt on the CPS, so one can see that by following from this point down, the bolt could only end up as stated above. In the image with the torque converter in place you can see that there would be space for the bolt to migrate into the area of the TC and flywheel. I did get my boroscope in that cavity pretty well and did not see anything. But I did not see enough to rule out the bolt being in there. I ran magnet through again with no luck. Anyway, just wanted to pass along my progress so far to see if there are any other thoughts.
-
Crankshaft Position Sensor on a Tiptronic
crwarren11 replied to crwarren11's topic in 986 Series (Boxster, Boxster S)
Indeed Murphy loves me. As my wife reminds me, every time I do car work I drop/lose a bolt somewhere in the process. I think this is the first that has been in a dangerous place though. Yay! -
Crankshaft Position Sensor on a Tiptronic
crwarren11 replied to crwarren11's topic in 986 Series (Boxster, Boxster S)
Haha yes. Very likely. I’ll give it a few minutes while I chase the not-starting issue...and then sounds like I’ll be dropping the trans yet again. -
Crankshaft Position Sensor on a Tiptronic
crwarren11 replied to crwarren11's topic in 986 Series (Boxster, Boxster S)
Thanks! Also thinking to try a vacuum through a small flexible tube to see if I can get lucky in retrieving it. -
Crankshaft Position Sensor on a Tiptronic
crwarren11 replied to crwarren11's topic in 986 Series (Boxster, Boxster S)
Thanks! I have a scope. I’ll see if I can find it in there! Didn’t even think about that. -
Crankshaft Position Sensor on a Tiptronic
crwarren11 replied to crwarren11's topic in 986 Series (Boxster, Boxster S)
Whatever you might have would be greatly appreciated. As it turns out the CPS is not even the problem. The car still won’t start. On to fuel pressure test next. Going to be very hard to swallow having to drop the trans for that bolt. It sounds like you are telling me that I need to... -
Crankshaft Position Sensor on a Tiptronic
crwarren11 replied to crwarren11's topic in 986 Series (Boxster, Boxster S)
Thanks JFP. So much to look forward to! [emoji30] -
Crankshaft Position Sensor on a Tiptronic
crwarren11 replied to crwarren11's topic in 986 Series (Boxster, Boxster S)
Yep I think that’s where mine is...I can reach a little into the hole but not enough to find it. Probed around with the magnet in there too as much as I could. -
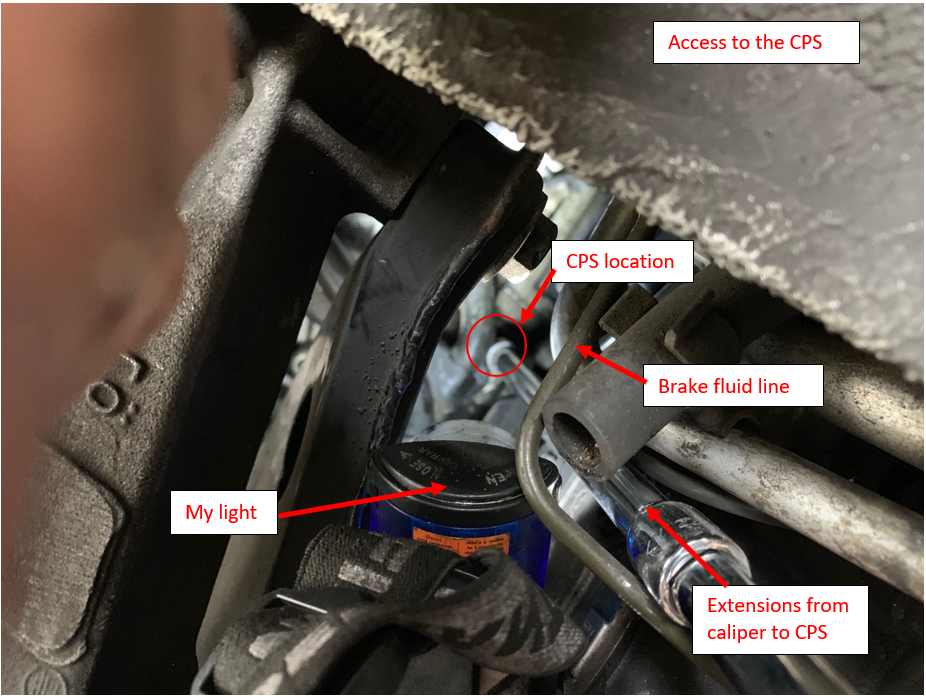
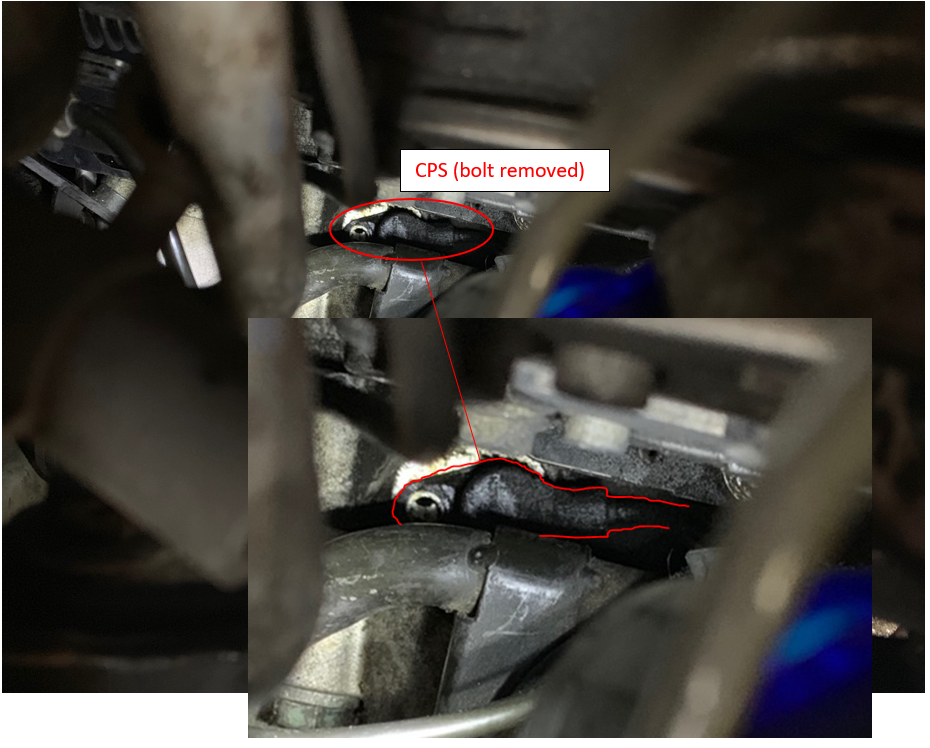
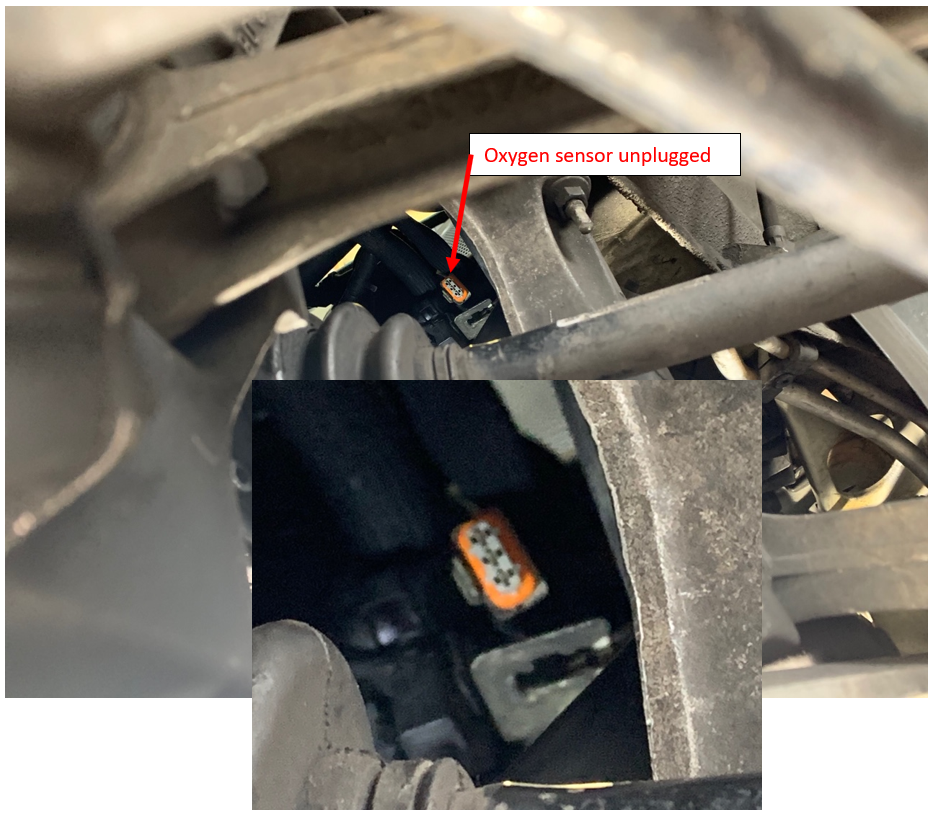
Hi all, Hoping to provide some clarity on replacing the crankshaft position sensor on a 986 WITH Tiptronic transmission as I have not seen (or was unable to find) any good/clear pictures of the process to find the sensor. As I found out, it is hiding well behind the plug/receptacle for the Oxygen sensor on the right side of the vehicle. I read all kinds of guides pointing me to the correct general location, but they all pretty much said it was obvious and I knew exactly what I was looking for. I spent well over an hour searching because I could not see it, and found out that on a Tiptronic, you have no direct line of sight to the sensor unless you move the oxygen sensor plug/receptacle. Hopefully these pictures will help anyone else trying to replace the CPS no a tip. In order to see the CPS you must unplug the oxygen sensor, remove the receptacle mounting bolt and push both cables and mount/receptacle out of your way. The view shown here is from underneath the car looking up towards the wheel well and CV joint. A wider view of the area you need to look into remove the oxygen sensor, receptacle, and bracket. You can follow the cable from the oxygen sensor to the bracket in order to find it more easily. This is your entry point and trajectory. Just beside the right rear brake caliper, under the brake fluid line, past the coolant reservoir drain hose. The extension is probably all of 18 inches to get you deep into where you need to be to unscrew the bolt holding the CPS in place. I used the light you see plus a large work light on the floor to finally visualize the sensor. The only way I was finally able to find the sensor was to identify the cable from the sensor and follow it by hand and light. That is when I realized I could not see it due to the oxygen sensor plug being in the way. This is just a wider shot of the entry using the light as a reference and the brake caliper is in the foreground. Here is a view of the CPS still in place, but the bolt has been removed. The oxygen sensor plug and receptacle have also been removed and pushed out of the way. Once you see the CPS, it is obvious that is what you've been looking for. What I think are coolant hoses are very close to the trajectory you need to access the bolt. My extensions were pushed up right next to these hoses and I had to push on them with the tool in order to get access to the bolt. Just a couple of other tips and tricks. The bolt of the CPS is held on by thread locker. Make sure you have good engagement with your male hex into the screw head during removal, otherwise it could strip. I recommend ordering a new screw for the CPS while you're at it, the newer ones are torx and less likely to strip. Once you locate the CPS you will find that you can actually reach in there with your fingers through a path in order to push it out of and into the hole. When you go to put in your new CPS, place it in first without the bolt. You can wiggle it into the hole reasonably easy with your fingers through the aforementioned path. When you go to place the bolt, either use a magnetic tool or tape the bolt to your male hex so that it doesn't fall off. Yours truly lost the original bolt and still have yet to find it. Luckily it is a pretty standard M6x16 available at your local hardware store. But I have no clue where that bolt ended up. I searched by every means possible including a powerful magnet around the area of loss and still could not find it. Hope this helps save you the hour or so of searching in your 986 Tiptronic for the CPS. Remove that O2 sensor harness first and you'll save a bunch of time and frustration!
-
986 2,5 Automatic transmission fault.
crwarren11 replied to Kristoffer Sellebjerg's topic in 986 Series (Boxster, Boxster S)
I am not an expert but went through a tip rebuild on a 2000 Boxster. If you have a coffee looking mixture in your trans oil then it indicates an intermix. The only place this can happen is with the atf cooler which is exactly what failed in mine. The intermix will destroy the clutches inside the transmission. In my case I tried to only replace the atf cooler and put in new atf but after a few weeks it failed again due to the clutches slipping. Ultimately I had to pull out entire trans and empty/replace the torque converter of all intermix and replace all clutches and plates. Sorry, I don’t recognize the part that you broke. -
986 Tiptronic Transmission Mounts
crwarren11 replied to crwarren11's topic in 986 Boxster Suspension, Brakes, and Wheels
You have to remove the entire bracket but you only need to replace the hydraulic unit. No need for a new bracket unless there is something wrong with it. Right side is a challenge to remove. Best advice was to lower the trans on the jack a couple of inches to get some space to fish it out. Pay attention to the orientation of the bracket and mount assy as you pull it out because you will need to follow that orientation to get it back in. There are three bolts holding the bracket in. Do not remove the hydraulic unit until it is all removed from the car. Also note the orientation of the hydraulic unit on the bracket. It is a square fitting which you can reverse the orientation if not careful. The left side is a bit easier. Be patient, it does come out and go in as an assy on both sides. -
Boxster 986 Tiptronic 'Skid Plate'
crwarren11 replied to wizard's topic in 986 Series (Boxster, Boxster S)
Oh man, I’ve been there many times. I usually manipulate the bracket a little bit by hand holding those two bolts that you’re pointing at. It is somewhat pliable. I can’t say that this is the correct way but it works for me. I also leave every other connection loose until all bolts are engaged in the holes. Leave the diagonal strut braces loose too where they connect with the cover. -
Noise after starting?
crwarren11 replied to Porsche_Boxster986's topic in 986 Series (Boxster, Boxster S)
Could be the secondary air pump. It whines at startup sometimes and it will run for about 30 seconds after start. You said only a couple of seconds, but still might be worth a check, as mine will whine only on occasion and not for the full time it is running. You would hear it at the right side of the car in the engine bay, sounds like it is behind the seat. If it is a problem you should get an error code indicating SAP. Mine has done it for years and I’m still waiting for it to completely go. If it is the SAP then I wouldn’t worry too much yet. -
Carpet Interior Door Panels Replaced
crwarren11 replied to kbrandsma's topic in 986 Series (Boxster, Boxster S)
Looks great! Very nice work! -
Exhaust Smells Sweet, No Smoke at All
crwarren11 replied to Sam Stevenson's topic in 986 Series (Boxster, Boxster S)
Second the coolant cap. Also check the trunk for any coolant leaking there. If the coolant reservoir is cracked it will leak into the trunk and make the carpet wet. In my case this crack was small and not enough that the coolant leaked to the ground, only to the trunk, so worth a quick and easy check. Also only happened under increased pressure such as when the car has been running for a while. -
Hi all, After 18yrs my convertible top has finally encountered its first issue. After using this forum (thank you!!) to figure out how to access all of the components (top was stuck in closed position), I found the root of my issue, a bad cable. However, as I was very carefully removing the cable from the transmission, the "clip" which is molded into the plastic cover cracked and is no longer functional (see image). Not really surprising on an 18yr old piece of plastic. The transmission works perfectly and I do not want to replace it, so I am looking for advice on any other ways that I can keep the cable properly engaged to the transmission. Please let me know if anyone else has encountered this and if there are any viable solutions. Thank you!
-
I would definitely do all the ancillary stuff but I wouldn’t say that the springs are necessary. The Porsche struts are also bilstein.
-
Recommendation for water pump
crwarren11 replied to CJamerson1212's topic in 986 Series (Boxster, Boxster S)
Sunset is great. I’ve always had very good experiences with rmeuropean as well. The website will show you which parts are oem even if not Porsche branded. -
986 Tiptronic Transmission Mounts
crwarren11 replied to crwarren11's topic in 986 Boxster Suspension, Brakes, and Wheels
Well I will answer my own question. Yes, the 993 engine mounts are basically equivalent and a bit cheaper. Fortunately the 986 mounts went back to normal prices so I just got those instead for just a bit more than the 993 version. Now, if I can only figure out how to get them back in...serious puzzle trying to feed the assembled unit back into place. -
I got a remanufactured unit through Trans star. I also got some other parts from CTSC (California transmission supply company) and europeantransmissions.com . Rebuilt TC was $340 5 years ago.
-
Understood. Wouldn’t want to cause any problems.
-
I guess I was under the impression that things available in the public domain were not an issue. But either way I have remediated. Apologies.
-
Woops. Sorry didn’t know.