Welcome to RennTech.org Community, Guest
There are many great features available to you once you register at RennTech.org
You are free to view posts here, but you must log in to reply to existing posts, or to start your own new topic. Like most online communities, there are costs involved to maintain a site like this - so we encourage our members to subscribe or donate. All subscriptions and donations go to the costs operating and maintaining this site. We prefer that guests take part in our community and we offer a lot in return to those willing to join our corner of the Porsche world. This site is 99 percent member supported (less than 1 percent comes from advertising) - so please consider an annual subscription or donation to keep this site running.
Here are some of the features available - once you subscribe RennTech.org
- View Classified Ads
- DIY Tutorials
- Porsche TSB Listings (limited)
- VIN Decoder
- Special Offers
- Paint Codes
- Registry
- Videos System
- View Reviews
- and get rid of this welcome message
It takes just a few minutes to register, and it's quality Porsche information at a low cost.
Contributing Members also get these additional benefits:
(you become a Contributing Member by subscribing or donating money to the operation of this site)
- No ads - advertisements are removed
- Access the Contributors Only Forum
- Contributing Members Only Downloads
- Send attachments with PMs
- All image/file storage limits are substantially increased for all Contributing Members
- Option Codes Lookup
- VIN Option Lookups (limited)


voodoocat
-
Posts
60 -
Joined
-
Last visited
-
Days Won
3
Content Type
Profiles
Events
Forums
Exterior Paint Colors
Downloads
Tutorials
Links Directory
Collections
Classifieds
Store
Everything posted by voodoocat
-
Yes it can identify which sensor is faulty. It was my first diagnostic when I got durametric.Turn on the hazards when diagnosing, this keeps can bus stay on.
-
crankshaft sensor
voodoocat replied to mbagge01's topic in 9PA, 9PA1 (Cayenne, Cayenne S, Cayenne Turbo, Cayenne Turbo S)
oh yeah -
crankshaft sensor
voodoocat replied to mbagge01's topic in 9PA, 9PA1 (Cayenne, Cayenne S, Cayenne Turbo, Cayenne Turbo S)
1) do not buy Beck / Arnley CPS. Though it says made in germany, they sell a defective unit. Bought 2 sensors, the measurement across pins are different between two units. Another poster had a problem too. yes it's 1/2 the price of Bosch, but it doesn't work. For me durametric said the value was off, but was not causing a code. I replaced with B&A, car couldn't start, so i put back the original/genuine. 2) If you are very careful, you can replace from top; get a skinny T10 socket (male), get at Harborfright for ~10. remove 2ndary air pump, and you will find cps. remove connector, carefully remove the screw and take out the unit. the oring tend to stay on the block side. -
Intercooler boot
voodoocat replied to mbagge01's topic in 9PA, 9PA1 (Cayenne, Cayenne S, Cayenne Turbo, Cayenne Turbo S)
You should replace the gasket for intercooler pipe. Driver (left) side seem to have more issues. It is inexpensive. -
Durametric can pinpoint the faulty sensor. You will have to remove the bumpers to replace them, though not too difficult. Get a spray paint in advance so you can spray paint the sensors to bumper color.
-
That is the t pipes. The rubber deteriorated so at low speed, coolant won't leak but as water pump pumps more fluid, will leak the coolant at the crack. There's two t pieces replace both. You can see it with inspection camera deep into drivers side firewall. if you changed coolant pipes you will see the right one will lead to the two ts. You can look up from bottom, but you don't want to be under your car when running. If you are going to pull the manifold, while out exchange the cam position sensors, that is bound to fail.
-
Have you checked expansion tank? It will leak down to pass side suspension area.
-
2004 TT I don't know if the quality varies with the model year, but 2004 is the first real year for Cayenne.
-
Oh well the air spring did blow. Replaced with Arnott.
-
Hi, I had P0491 P0492, as well as other fault code indicating faulty cam position sensor. I have 04 CTT 60Kmi. the 40A fuse in fusebox (next to brake fld reservoir) was blown. replacement resulted in another blown fuse. so i removed and disassembled both secondary air injection pumps, those two things that look like oversized windsheild wiper motor. The pump consist of motor and plastic vanes, that spin to pump air into the pipe/hose. the vanes have tight tolerance against the aluminum housing. i think over time, the motor bearing start to give, the vane (fin) contacted the housing, broke off and failed. the broken pieces were jammed all over inside the housing and motor wouldn't turn at all. Both pumps had same failure. If this happened to you, i don't recommend to keep on replacing the fuse, or worse, put bigger fuse in it. you might overheat the motor and burn it up, or worse yet (if you put larger fuse), melt the wiring harness. 40Amps are a lot of current and can start a spark/fire. Pump is about $150 a piece, but recommend to replace both. Don't recommend a used unit, you'll just get another failed pump soon. also note, the L and R pumps are different, don't buy 2 of the same. 7L5.959.253.A and 7L5.959.253.B Durametric showed a lot of faults, initially cam position sensor fail. Some forums suspected diverter valve failure. I'm glad to check this and find the problem was easily accessible. You need to pull intake manifold to check CPS...
-
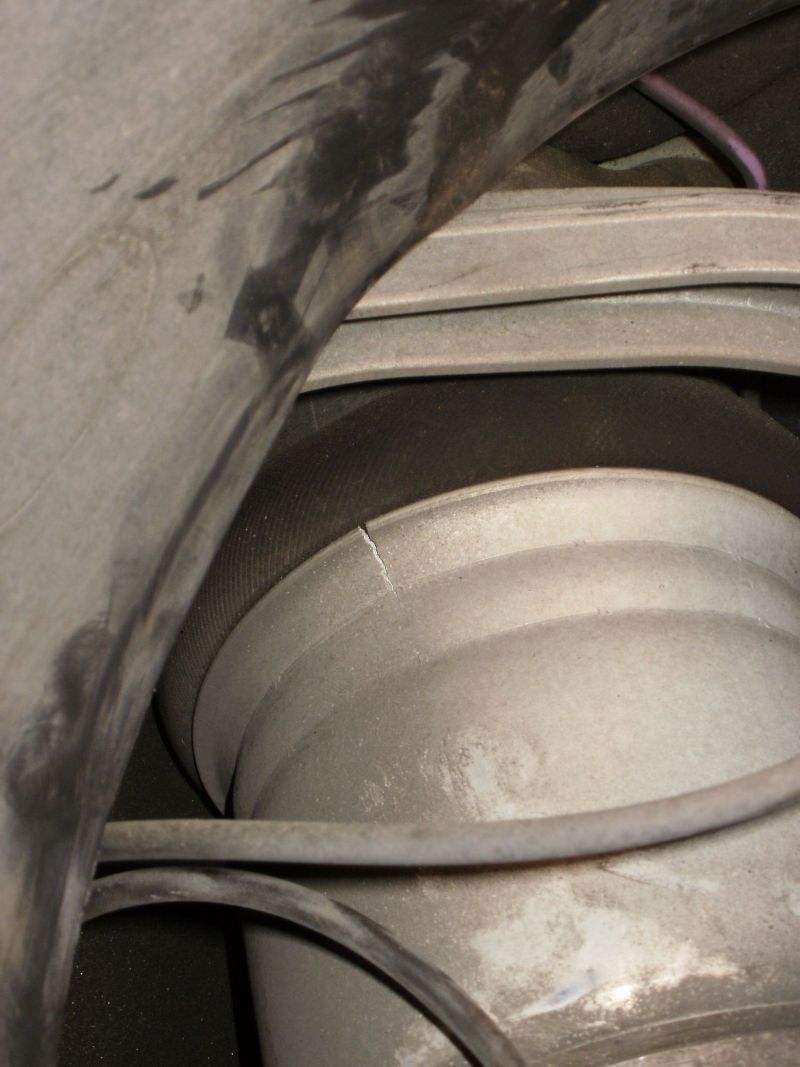
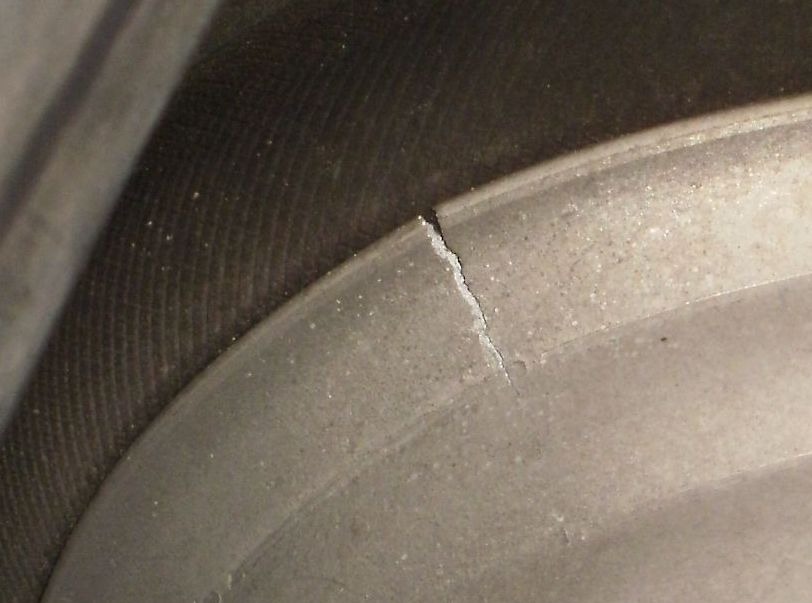
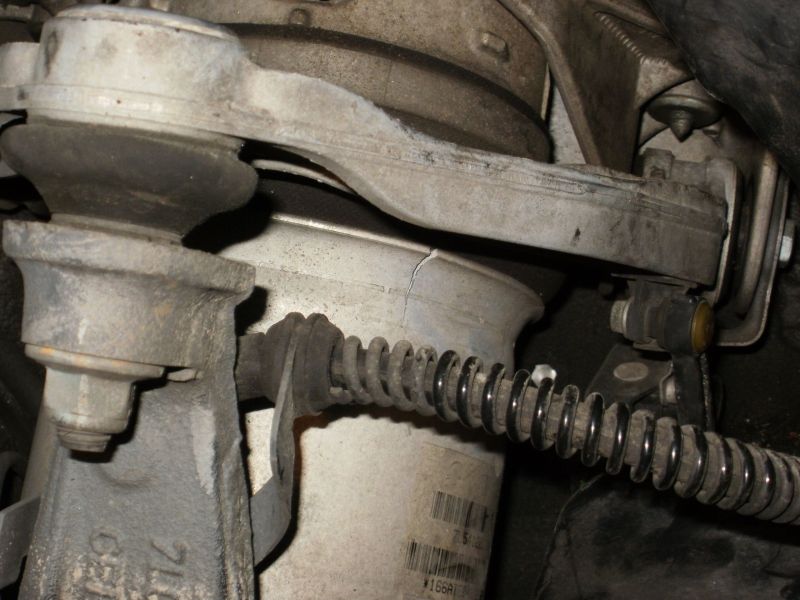
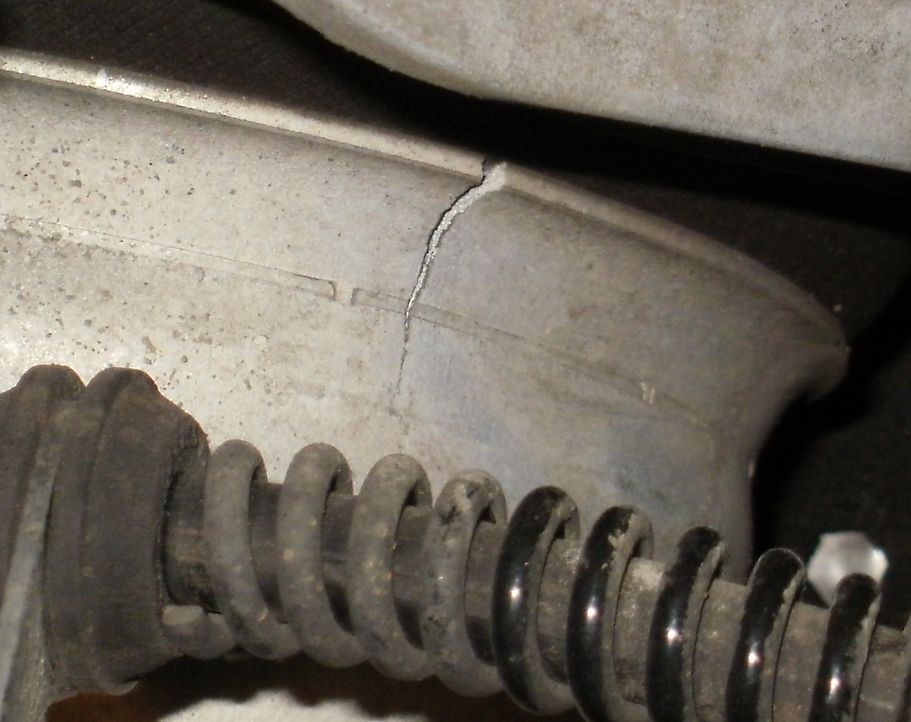
Hi I found 2 cracks on the drivers side front airsus housing. From what I understand this is a protective 'shell' but does not carry weight or hold pressure. Do I need to replace the shocks right away? Thanks in advance.

-
MPG!
voodoocat replied to absln's topic in 9PA, 9PA1 (Cayenne, Cayenne S, Cayenne Turbo, Cayenne Turbo S)
Us 15mpg 04 Ctt when I drive gingerly. my wife has heavy right foot 13mpg. Remember it's a 5000 lb vehicle. It's not a prius -
I had the same problem, a slow leak at bottom of expansion tank and coolant ran down with a small puddle near right front suspension. I first thought it was trx fld because it's red, but coolant. Need to remove bracket that hold the to arm, and need HL out to access the 2nd bolt. Just loosen and swing up the tq arm no need to remove. It holds almost a gallon so order Porsche coolant (and new tank cap) when ordering the tank.
-
85w140 is too heavy, I used Redline
-
make sure to use triple square, not hex bolt. it is on very tight and the bolt is made of aluminum. hex will strip it.
-
(disclaimer: not responsible if you damage your car) My 2004 CTT already had the aluminum cooling pipe, but recently it lost a lot of coolant as the T pipe broke. A steady stream of coolant flowed out. If your CTT is 50K+ miles, suggest to have them replaced. I think that part will eventually fail for everyone. Unlike breather / vacuum like breaking (that happens often too), the coolant T pipe will disable the car. Actually I was able to slowly drive it home after filling with distilled water, but fortunately the failure happened near home. If you are going to change the coolant pipes, take the extra afternoon and change t-pipes. Rennlist and 6speed have more information on the coolant t-pipe but I’d like to share my experience here. Refer to articles on rennlist/6speed also as I may have omitted some details. Note, if you are not confident of making your $90k new /twin turbocharged 450HP car completely disabled and put it back together, don’t do this job. If you make a mistake, you can cause serious damage beyond the ~$2k you are saving. I am not responsible for any damages you may cause. Remember this is a 4.5L V8 Porsche engine, not a small block chevy. Purchase the following. Sunset Imports has good pricing on Porsche parts: 1 or 2 Gal Porsche coolant, distilled water. I think I lost couple of gallons. There are enough articles to warn not to mix coolants. This (lifetime) coolant feels different, a little oily, and I’m not sure it is completely harmless to paint, etc. I thoroughly rinsed the area that was exposed to the flowing coolant. Cable actuated hose clamp device like http://www.sears.com....1&blockType=G1 this one does not work well out of box; because cable stretched and it didn’t expand the clamp completely. I needed 1mm more to fully open the clamp. Break off the cable end, and use the replacement cable stop for full opening (you’ll see what I mean). All 5 hose bands will require this tool. Another special tool is triple square bit for the engine mount screw. You can try your luck and use hex bits, but that bolt is aluminum, if you strip the socket you're screwed. :) Intake manifold gasket, 2 pcs. Don’t reuse just replace it for peace of mind. T piece hoses 955 106 323 50 and 948 106 035 51. Get both. They will both eventually fail. The coolant comes to the tee from the coolant pipe (under intake manifold, right one of the three), branches off to another tee, and then to two turbos. As mentioned in many other forums, it is located behind the engine on driver side, and you cannot see them from the top. You can partially see from bottom. One of the T’s have pre-installed metal band. The hose orientation are set for proper install, so don’t turn it. The 2 tees will fit to each other, along with 4 other connections. Do not throw away the larger hose clamps when hoses are removed. You’ll reuse them. Remember to pre-install the clamps before hose installation. (I hate it when that happens, and you know what I’m talking about) Remote access camera, harborfreight has it for less than $100. This comes in handy to see the Tee, you can verify if the clamps are properly fit. 3/8 barb-1/4MIP (3pcs) and 1/4FIP brass Tee for $16 at home depot to repair/cut/patch the breather pipe tee located directly behind intake manifold by the firewall that will deteriorate and eventually break. Under the “PORSCHE” plastic cover on pass side, along the fuel rail you will find two ~1/2” black rigid plastic breather pipes running to back. The top one leads to this Tee. Also get couple of feet of 5/16” fuel hose to bridge/patch the hard plastic hose. Take note of the hose routing and make proper patch with right length. Alternately you can replace the breather hose assembly with genuine replacement. http://www.renntech....-breather-pipe/ If you still have the plastic coolant pipe, order the parts and replace it. It will fail, so better take care of it. Refer to many articles written about it. Cover the entire front end including nose and fender with towel or something thick. You will be leaning into it all the time. A stool on both sides helps to reach in to the engine compartment, especially if the truck is on ramps. Remove all engine compartment cover, and the bottom sheilds. Keep track of screws. I found that the intake manifold removal was not much of a big deal. There’s a lot of screws and connections to remove, have to be very careful for sure, and the tricky ones were removing pass side engine block cover (that silver plastic with PORSCHE across the top, loosen the frame side engine mount for easier removal), and the rear pass side manifold torx screw (be careful not to damage the rigid plastic breather pipes that are in the way). Pull out 15A fuel pump fuse 13/14 at driver side firewall fusebox. Relieve fuel pressure at the end of (pass side) fuel rail; unscrew the black cap, push the valve’s center pin (like on a tire), only few tablespoons will squirt out. Remember you still have fuel in the rails, take care when you turn the manifold upside down. Remove fuel line at back of intake manifold. EGR and other breather pipe connectors are hard to remove, squeeze the ring firmly to release them. Also throttle body y pipe has a piece of pipe sticking out at bottom, connected to a hose, don’t break it. Remove the 2 plastic torx ‘rod’ that secures throttle body to intake manifold. Once necessary wire/hose/bolt are removed, very slowly wiggle out the intake manifold, remove 3 hoses in the back (+fuel line) when you gain access (don’t forget to re-connect them!), then eventually whole intake manifold slides out. Once the throttle body and manifold is out you can see/access all the intake valves (I suggest to simply tape the ports with masking tape but not stuff anything in the ports). You may be tempted to clean/scrape off the deposits on valves; unless you really know what you’re doing, don’t touch them. If you are thinking of cleaning the oily deposit inside manifold, remember that all loose particles will go into the combustion chamber. That was the easy part. Take note very carefully how the coolant T’s are connected. Of the 4 connections for both coolant tees (+ tees connecting to each other), 1 need to be removed from bottom, a 1/2”-ish metal pipe (so you need to remove all the bottom covers). Looking up from bottom, you will see metal heat shield covering transmission selector lever. If you remove the shield, don’t touch the lever; a slight push will disengage the gear (so work on level surface and put parking brake and chock the wheels). There is no need to remove exhaust components. It depends how big/long your arm and hands are, but other parts removal/install were all done from the top. Many of the hose clamps need to be removed by feel using the hose clamp tool, with one hand. It gets frustrating quick. Removing the hose from coolant pipe (under manifold, the right one of the three) was very difficult because of the access, reach and old hose being stubborn. Pry loose with flat screwdriver. I had to use small knives to cut through some hoses, prying with screwdriver for others. They are stuck on tightly and the hose lost elasticity, you can’t twist them off and no space for pliers. Install of the new hoses are much easier. Be sure to lubricate the hose ends so it slips in easily. When installing new tees, I installed one, then the second one (the banded one). I didn’t connect 2 tees together and install; no space. Be sure to reinstall all hose clamps correctly, and double check your work. You will not be seeing it for a long time, if done right. Before reinstall of intake manifold, I recommend to replace/repair the breather tee with the mentioned Home depot replacement. The tee is inserted 1” into the hose, I cut it and patched with the replacement. I didn’t clamp it, it doesn’t carry pressure (but it is exposed to heat/cool cycling). Now you are going to put them back together. Double/triple check when reinstalling intake manifold. Make sure nothing is covering/interfering the intake ports. That is the last critical step. Rest are comparatively easy. Say goodbye to the starter, located under the 3 coolant pipes (!). When starting the car, if idle is rough and hear terrible popping/firecracker sound, the manifold is leaking air. Something is between the gasket and intake port. Don’t gas it hoping it’ll go away; you’ll need to pull the manifold again. Put all pieces back together, refill coolant over several normal temp/cooldown cycle to purge air (I guess there are other techniques).
-
Cayenne turbo cooling T pipe replacement (disclaimer: not responsible if you damage your car) My 2004 CTT already had the aluminum cooling pipe, but recently it lost a lot of coolant as the T pipe broke. A steady stream of coolant flowed out. If your CTT is 50K+ miles, suggest to have them replaced. I think that part will eventually fail for everyone. Unlike breather / vacuum like breaking (that happens often too), the coolant T pipe will disable the car. Actually I was able to slowly drive it home after filling with distilled water, Author voodoocat Category Cayenne (9PA, 9PA1) - Common Fixes and Repairs Submitted 01/19/2012 05:58 AM
-
Replacing Cayenne rear hatch struts
voodoocat replied to Papagut's topic in DIY Articles - Cayenne - Common Fixes and Repairs
Hi thanks for the article. I replaced the hatch strut 3 years ago, and it started to sag again so replaced the strut again. This time, I replaced both hatch and glass struts, 4 struts total. I recommend to change all 4, because the hatch is actually held up by all 4 struts. Now the hatch practically flings open. -
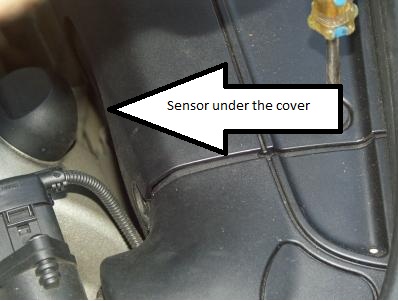
Hello, I find that the Driver's side air intake pipe, after turbo, has a coating of oil and attracted dirt. I have a normal oil consumption for this car, maybe 1qt every 1000 miles. I also found that there is a minor oil seep from the sensor covered under the black plastic cover. Oil trails from this cover down to the mentioned intake pipe. Maybe the seal for the sensor is leaking, or the sensor itself has a leak. What does the sensor do, and should I be concerned? Car runs fine. Thank you
-
Durametric will pinpoint which one is defective
-
Cayenne Turbo - Removing and installing drive belt
voodoocat replied to Loren's topic in DIY Articles - Cayenne - Maintenance
Thank you loren for this information. This work is HARD! It takes less than 5 minutes on other cars to change the belt, for TT it took me hours! Step 17 is the most difficult. the '2' pressure pipe has an interlock connector. Unless you plan to destroy and replace, you have to see how that is interlocked and carefully undo the latches. The piece is small and too much force will break it. You need to pry open the '1' at collar. For some reason these 2 hoses cross the loop of drive belt so it need to be disconnected. Don't loosen the belt until you can separate these 2 pipes. most of the vacuum hoses are rigid plastic type, if you force it'll crack. all the photos show as if the engine is pulled. In reality there is extremely little space to work. to route belt, you need to have small arms and hands or your forearm may not reach the '4' pulley. Need to go from bottom. Removal of Y pipe takes patience. It is not possible to remove the 2nd screw of driver side pressure pipe (pipe that lead to Y pipe bellows, so don't bother removing the 1st screw. (fig. 16 is passenger side) I didn't try removing the rigid pipe containing MAF. You will need to rotate to get access, so remove electrical connector as there's no slack. Be very careful and don't drop anything. otherwise you'll have to take bottom cover off, and find what you dropped, if you're lucky. Needless to say, quadruple-check the belt routing. You don't want anything running backwards. -
I did just like the audi procedure below. worked out very well, with $10 in plumbing pieces from Home Depot, $6/qt Toyota T-IV ATF, gasket and filter (Thanks, sunset). I used aquarium thermometer with remote temp sensor that i put in the pan during fill. I also measured the pan temp with infrared thermometer, and it's within 1c difference. Next time i'll just use the infrared thermo to measure pan temp. it will take 15 min or so from cold to 40c. The fluid after 50kmi was red like blood, while new one is clear red like red wine. 6 magnets had thick coat of metallic crud. I would not leave that in for 160k miles. one word of caution is not to overtighten the drain plug (the small one, not the 17mm allen). it's a 10mm aluminum torx screw, don't overtighten. Torque for pan and 17mm allen is available here, but could not find for the drain plug.
-
I think Porsche uses Mobil 1 ATF 3309 in all Cayenne's auto tranny based on my research. However you have to idle the engine and make sure the tranny temp is 40C to get the correct fluid level Too bad that I haven't found where to check the tranny temp in my Durametric software. On many forums, I find that Toyota T-IV ATF is actually Mobil 3309. T-IV meets JWS3309 and it is for Aisin AW transmission. The latest beta v.6 Durametric still does not measure ATF temperature.
-
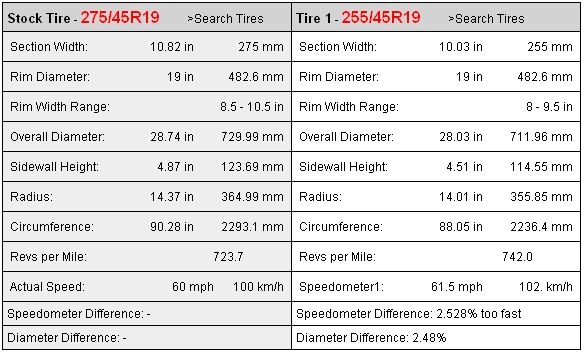
Hi, I think some people 'size up' from stock, but is there any problem going down in size? The Porsche 19" wheel is 9.5 x 19 (275/45/19 stock), so fit to the wheel is ok, with slight speed difference. But is there a problem with fitting these tires on 04TT? I don't have TPMS. Thanks!
-
Durametric will pinpoint the faulty sensor. I had intermittent problem, then eventually stopped working (red LED on parking indicator). Replaced the sensor and works fine. You'll need to prime/paint/clearcoat the sensor, and need to take off the bumper to replace the sensor. also don't throw away the rubber ring that comes with new sensor.