Welcome to RennTech.org Community, Guest
There are many great features available to you once you register at RennTech.org
You are free to view posts here, but you must log in to reply to existing posts, or to start your own new topic. Like most online communities, there are costs involved to maintain a site like this - so we encourage our members to subscribe or donate. All subscriptions and donations go to the costs operating and maintaining this site. We prefer that guests take part in our community and we offer a lot in return to those willing to join our corner of the Porsche world. This site is 99 percent member supported (less than 1 percent comes from advertising) - so please consider an annual subscription or donation to keep this site running.
Here are some of the features available - once you subscribe RennTech.org
- View Classified Ads
- DIY Tutorials
- Porsche TSB Listings (limited)
- VIN Decoder
- Special Offers
- Paint Codes
- Registry
- Videos System
- View Reviews
- and get rid of this welcome message
It takes just a few minutes to register, and it's quality Porsche information at a low cost.
Contributing Members also get these additional benefits:
(you become a Contributing Member by subscribing or donating money to the operation of this site)
- No ads - advertisements are removed
- Access the Contributors Only Forum
- Contributing Members Only Downloads
- Send attachments with PMs
- All image/file storage limits are substantially increased for all Contributing Members
- Option Codes Lookup
- VIN Option Lookups (limited)


1schoir
-
Posts
2,739 -
Joined
-
Last visited
-
Days Won
9
Content Type
Profiles
Events
Forums
External Paint Colors
Downloads
Tutorials
Links Directory
Collections
Classifieds
Store
Everything posted by 1schoir
-
My first check engine light - at 50K miles
1schoir replied to geoff's topic in 986 Series (Boxster, Boxster S)
Geoff: The part number that you have listed, 996.606.125.01, is ONE of the correct part numbers for the e-gas Boxsters, years 2000 trhough 2004. Best approach is to take out your current MAF and match up the part number to the new one you will want to order. Take a look at the following link for a definitive list of the MAF part numbers, courtesy of Mike Focke: http://mike.focke.googlepages.com/checkeng...ssairflowsensor Regards, Maurice. -
Yes, if it is the original factory radio. Becker used the radio codes in 1997 through 2003 model year Boxsters. Regards, Maurice.
-
rear plastic window on cab
1schoir replied to bink000's topic in 996 Series (Carrera, Carrera 4, Carrera 4S, Targa)
But, does it stay that way? In my experience, mine pretty much back to where it was within a couple of weeks (with Meguiar's PlastX) . :( MD: If you give it a couple of treatments with the #1 and #2, then you only have to use the # 3 to maintain the clarity. The #1 is the most abrasive, #2 is less abrasive, and # 3 just polishes it. It wont go back to cloudy as quickly as you describe, even if you don't treat it anymore. Regards, Maurice. -
If it's not the ignition switch, do you possibly have the headlight switch pulled out (towards the rear of the car) one click and turned one click to the left (CCW) of the off position? That will cause the passenger's (right) side driving and parking lights to remain on (both front and rear), even with the key out of the ignition. If you don't have the headlight switch pulled out one click, but are still getting this, then consider the possibility that your headlight switch itself is faulty. Regards, Maurice. Thanks for that info. Maurice. I think your right about the headlight knob position. After I reconnected the battery the problem went away so I called my shop and they told me the problem was the European parking lights were activated. I didn't even know that this existed. He said it's for Europeans (who park on the left side) to alert other drivers when their parked by leaving just the right side driving lights on. Interesting. The only problem was when I tried to activate them again the knob simply popped off in my hand when i pulled it. Is there a trick to activating them? Scot: There is not trick to activating the parking lights on one side, other than to not pull the headlight knob so hard that it will come off. Just pull the knob one click and then turn it CCW to first activate the passenger's (right) side light, and then CCW again (another click) for the driver's side. If the knob comes off completely, just to put your mind at ease that you have solved the problem, grab the shaft that the knob is mounted onto with a suitable tool and try to operate it that way. If it checks out, you will only have to replace the knob if you want to be able to activate that feature. Regards, Maurice.
-
If it's not the ignition switch, do you possibly have the headlight switch pulled out (towards the rear of the car) one click and turned one click to the left (CCW) of the off position? That will cause the passenger's (right) side driving and parking lights to remain on (both front and rear), even with the key out of the ignition. If you don't have the headlight switch pulled out one click, but are still getting this, then consider the possibility that your headlight switch itself is faulty. Regards, Maurice.
-
rear plastic window on cab
1schoir replied to bink000's topic in 996 Series (Carrera, Carrera 4, Carrera 4S, Targa)
There is nothing like Novus 1, 2 & 3 for restoring a hazy or scratched up window. If you follow the instructions, you can bring back almost any window to like new clarity. Regards, Maurice. -
One possibility is the ubiquitous ignition switch. It's usually the cause of otherwise unexplained electrical gremlins such as various items remaining on when the key is turned off. Inexpensive part and relatively easy DIY if you have decent contortionist skills and your hands are not too big. Take a look at Mike Focke's Boxster Pages for a general idea of what you are up against if it turns out to be the ignition switch. I know yours is a MY97 C2 cab but it's either the same or very close : http://mike.focke.googlepages.com/ignitionswitchreplacement Regards, Maurice.
-
Jeff: Are your CD's that include the Litronic retrofit still available? Regards, Maurice.
-
Help Passenger headlight wont come out
1schoir replied to Roeske's topic in 986 Series (Boxster, Boxster S)
Roeske: Try using a 5mm socket, extension and ratchet, instead of the headlight removal tool that's in the tool kit. The tool from the tool kit strips fairly easily or more often strips the point of the locking part that you are trying to turn (I think it's called a "clamping bow"). Are you getting any resistance when you are trying to turn it? If you are positive that you have successfully turned the clamping bow, you may just have to pull with more force to get the headlight to come out, but there's a good chance the clamping bow is not really turning to unlock the housing. Regards, Maurice. -
Tom: You should not use soft summer tires whenever the temperature drops below 35 to 40 degrees (Farenheit). It's not a matter of extra wear or damage to the tires, and "extreme bad handling" is putting it mildly. Driving with them in snow is somewhere between an accident waiting to happen and actual suicide. Take a look at this thread on PPBB, where they discuss the "Pucker Factor" elicited by driving with summer tires when they should not: http://www.ppbb.com/scgi-bin/boards/986/main.pl?read=1261144 Regards, Maurice.
-
Honda: To have the best chance to "take out" the wrinkles shown at the front edges of your top in your photos above, you are going to have to "unpeel" the front of the top again. I am going to assume you already know how to do that if you have already removed and installed the top yourself. (If not, let me know). Once the front edge of the top is peeled back, you first have to clean away any glue or double sided tape residue that is there so that you have a completely clean surface. You can use denatured alcohol for that purpose, it works well and the new double sided tape will stick on that much better. Once that surface is cleaned, apply two sided tape in the channel between the two ridges that run from left to right across the entire metal rib. I used 3M automotive double sided tape, Item #06384 available at any auto paint store. The front edge of the canvas top will have a leather or cardboard strip to help you line it up parallel and tight. Stretch the canvas top by pulling it forward, wrap it around the metal rib and press it onto the double sided tape that you just applied. The adhesive will hold it in place but I also used a couple plastic spring wood clamps to pinch it in place so I can walk around and make sure it was even and straight. Now, this is the crucial part for getting rid of the wrinkles: To line up this part of the front edge correctly, make sure that the leather or cardboard strip lays in between the two slight metal ridges that run from left to right, and that it lines up snug against the rearmost of the two ridges when you are gluing/clamping that part of the canvas top. Work from the center out to each side. When you get to right and left corners, make sure that you pull hard on the canvas so that it is tightly wrapped around the front of the metal rib before you wrap the very corner of the canvas top (with the small indented cutout to allow the screw to go through) around and fasten it with that one screw (after you next install the weatherstrip gasket over it). Here is a photo showing the method of holding the canvas in place as you are lining it up (click on the photo to blow it up): The red arrows show the area under which the two ridges are and the clamps used to hold the canvas against the double sided adhesive tape. Note that the front weather strip gasket has been temporarily attached at the right and left corners with one screw in each corner. If you do the repair, please post photos or questions with any difficulty you may encounter. Also, if you do this successfully and you feel up to tackling the wrinkles at the rear, we'll give that a shot too. Good luck! Regards, Maurice.

-
Wind noise on drivers window
1schoir replied to Rolla's topic in 996 Series (Carrera, Carrera 4, Carrera 4S, Targa)
Joel: To avoid too much trial and error on the front of the glass issue, try the trick I mentioned before. When the window is all the way up, mark the outside surface of the glass window with either masking tape or a grease pencil, by tracing along just where the rubber seal meets the window. Then, when you lower the window slightly, you'll be able to see instantly how much you have to adjust to get it snug all around. Regards, Maurice. -
Honda: Good job! Let's hope Will has the same success. If you are up to tackling the front bulges at the front corners, let me know and I'll give you a procedure that will probably solve or ameliorate the problem. Regards, Maurice.
-
Wind noise on drivers window
1schoir replied to Rolla's topic in 996 Series (Carrera, Carrera 4, Carrera 4S, Targa)
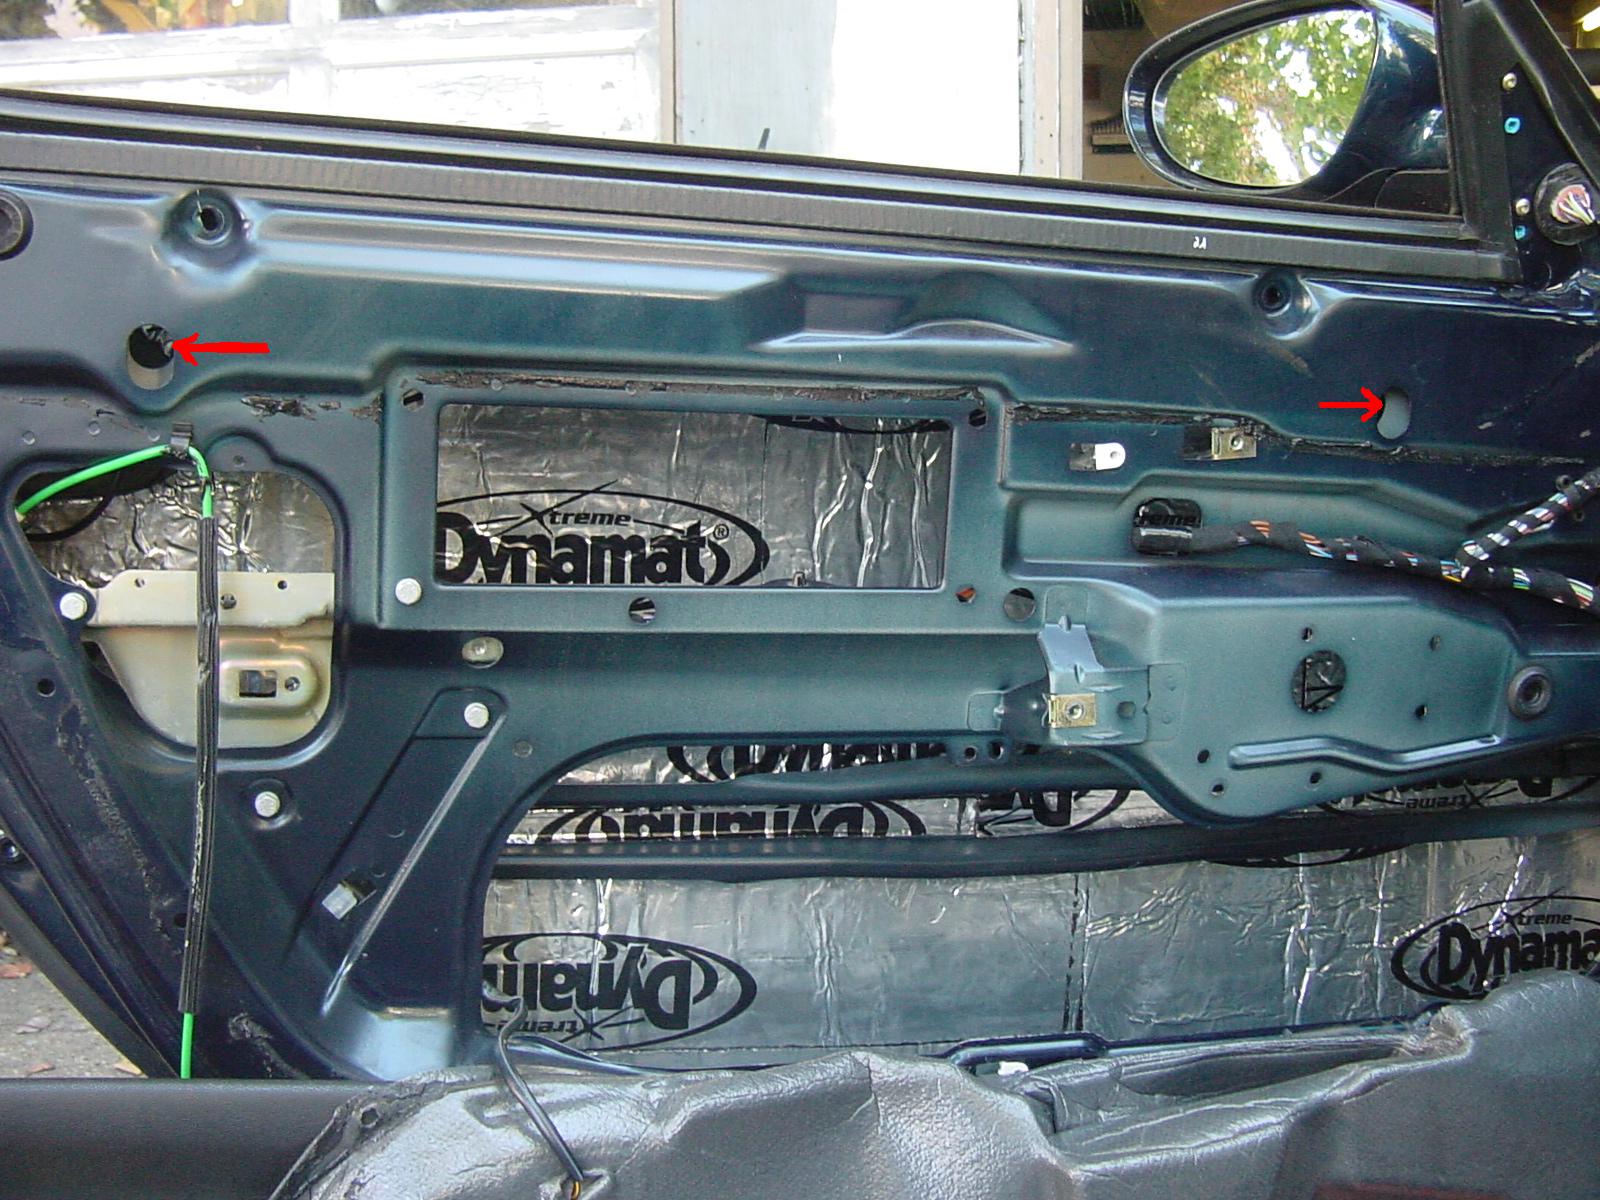
Joel: Judging from the photos you supplied, there is a remote possibility that you can make enough of an adjustment to the window without removing the door panel. Since it appears that you have a larger gap at the top rear of the front window than at the bottom rear of the front window, you can try to "pivot" either just the front or both of the window regulator legs by the following method: Pop out the two INBOARD rubber plugs found under the door bottom on the driver's side. The very edge of one of these two plugs is pointed out by the red arrow in the previous photo that I posted. Once you remove the two INBOARD black rubber plugs, you will have access to the single (10 mm?) nut that holds the base of each of the two window regulator legs to the bottom of the door. Note that each window regulator assembly has two legs (that are raked back at an angle similar to the rear edge of the door) and that each leg is fastened 1) at the bottom as described directly above, and 2) near the top at one of the two points pointed out by the red arrows in this photo: At each of these two points, the top of the regulator legs are helt in place by small bolts. What you are trying to do here is to "pivot" the window regulator legs on these two attachment points by moving the bottom of the legs forward, without having to access the small bolts (which would require removal of the door panel). I would first try to loosen the nut at the bottom of the FORWARD leg and then move the stud (that is pressed in to the base of that window regulator leg) TOWARD THE FRONT as much as possible, then tighten that nut on the stud again. Then operate the window and see if you have gotten any improvement. Be very careful not to shift that stud (and therefore the leg that it is attached to) in towards the center of the car or out away from the side of the car, as that will affect the corresponding angle of the window as it travels up and down. The angle that you want to avoid altering with this attempt is the one that would cause the flat pane of the window to angle further in towards the inside of the cabin or further out towards the outside of the cabin as it travels up. You may have to also do the same for the rearmost leg of the window regulator as you just did for the forward leg, to keep the window even. By doing this (either just the front leg or both), you may be able to get the gap at the top rear edge of the window to get smaller, because in effect the window will be "raked" back further. You may then have to again tinker with the up and down adjustments through the other holes and the torx screws, as I described in the previous posts. If this method does not work, you will have to remove the door panel and make the proper adjustment by loosening each of the two clamping jaws that hold the glass in place and then sliding the glass towards the rear so that you end up with the same gap as you show at the rear of the passenger's side window. Keep us posted with any results. Regards, Maurice. Maurice I cannot thank you enough for all your help on this issue. I ended up having to pull the door trim off to adjust the thing. There I found the main reason for my pain. Broken glass. So it seems whoever put the replacement in went lazy on adjusting it. I think I have it 90% now just a few more hours of adjusting it and it should be good to go :-D. Thanks for all your help. Joel Joel: Glad I was able to help. Bummer about the broken glass. Amazing what surprises you can find when you trust someone else to work on your car! It will feel satisfying nonetheless when you're driving on the parkway and notice how relatively quiet you have succeeded in making it. Plus, you have gotten to know the workings of your car that much better, which always keeps you one step away from the dealer and, it's one more thing they can't "snow you" on. Good job in sticking with it and getting it done! Regards, Maurice. -
Airbag Light On....help
1schoir replied to 99-996's topic in 996 Series (Carrera, Carrera 4, Carrera 4S, Targa)
Erik: Thanks for the update. I hope that the dealer charged you a little less than the "repair" they did on the driver's side. The wiring that has to be updated with the wiring kit is less involved than that required on the driver's side, not to mention the cost of the second buckle. If they didn't give you a break, you can point it out to them the next time you visit, and maybe they can give you a break. Nonetheless, it is good news that you no longer have that light on. It's very distracting and it potentially desensitizes you to the lighting up of any of the other warning lights. I know I was relieved to get rid of the light. Regards, Maurice. -
leak behind the passenger seat
1schoir replied to alstarz88's topic in 986 Series (Boxster, Boxster S)
Alstarz: Check out Mike Focke's Boxster Pages, at this link, for photos and diagrams of where the drains are located: http://mike.focke.googlepages.com/drainsdiagram Regards, Maurice. -
Will and Honda: If I read your posts correctly, I believe that you are not making the correct adjustments. In order to adjust how the front edge of the canvas top lines up with the top edge of the windshield frame so that the two tongues on the front edge of the canvas top can easily be guided into the two receptacles on the top edge of the windshield frame, you must make an adjustment at the push rods (or "joint arms") that are attached to the forwardmost part of the V-levers (when the top is almost closed). The easiest way to access the nut that you must loosen is to open the top about 12 to 18 inches and reach under the rear of the convertible top frame bow. Here is a photo of the push rod, with the red arrow pointing to the nut that must be loosened. The V-lever and the subject push rod have been removed from the car for this photo: You must loosen the 10mm nut (with the thick washer) that holds the two sections of each pushrod (one on passenger's side and one on driver's side), and then loosen or shorten the overall length of the pushrod so as to get the correct engagement at the front windshiled frame receptacles. The longer you make the overall length of the pushrod, the closer that side of the front of the canvas top will be to the top of the windshield frame. The shorter the length of the pushrod, the further away that side of the front of the canvas top will end up when the top has reached its forwardmost travel. Regards, Maurice.
-
Wind noise on drivers window
1schoir replied to Rolla's topic in 996 Series (Carrera, Carrera 4, Carrera 4S, Targa)
Joel: Judging from the photos you supplied, there is a remote possibility that you can make enough of an adjustment to the window without removing the door panel. Since it appears that you have a larger gap at the top rear of the front window than at the bottom rear of the front window, you can try to "pivot" either just the front or both of the window regulator legs by the following method: Pop out the two INBOARD rubber plugs found under the door bottom on the driver's side. The very edge of one of these two plugs is pointed out by the red arrow in the previous photo that I posted. Once you remove the two INBOARD black rubber plugs, you will have access to the single (10 mm?) nut that holds the base of each of the two window regulator legs to the bottom of the door. Note that each window regulator assembly has two legs (that are raked back at an angle similar to the rear edge of the door) and that each leg is fastened 1) at the bottom as described directly above, and 2) near the top at one of the two points pointed out by the red arrows in this photo: At each of these two points, the top of the regulator legs are helt in place by small bolts. What you are trying to do here is to "pivot" the window regulator legs on these two attachment points by moving the bottom of the legs forward, without having to access the small bolts (which would require removal of the door panel). I would first try to loosen the nut at the bottom of the FORWARD leg and then move the stud (that is pressed in to the base of that window regulator leg) TOWARD THE FRONT as much as possible, then tighten that nut on the stud again. Then operate the window and see if you have gotten any improvement. Be very careful not to shift that stud (and therefore the leg that it is attached to) in towards the center of the car or out away from the side of the car, as that will affect the corresponding angle of the window as it travels up and down. The angle that you want to avoid altering with this attempt is the one that would cause the flat pane of the window to angle further in towards the inside of the cabin or further out towards the outside of the cabin as it travels up. You may have to also do the same for the rearmost leg of the window regulator as you just did for the forward leg, to keep the window even. By doing this (either just the front leg or both), you may be able to get the gap at the top rear edge of the window to get smaller, because in effect the window will be "raked" back further. You may then have to again tinker with the up and down adjustments through the other holes and the torx screws, as I described in the previous posts. If this method does not work, you will have to remove the door panel and make the proper adjustment by loosening each of the two clamping jaws that hold the glass in place and then sliding the glass towards the rear so that you end up with the same gap as you show at the rear of the passenger's side window. Keep us posted with any results. Regards, Maurice.
-
Painting brake calipers
1schoir replied to Fluke996's topic in 996 Series (Carrera, Carrera 4, Carrera 4S, Targa)
Doug: Thanks for the kind words. I know exactly what you mean by things getting in line for what gets to be done next. I keep chipping away at my list, and sometimes I actually feel like I'm actually making progress. Regards, Maurice. -
Painting brake calipers
1schoir replied to Fluke996's topic in 996 Series (Carrera, Carrera 4, Carrera 4S, Targa)
Snaray and Blinkwatt: Here is a simplified step by step. Wet sanding is just that, sanding down a surface while using water to carry away the sanding residue. Using that method properly will eliminate the scratch marks that are caused by the sanding residue being rubbed into the surface by dry sandpaper. You can get a small spray or stream of water and have it flow directly over the surface that you are sanding and use special automotive sandpaper made for that purpose (it does not fall apart when wet). For sanding just the clearcoat off, you can start with 400 grit sandpaper and then go over the surface again with 600 grit sandpaper. The 600 should be fine enought to not leave any sanding marks behind. You don't have to remove ALL of the clearcoat paint, so long as you feather out the edges between any remaining clearcoat and the color coat. If you get it right, you should not be able to feel any "step" or ridge between the color coat and the edge of the clear coat that remains and has been feathered out. Before you start to sand, be sure to thoroughly degrease and to clean the surface, preferably with the solvents I mentioned above. Again, if you can't get those, you can use the original Formula 409 because it doesn't leave a residue. THE CLEANING STEP IS THE MOST IMPORTANT STEP FOR A SUCCESSFUL JOB. Also, because of the shape of the calipers (i.e., a surface that is not flat), be VERY careful when sanding near any corners or protrusions because the sandpaper will cut through those spots VERY VERY quickly. If that happens, you may have to respray the color coat, or even worse, the primer and then the color coat. The best way to avoid that is to use a flexible (foam) backer for the sandpaper, but even in that case you must be extremely careful not ot cut through at the corners, etc... Once you have properly prepped the part (cleaned, sanded, and masked), it should be relatively easy to spray on the clear. If you are using a spray can instead of a professional spray gun, it's a little more difficult to control the density, direction and amount of material sprayed out, so you have to be extra careful to apply very light coats. Otherwise, you will get drips or runs. If you do, either wipe off the entire surface with a solvent, or wait until it dries and sand off the drip or runs carefully and respray. Regards, Maurice. -
Pictures of new paint and headlights!
1schoir replied to CJ_Boxster's topic in 986 Series (Boxster, Boxster S)
Carlos: Looks like a nice, professional job. Kudos to you for making lemonade when someone gave you lemons. Now it's time for you to update the photo at the bottom of your posts. Looks good without the amber. Regards, Maurice. -
Beety: Also make sure that your front drain holes are not clogged, which would cause puddles of water to collect and possibly cause some condensation. There are two drain holes, one to the left and one to the right of the battery on the "floor" of that compartment. Those holes get clogged very quickly by leaves and other debris. Regards, Maurice.
-
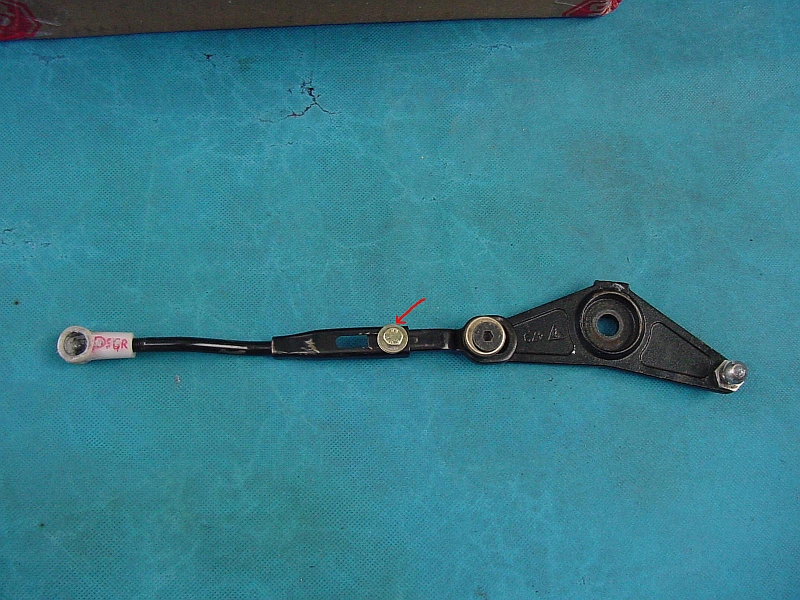
Plastic ball joint
1schoir replied to matthewjamesdunn's topic in 986 Boxster Convertible Top Issues and Solutions
Matt: There has been a lot written on this topic here. The problem with using the metal ball joints is that they may not give way when there is a malfunction with your top mechanism and thereby cause some much greater ($$) damage. Tool pants posted on the topic, along with the name of the person who had made some for sale. I don't know if they are still available Porsche will not sell just the plastic ball joint part, and only makes it available as a part of the larger, more expensive, joint arm. There is a guy, named Martijn Brink (in the Netherlands) who recently had the plastic ball joints duplicated (in black) and he has started selling them on eBay. I bought a few from him and they are exact duplicates (except for being black) and good quality. If you want his e-mail, drop me a PM and I'll send it to you. He is very reputable and accomodating. Regards, Maurice. -
Newbie with lighter and remote issues
1schoir replied to momo187's topic in 986 Series (Boxster, Boxster S)
Momo: The alarm module under the seat DOES have its own fuse. Sometimes just taking it out and putting it back in a few times will correct the problem (cleans the contacts slightly). Regards, Maurice. -
Newbie with lighter and remote issues
1schoir replied to momo187's topic in 986 Series (Boxster, Boxster S)
The size of the lighter socket in the Porsche is a slightly different size than the one that is standard in U.S. cars, so what Jim says makes perfect sense. I think that Sunset Imports sells a socket that can be retrofitted that is the "correct" size. Regards, Maurice.