Welcome to RennTech.org Community, Guest
There are many great features available to you once you register at RennTech.org
You are free to view posts here, but you must log in to reply to existing posts, or to start your own new topic. Like most online communities, there are costs involved to maintain a site like this - so we encourage our members to subscribe or donate. All subscriptions and donations go to the costs operating and maintaining this site. We prefer that guests take part in our community and we offer a lot in return to those willing to join our corner of the Porsche world. This site is 99 percent member supported (less than 1 percent comes from advertising) - so please consider an annual subscription or donation to keep this site running.
Here are some of the features available - once you subscribe RennTech.org
- View Classified Ads
- DIY Tutorials
- Porsche TSB Listings (limited)
- VIN Decoder
- Special Offers
- Paint Codes
- Registry
- Videos System
- View Reviews
- and get rid of this welcome message
It takes just a few minutes to register, and it's quality Porsche information at a low cost.
Contributing Members also get these additional benefits:
(you become a Contributing Member by subscribing or donating money to the operation of this site)
- No ads - advertisements are removed
- Access the Contributors Only Forum
- Contributing Members Only Downloads
- Send attachments with PMs
- All image/file storage limits are substantially increased for all Contributing Members
- Option Codes Lookup
- VIN Option Lookups (limited)


1schoir
-
Posts
2,739 -
Joined
-
Last visited
-
Days Won
9
Content Type
Profiles
Events
Forums
External Paint Colors
Downloads
Tutorials
Links Directory
Collections
Classifieds
Store
Everything posted by 1schoir
-
Revised windstop clips
1schoir replied to Tool Pants's topic in DIY Articles - Boxster (986) - Common Fixes and Repairs
Do you remember what they charged for the ?pair? zlawman: The windstop clips (or "windstop locking levers) are $2.09 each plus shipping, at Pelican Parts, here: http://www.pelicanparts.com/cgi-bin/ksearc...;FILTER_TOOL=ON Most parts are a little cheaper at either Sunset Imports, which I believe is a sponsor of this forum, or Suncoast. To access Sunset Imports, click on "Porsche Parts at Dealer Cost", near the top of this page. Regards, Maurice. -
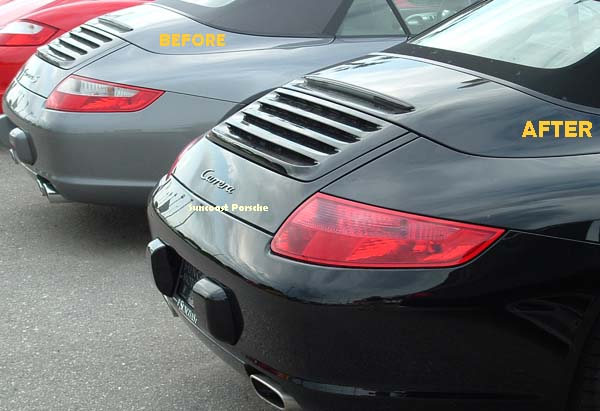
Benny: Here is the before and after photo from Suncoast: Regards, Maurice.

-
O2 Sensors CEL
1schoir replied to SNaray8442's topic in 996 Series (Carrera, Carrera 4, Carrera 4S, Targa)
SNaray: If you have to get the 02 sensors, don't spend the extra money for the "Porsche" part with the Porsche Part number. Get the equivalent Bosch part. Same part, but no Porsche box or part number stamped on it. Porsche does not manufacture 02 sensors, Bosch does. The Bosch part is exactly the same, and has the correct connector. Regards, Maurice. -
Always wanted to build a kit car
1schoir replied to Tool Pants's topic in 986 Series (Boxster, Boxster S)
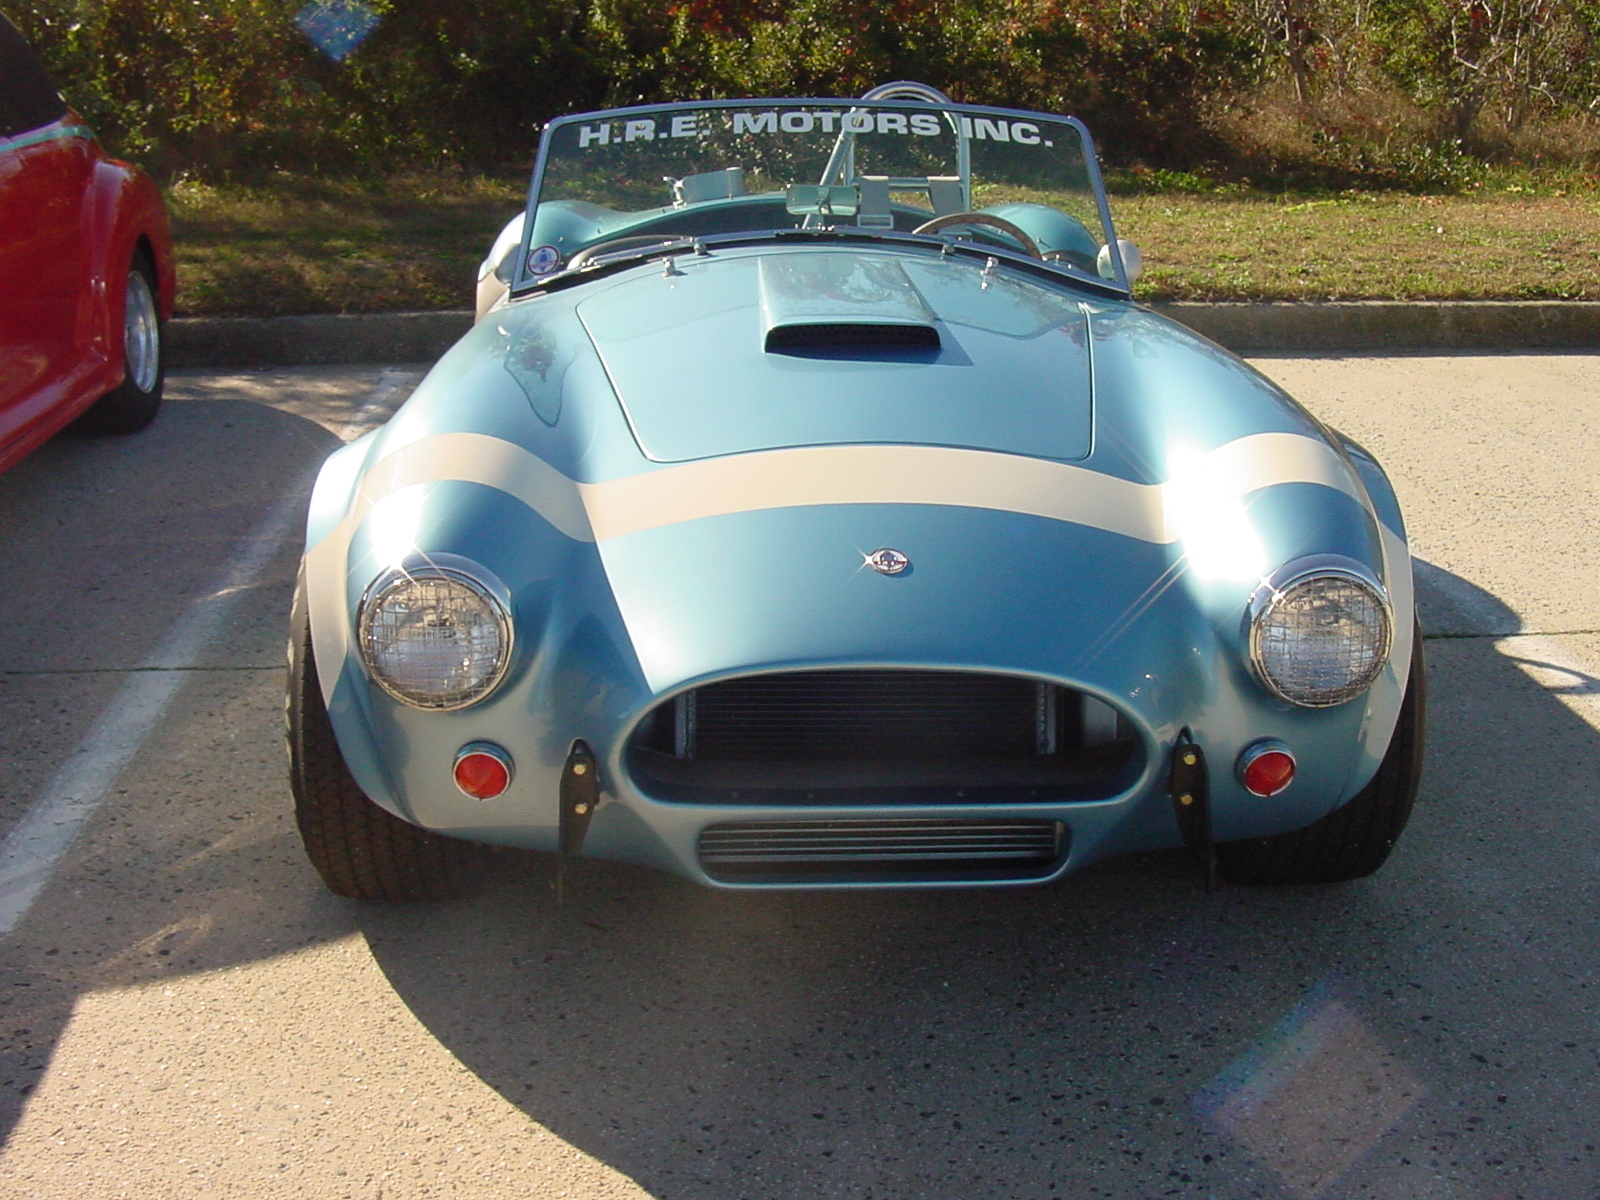
Seafeye: Excellent photos. Thanks for sharing. Here is a photo of an aluminum bodied, "continuation" of the original Shelby Cobras for Djomlas and Rick3000. Owner told me he was into it for a little over $150K so far, and that he had to wait 15 months for delivery of the aluminum body and kit from Shelby. The color is called "Viking Blue." I have more photos if you want to see them, let me know. Regards, Maurice.
-
Rich: There are adjustments that can be made both to get the window to up a little further (or a little less) and to get the window to end up a little further forward to have its front edge end up closer to the front of the car or a little further back to have its rear edge end up closer to the rear of the car when the window is closed. The up down adjustment is relatively uninvolved and the forward to back adjustment is more involved and requires removal of the inner door panel. A few questions: How severe was the damage repaired by the body shop, and did it involve handling/removing/adjusting the convertible top? What position does the window end up in when it is completely raised with the door completely closed in terms of centimeters or fractions of an inch at the forwardmost top edge of the window, and at the rearmost top edge of the window? Is the space even all the way across the top edge of the window, where it meets the rubber of the convertible top frame? Has the passenger's side window been affected at all, or is it even and snug all around on the passenger's side? Also, is your Boxster a 2001 (986) or a 987? Post answers to these questions, or pics and we will go through the proper adjustments, step by step. Regards, Maurice. Maurice, I apologize for the delay in responding, spending time with my daughter. It's a 986 and the damage was purely cosmetic, the result of a sandstorm and other than having to feather the new paint into the doors there was no reason to get near the top. I purchased the car used 14 months ago. The space is not even, the window is actually contacting the hard drip edge of the convertible top at the rear of the drivers door and being restrained from further movement. The passenger window seals fine. The drivers window is chipped along the rear edge, and has been since I purchased the vehicle. I often wondered how that damage might have occurred but now with this present problem I'm thinking this might have happened before. The window catching on the hard drip surface? I'll get some pics posted, just need to grab my digital from my estranged spouse. I'm of the opinion the top has somehow shifted..... Rich: No problem. Spending quality time with your daughter should never be put off. The car can always get fixed later. Pics would definitely be helpful, but in the meantime, some thoughts. Since there was no major bodywork, and since the passenger's side seals fine, it is very unlikely that the top has somehow shifted. If it had shifted, there would likely be some effect showing up on the passenger's side, in the form of some different gap, etc. First, take a look from the inside of the canvas top (should be easy if your Boxster is an early enough year to not have a liner [pre-2000 or 2001, I think]) and look at the two joints (one left and one right) that are on the bow almost directly above the roll bar. The joints are located just before the bow section starts to slope/angle downwards from the horizontal. If the joints aren't tight, you should see some white/beige powdered adhesive residue, as opposed to a tight joint that will be just black and snug. Aside from that, the entire convertible top frame cannot shift unless the three bolts on each side that hold the frame to the top are loose or missing. Rather than looking for those bolts, take a look at how the top lines up side to side by inspecting it at two specific spots: Measure (or eyeball) the distance between where the outside of the base of the B-pillar part of the convertible top and the inside edge of the small parrallelogram-shaped piece of the body meet (just forward of the each forward point of the clamshell, body paint colored with a flat black piece of trim on its innermost edge). Do that on each side and see if the space is the same on the driver's side as on the passenger's side. The B-pillar part of the convertible top that I am referring to is the (flat black) part that ends up mating up with the rear edge of the window when the window is fully raised. At its widest part, near the body of the car is where you measure. Then, look where the front edge of the convertible top meets the windshield frame and measure (or eyeball) how the "drip edge" (flat black) on each side of the convertible top canvas meets up with the slanted (not quite vertical) rubber gasket that runs up from each side of the base of the windshield frame to the top of the windshield frame. If those two pieces (the drip edge and the rubber gasket) are lined up (i.e., on the same plane along the side of the window) AND the passenger's side and driver's side have the same spacing, then your top has again not likely shifted. It is more likely that the glass part of the window may have shifted in the two clamping pieces of the window regulator that hold the glass in place. Do you know if the window regulator has ever been replaced in the driver's side door? How much mileage on the car? The reason I ask is because you mentioned the window is chipped along the rear edge. That may have happened if someone replaced the window regulator (which requires removal of the glass from the clamping pieces of the old regulator) and did not insure that the glass was exactly relocated on the new regulator's clamping pieces. Take a look at the six spots mentioned above (joint on bow above the roll bar, space at base of B-pillar, alignment where the side of the canvas top meets the windshield frame ), and report back. If you get pics, it will be easy to determine where the adjustments have to be made. Again, from what you describe, it's likely fixable without too much difficulty. Regards, Maurice.
-
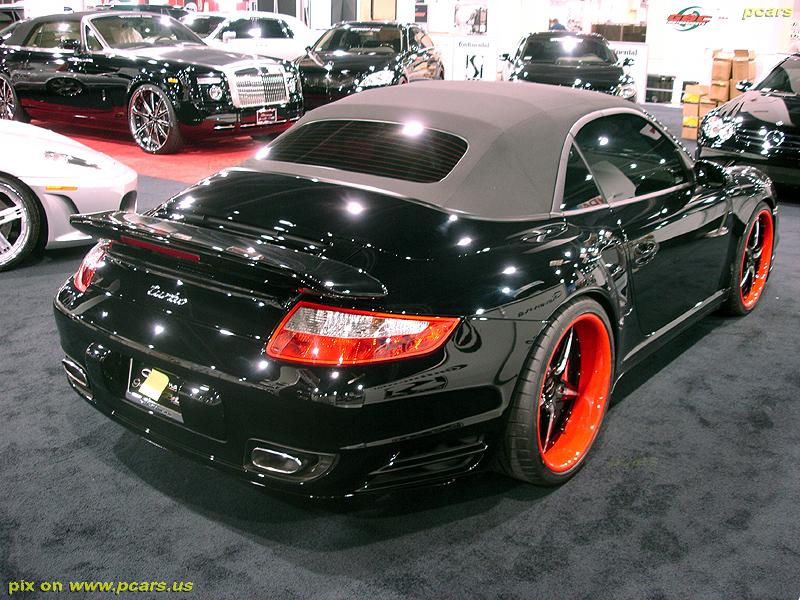
Camores: Nice choice of colors for the wheels. The photo with that color combination gives the car a more "updated" look. The trend in rims lately seems to be towards black or body-color painted rims. On the other topic, there is nothing like a 2002 for zipping around and throwing into corners. Regards, Maurice.
-
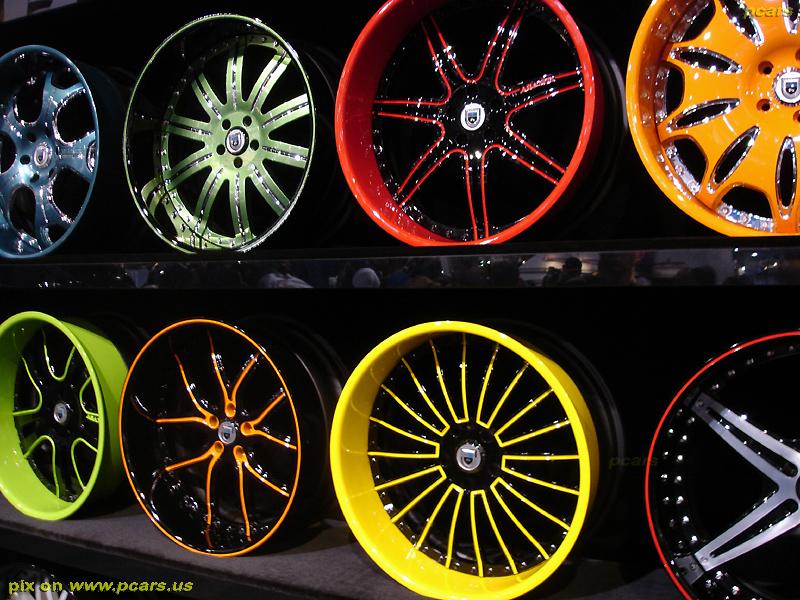
Camores: Found a couple of painted rims photos. Check them out. Most are a little too garish for my taste, but I note that in the photo with the multiple wheels, the bottom right corner wheel is similar to stock rims I saw on a red Cayenne S last week. Regards, Maurice.
-
Window has a mind of it's own
1schoir replied to 2Fast996's topic in 996 Series (Carrera, Carrera 4, Carrera 4S, Targa)
i am having almost the same exact problem. however, my window made a grinding noise as it was being raised and lowered. i had to try about six times to get it to close. kind of disappointing with only 6k miles on the clock. taking it to the shop today. i'll let you know what they say. typhon Typhon: In your case, it sounds like your regulator cable fraying, rather that the outer sheath crumpling. Kind of surprising with only 6K miles, though. Keep us posted. Regards, Maurice. got it back today. regulator was toast. new one cost me $198 labor $259.67 for the regulator. works like a champ. typhon Typhon: Thanks for the update. Regards, Maurice. -
Cigarette Lighter Diameter Question
1schoir replied to tah's topic in 986 Series (Boxster, Boxster S)
Got the parts from Sunset today. Just to be clear, the lighter/switch panel simply pulls out from the dash? I've got plastic pry tools but sure don't feel like breaking anything. Thanks. TAH: The lighter/switch panel simply pulls straight out. It just takes some force. Try to put one of the plastic pry tools in from just below the top left corner of the the lighter/switch panel and complete the pull with your fingers once you get some daylight there. When I did it that way, I then pulled the top right side out and then wiggled the whole bottom part (where the lighter is) off by rocking it a little back and forth. There are no tricky tabs on this one, like the one in the inner door handle surround. Regards, Maurice. -
Camores: Nice father! I still have a set of the basket weave gold BBS rims with a polished lip on my '71 BMW 2002. It's the only car I ever bought new, and I still have it. The car is Agave Green (sort of a not too dark green with a bluish tinge) and the contrast between the green of the car and the gold on the wheels looks excellent. Don't know anything about the history behind Arena Red, but someone else here probably does. Let me know if Djomlas does anything with his photoshop, I'd like to see the results. I don't want to bombard him with requests. Regards, Maurice.
-
Rich: There are adjustments that can be made both to get the window to up a little further (or a little less) and to get the window to end up a little further forward to have its front edge end up closer to the front of the car or a little further back to have its rear edge end up closer to the rear of the car when the window is closed. The up down adjustment is relatively uninvolved and the forward to back adjustment is more involved and requires removal of the inner door panel. A few questions: How severe was the damage repaired by the body shop, and did it involve handling/removing/adjusting the convertible top? What position does the window end up in when it is completely raised with the door completely closed in terms of centimeters or fractions of an inch at the forwardmost top edge of the window, and at the rearmost top edge of the window? Is the space even all the way across the top edge of the window, where it meets the rubber of the convertible top frame? Has the passenger's side window been affected at all, or is it even and snug all around on the passenger's side? Also, is your Boxster a 2001 (986) or a 987? Post answers to these questions, or pics and we will go through the proper adjustments, step by step. Regards, Maurice.
-
White987S: That is precisely what I have been wishing for, but I'm not "with it" when it comes to these programs. Anymore details on Photoshop? Is the program expensive or difficult to learn to use? Regards, Maurice.
-
Camores: I have the same rims on my MY97 Ocean Blue Metallic Boxster, and I have had the same thoughts about re-painting my wheels, which have some scuffs and scratches on the original finish. I have been tossing around the idea of painting the center of the rims in Ocean Blue, and making the outer lip (about 1" wide) in the original silver, or doing the center in blue and "fading" to the silver lip. Can't decide between that and redoing the rims as they were originally, but I am leaning on the color solution. I might try one rim with the two different schemes and see which one appeals to me more but won't get to it for a while. If you paint yours first, please post photos and details on materials. Regards, Maurice.
-
Convertible Rear Window Delamination
1schoir replied to flat6's topic in 996 Series (Carrera, Carrera 4, Carrera 4S, Targa)
Flat6: Forum member "juniinc" replaced his vinyl window on his 986 without removing the canvas top and now sells "kits" to replace the windows in Boxsters and 991's. The kit apparently contains instructions. Maybe you can get a hold of one of those instruction sheets to put in your factory vinyl replacement window. Here is his link: http://www.renntech.org/forums/index.php?s...c=16778&hl= There has also been a lot of discussion on the ease (10-15mins and about 6 bolts) of removing the entire top, with the mechanism, to do the vinyl window install. I recall that the discussions revolved around a Boxster top, not 911, so it may be a different story there. I think they (the kits) are also available on eBay from juniinc and from another seller. Regards, Maurice. -
is there a way to re-index a working window?
1schoir replied to stumpjumper's topic in 986 Series (Boxster, Boxster S)
Stump: Way to go! Regards, Maurice. -
Carlos: For what it's worth, legally they have an obligation to tell you that you can choose your shop, although they try to steer you to the shops they have on their list. Generally, if you know and trust a good body shop, you are much better off going there. The ones that are on their "approved" list have to be in bed with the insurance company to some degree, or they risk being taken off the list and thereby losing a source of cars to be repaired. PM me and I will give you more info if you need it. Regards, Maurice.
-
Carlos: What a bummer! The one piece of advice I can give you is as follows. Do not try to adjust the claim directly with the insurance company yourself. The biggest favor that you can do yourself is to take your car to a body shop that you trust (not the one the insurance company might try to recommend) and make sure that the insurance company sees the car AT THE BODY SHOP. Not at your house or at their claims center! Most reputable body shops have relationships that they cultivate with the individual claims adjusters that come to their shops on a regular basis. Having the adjuster see the car at the body shop and deal directly with the body shop guy will get you the best result. Tell the body shop guy the type of repair you hope to get and let him go to bat for you. Especially in this kind of repair, the body shop stands to earn more from a job that is properly done, rather than just touched up, and that will be to your ultimate benefit. It's a little more inconvenient to take the car to the body shop and leave it there for the adjuster to see, but it's well worth the inconvenience. Don't forget, you (more than anyone else) will be looking at the repaired area with a critical eye every time you approach your car or are working on something in that area. It will be a constant annoyance to you if you don't get it done right. Regards, Maurice.
-
Seat height strut / piston broken?
1schoir replied to spen's topic in 986 Series (Boxster, Boxster S)
Spen: Do not pull the seat out until AFTER you have pulled the key out of the iginition and disconnected the battery. Wait at least one minute and then proceed. If you don't disconnect the battery and then disconnect the 8 pin connector under the seat, you will get the dreaded airbag light. Then it can only be reset with a Durametric, PST2 or PIWIS. Regards, Maurice. -
Carlos: Just measured 61.3 cm from center of bolt to center of nut. Same on left and right. Mine's a 1997 Boxster, all stock. Regards, Maurice. THANK YOU SO MUCH!!!!!!!!!!!!!!!!!!!!!! You dont know how much this helps me! BTY when you measured, was the car jacked up from the side with the rear wheel in the air or were the wheels on the ground when you measured? Reason i ask is cause the pivoting action of the arm could mean that if you measured while the wheel was suspended in the air, the distance of 61.3 cm will increase maybe .2 or .7 more cm from when wheel is on the ground cause the bear cartridge will pivot away slightly from the rear bolt when grounded. Carlos: Sorry, I should have specified it more clearly. Each rear wheel was in the air in turn when I measured. I first jacked up at the rear jacking point, as high as my floor jack would go and measured the left (drivers' side) rear ontrol arm. I did see what you are talking about the pivoting, but that was at the front bolt point. I then lowered the car and did the same on the right (passenger's side). If you need measurements with both rear wheels rolled up onto ramps, let me know. Regards, Maurice.
-
Hard to predict. Sometimes it will stay fixed, other times you may have to whack it again, and at other times no amount of whacking will get it to work again. New one is about $75 at Sunset. Part # is 986-618-111-02. Regards, Maurice.
-
Driver Door Glass Strange Behavior.........
1schoir replied to tah's topic in 986 Series (Boxster, Boxster S)
TAH: Excellent work! Thanks for giving us the update. Regards, Maurice. -
SmartTop relay is not likely to fix this problem, unless the underlying problem is wholly due to a defective convertible top control module (top relay, located in the driver's side kick panel, in the relay tray above the fuse panel). The roof button is a possibility, but not likely if you are hearing a slight click in the back and, the roof light ("top open" idiot light in dashboard) is the first sign that the button has been pressed. That light goes on simultaneously with your pressing of the button. Start by checking your two fuses, located in the fuse panel (again, left footwell) at positions B6 and D3. Also, pull out the convertible top control module (it's the only double relay in the location described above, third row from the bottom [bottom row is empty of relays] second from the right). Tap the relay on a flat, hard surface a couple of times (like people used to tap their packs of cigarettes in the old days) and re-install it. Aslos, pull the relay on and off a couple of times, that sometimes cleans off enough corrosion on the connecting spades to make a connection. See if that yields any results. Since your windows come down when you open the latch, the microswitch contained in the latch assembly is most likely okay also. If your two fuses are okay, look at the V-levers (behind and lower than the base of the B-pillars to see if you have any movement at all(clockwise or counterclockwise) when you press the button. Once you have checked the above, report back and we will go to the next steps, which will involve the cables, the convertible top motor and the transmissions. (BTW, as far as engine replacement being connected with this problem, the only connection that would be logically related would involve fuses or corrosion of terminals, depending on how long the car was laid up, and in what environment). Regards, Maurice.
-
Carlos: Just measured 61.3 cm from center of bolt to center of nut. Same on left and right. Mine's a 1997 Boxster, all stock. Regards, Maurice.
-
Rear Wheel Bearing 102
1schoir replied to seafeye's topic in DIY Articles - Boxster (986) - Common Fixes and Repairs
Seafeye: Excellent write up and great photos. Thanks for going to the trouble of writing it all up. It will give lots of us the extra little push to do the DYI. Regards, Maurice. -
is there a way to re-index a working window?
1schoir replied to stumpjumper's topic in 986 Series (Boxster, Boxster S)
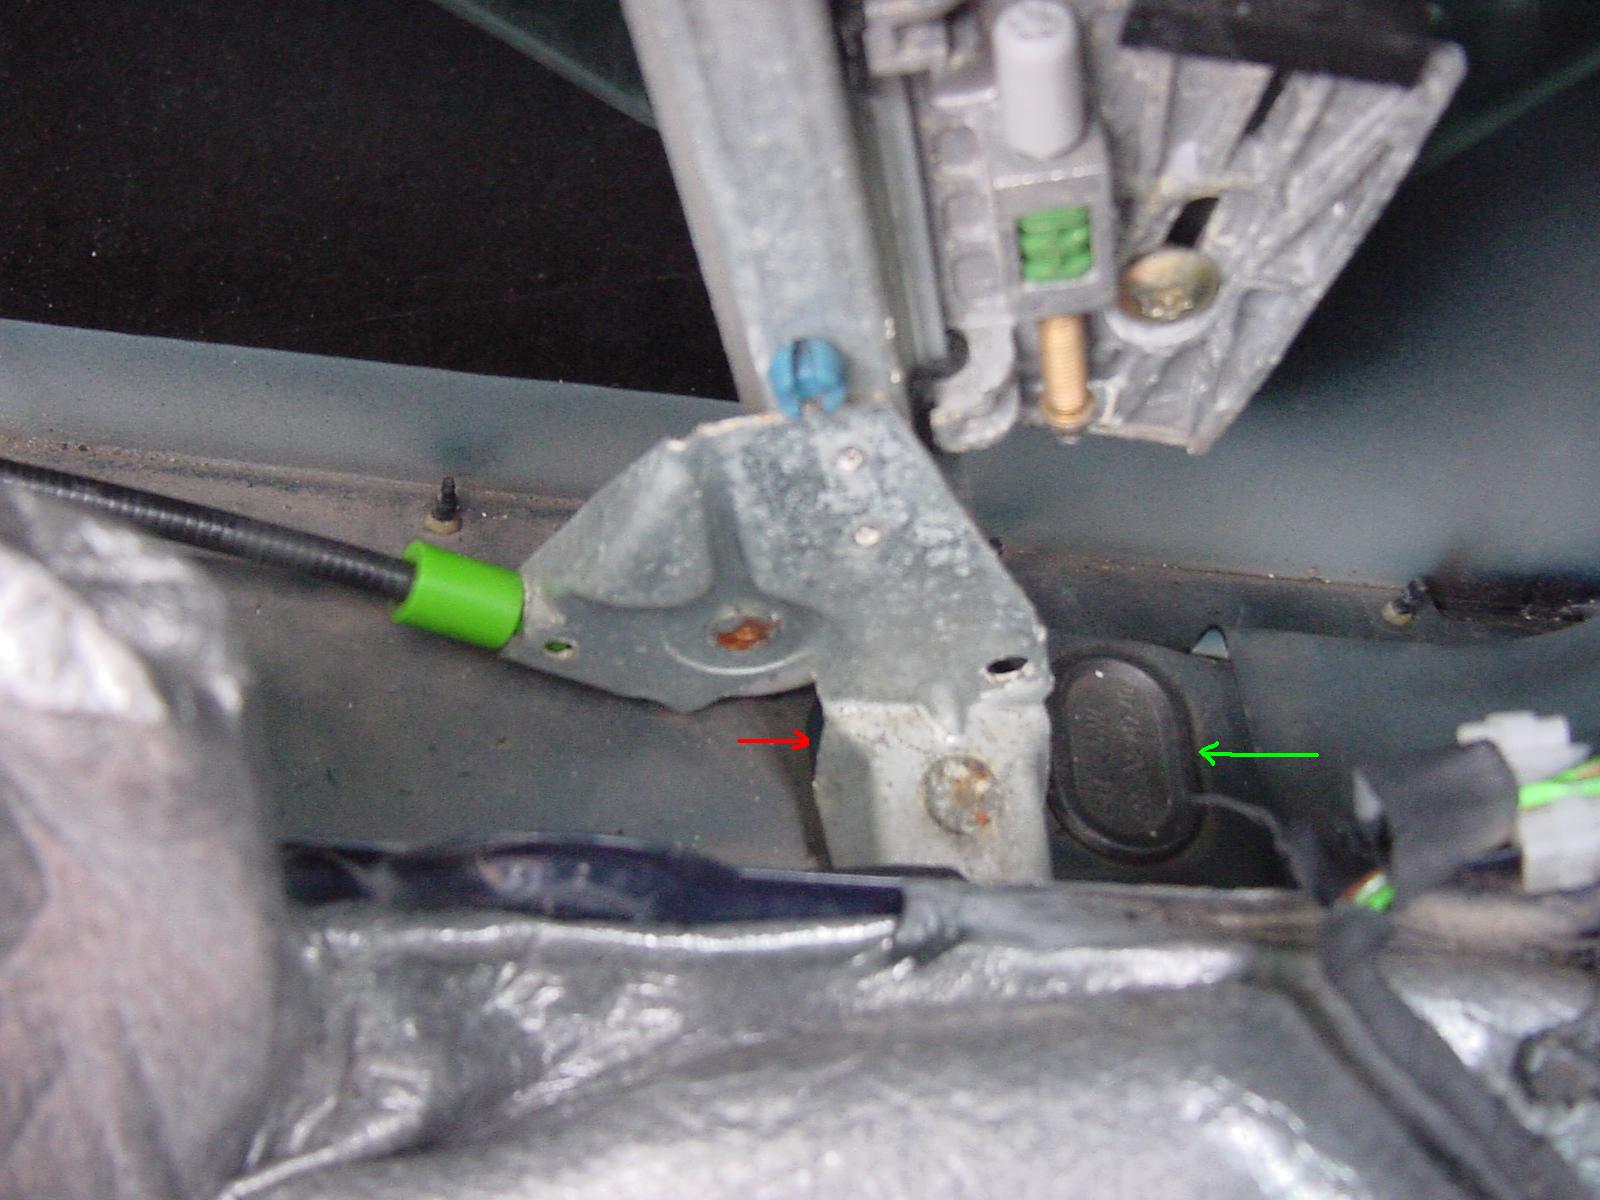
Stump: It is relatively easy. Just make sure you pull out the correct access plugs. Here's a photo of the foot of the forwardmost leg which shows the correct (OUTBOARD) plug that will give you access to the forwardmost adjustment screw (green arrow). The other plug (which is used to remove the nut that fastens the leg of the window regulator) is a little further inboard towards the car and has a red arrow pointing to the edge of it. If you can't see it clearly in this size photo, double click on the photo and you'll get the full size with all the detail. If you are patient, you can make your Boxster waterproof again and very quiet. Good luck! Regards, Maurice.