Welcome to RennTech.org Community, Guest
There are many great features available to you once you register at RennTech.org
You are free to view posts here, but you must log in to reply to existing posts, or to start your own new topic. Like most online communities, there are costs involved to maintain a site like this - so we encourage our members to subscribe or donate. All subscriptions and donations go to the costs operating and maintaining this site. We prefer that guests take part in our community and we offer a lot in return to those willing to join our corner of the Porsche world. This site is 99 percent member supported (less than 1 percent comes from advertising) - so please consider an annual subscription or donation to keep this site running.
Here are some of the features available - once you subscribe RennTech.org
- View Classified Ads
- DIY Tutorials
- Porsche TSB Listings (limited)
- VIN Decoder
- Special Offers
- Paint Codes
- Registry
- Videos System
- View Reviews
- and get rid of this welcome message
It takes just a few minutes to register, and it's quality Porsche information at a low cost.
Contributing Members also get these additional benefits:
(you become a Contributing Member by subscribing or donating money to the operation of this site)
- No ads - advertisements are removed
- Access the Contributors Only Forum
- Contributing Members Only Downloads
- Send attachments with PMs
- All image/file storage limits are substantially increased for all Contributing Members
- Option Codes Lookup
- VIN Option Lookups (limited)


1schoir
-
Posts
2,739 -
Joined
-
Last visited
-
Days Won
9
Content Type
Profiles
Events
Forums
Exterior Paint Colors
Downloads
Tutorials
Links Directory
Collections
Classifieds
Store
Everything posted by 1schoir
-
First check to make sure that there are no foreign objects obstructing the frame of the folded down roof. Next, disconnect the front pushrod and the rear pushrod on that side and see if you can press the convertible top frame and clamshell down to the proper position (when the top is folded down). If it does press down into the proper position, you will have to re-synchronize the V-levers by operating the passenger side (right side) drive cable with a cordless drill so that both sides of the clamshell close equally. Sometimes it's a matter of balancing the position of the left and right sides of the clamshell so that you get the best overall result on the clamshell whether the top is up or down. Regards, Maurice.
-
The two problems are unrelated. There is no adjustment to the latch, but you can insert a small spacer and attach it to the end of the latch hook so that it depresses the plunger-type microswitch in the latch a little more. If that does not solve your problem, you will have to repair or replace the microswitch. The microswitch is one of two inside the latch receptacle assembly and its plastic part deforms over time. You can sometimes put a heat gun on the plastic part of the microswitch to bend it back into the correct shape, otherwise you have to replace it. Removal and replacement has been covered here before, but it's pretty straightforward. As Thom pointed out, you have to isolate the "sluggish" window problem to determine whether you are getting the same result on both sides. My guess is that it is only happening on the driver's side and most probably your window regulator assembly is faulty. Either the steel cable in the regulator has streched or is "unwinding" itself (individual cables fraying) or one of the small plastic parts through which it travels has split or broken off. A good test for the regulator is to put the window all the way up and then try to manually apply pressure to the top of the glass. The window should not move at all. If you can push it down, even one half inch, then your regulator must be repaired or replaced. A poster on 986forum.com managed to devise a repair which involves using a bicycle brake adjuster, and that has been a solid repair for a number of years for him. I posted photos of his repair previously here about two (?) years ago. If I find the link, I'll post it. Regards, Maurice.
-
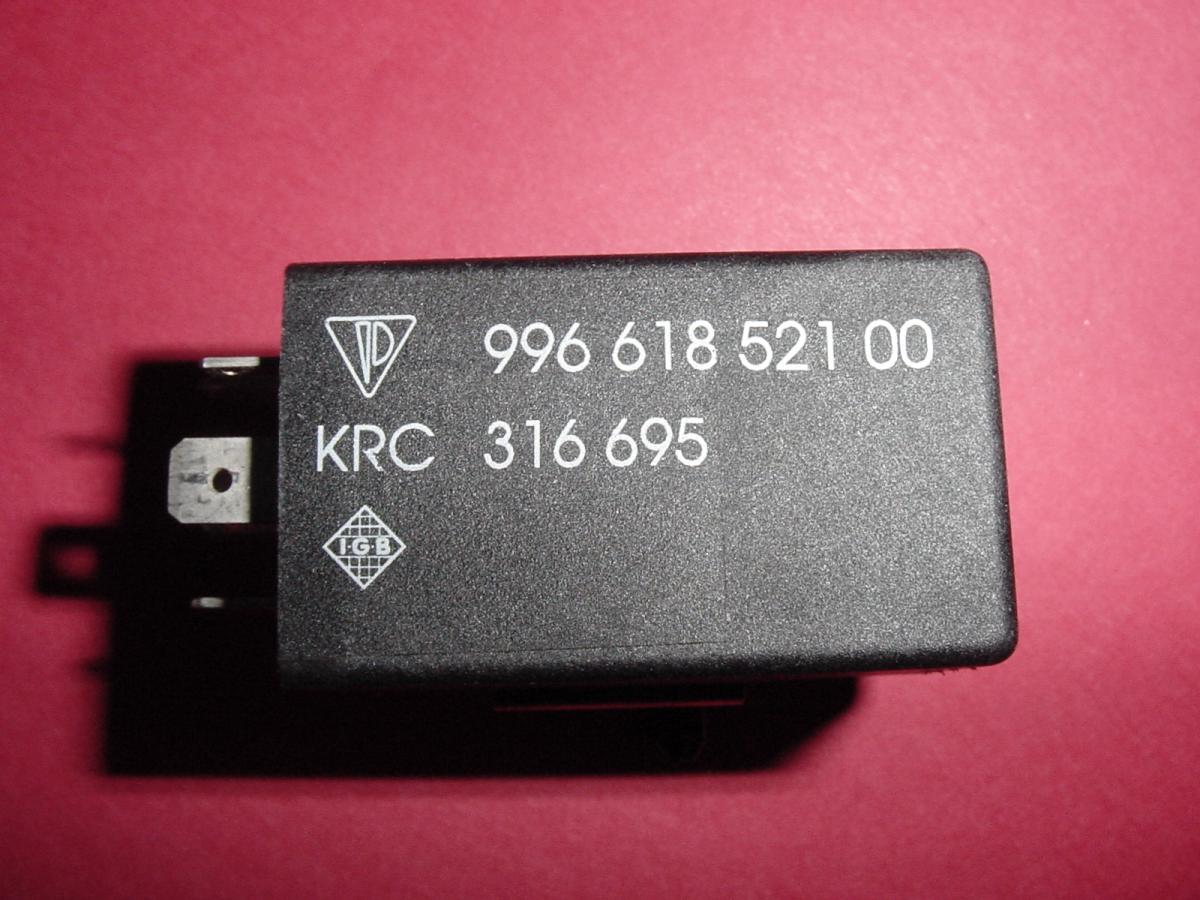
Dan: You don't have to remove the seat completely. You can just unbolt the four bolts holding the seat rails to the floorpan and then just TILT the seat back. That will expose the underside of the seat and give you enough access to get at the relay. Note that if you pull the seat out and disconnect the wiring harness, you will set off the airbag light which then can only be reset with a PST2, PIWIS or Durametric. Here are photos of what the relay looks like, and how it looks under the seat (this is from a Boxster, so yours may be a little different): Regards, Maurice.

-
Then that is the most likely source of the trouble. If you can get your hands on a PST2, PIWIS, or Durametric, read the code. The seat belt buckle codes are 44, 45, 46, or 50 Drivers side and/or 47, 48, 49, or 51 Passenger side. (These codes are for a Boxster, not sure whether the codes are identical for 911's. Regards, Maurice.
-
Good to hear that you made it that far without drama! Although the repair is a little challenging, it is straightforward and just requires some perseverance and patience. Let us know how it goes. Regards, Maurice.
-
:thumbup: Regards, Maurice.
-
Banged up quarter panel : (
1schoir replied to Badbull's topic in 997-1 Series (Carrera, Carrera 4, Carrera 2S, Carrera 4S)
You can tell them I sent you (I'm their attorney ;) ). Regards, Maurice. -
Roger: Congratulations on your new acquisition and welcome to the forum! :welcome: The most likely reason that your clamshell will not go up now is because when you removed the top and frame assembly, the B-Pillar microswitch (only in 1997 to 1999 Boxsters) is no longer being activated. The double relay (in the relay tray above the driver's side kick panel) causes the electric motor to reverse direction when it gets the appropriate signal from the B-Pillar microswitch. Make sure that you have re-installed and connected the B-Pillar microswitch and that it is opening and closing at the appropriate time in the closing cycle of the convertible top frame. That frame's B-Pillar on the driver's side, is what depresses and releases the microswitch. Regards, Maurice.
-
To further confirm your diagnosis of a bad AOS, try to remove the oil fill cap while the engine is idling. If the AOS is bad, the oil fill cap will be hard to remove because it is under excessive vacuum. If the AOS is in good shape, you should be able to remove the cap without much resistance. Also check the throttle body to see if there is a heavy coating of oil. A very slight coating is normal. If it is the AOS, do not drive the car as you could cause considerable damage if oil is then sucked into the combustion chamber and then cylinders because the pistons cannot compress the liquid (i.e., the oil). Regards, Maurice.
-
Banged up quarter panel : (
1schoir replied to Badbull's topic in 997-1 Series (Carrera, Carrera 4, Carrera 2S, Carrera 4S)
Performance Auto Bod y on Long Island (Bellmore, NY) does excellent work and stands behind their work. Especially helpful when it comes to a perfect color match (although your car is black, so that is not as crucial). From personal experience, I can also tell you that they are very good at dealing with insurance companies. Regards, Maurice. -
For this particular fix (as detailed in rsfeller's excellent DIY), there is no need to remove the dashboard. All the access you need is provided from outside of the car, just in front of the base of the windshield. You have to pull out the heater core, but that is a very straightforward job which is also detailed in the Bentley manual. If your foam keeps deteriorating, you may eventually lose enough of it to make the a/c (and heat) less than what you require. I venture to guess that a dealer's charge for this repair would exceed $1000, easily. It would take you about 3 or 4 hours to do the repair yourself, if you eventually need to do it. Regards, Maurice.
-
It will work pretty well, but not as well as when the foam seals are intact. With the pieces of foam breaking off, you don't get as good a seal. It's similar to leaky joints in air conditioning ductwork in terms of the effect. Some of the conditioned air "escapes", rather than gets directed 100% through whichever mode of venting that you select. The rest of the A/C function (i.e., how cold it makes the air that is produced when the compressor is on) is unaffected. Regards, Maurice.
-
The link above is outdated. Here is a current link to the procedure for rectifying the problem: http://www.renntech.org/forums/index.php/tutorials/article/121-fixed-my-lack-of-heat-problem-here-is-the-procedure/ Regards, Maurice.
-
Part Number for AOS seal for AOS to engine block.
1schoir replied to suburban99's topic in 986 Series Part Number Requests
No, you are not supposed to use sealant. There is a grease lubricant that Porsche sold especially for this purpose. It's called "syntheso gelp grease" (part # 00004320468) and it used to be shown in the same parts diagram that showed an exploded view of the AOS. For some reason that tube of grease is no longer shown there. It was a 50 gram tube. I bought a tube when I did my AOS, and did an AOS for about 4 friends. I now have enough left over to do about 500 cars. :eek: I think that any rubber grease that does not attack rubber will serve the same purpose. Regards, Maurice. -
Part Number for AOS seal for AOS to engine block.
1schoir replied to suburban99's topic in 986 Series Part Number Requests
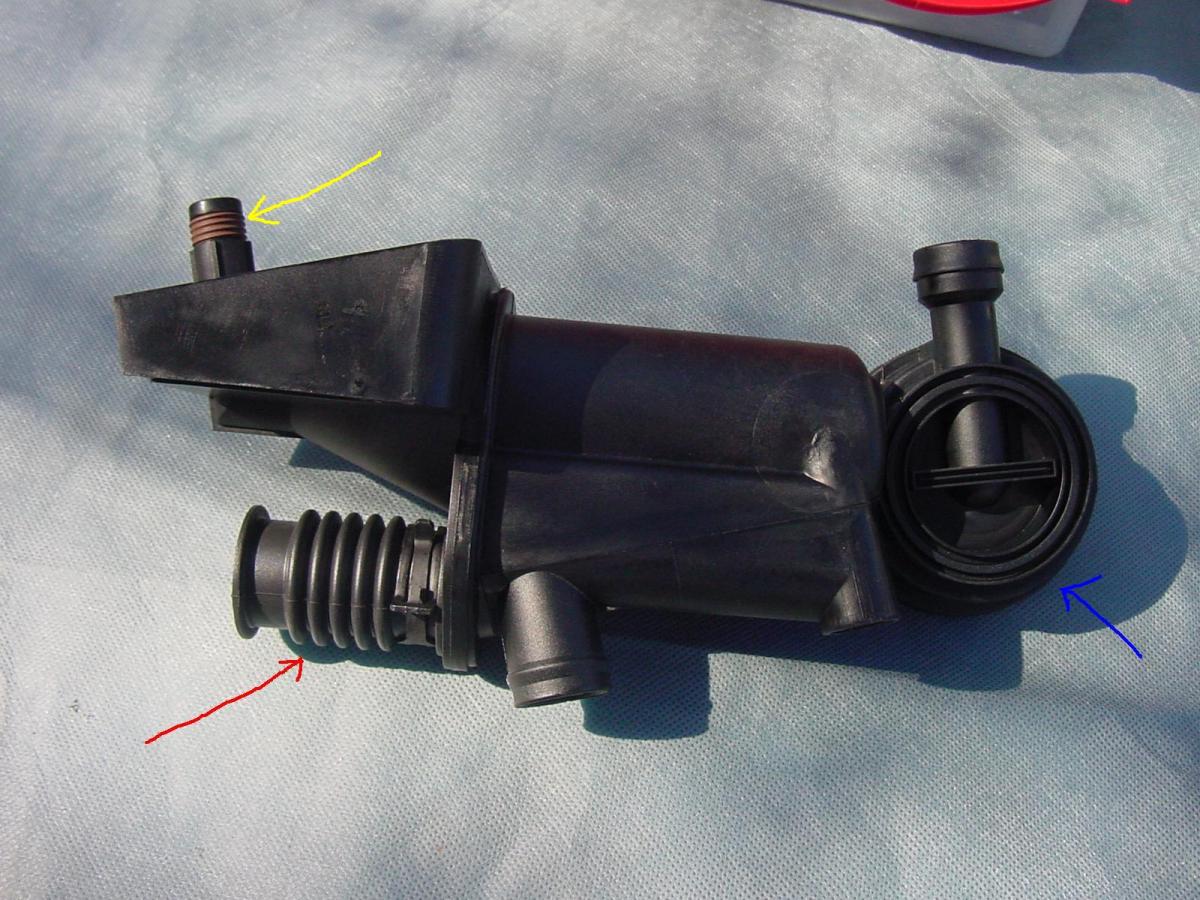
I think that the early Boxsters (97 & 98) had the AOS with the round part that is on top situated horizontally. In 1999, they "updated" the design and the AOS now sported the round part in a vertical position. AFAIK, you can only buy the "new" version AOS and that may be why the AOS is (perhaps mistakenly) listed as being from '99 on in the parts list. If the new one you purchased has the round part in a vertical position, it's the correct one. Here is a photo, with a blue arrow pointing to the "round part" to which I am referring: The part for which you asked the part number has a yellow arrow pointing to it. Regards, Maurice.
-
Part Number for AOS seal for AOS to engine block.
1schoir replied to suburban99's topic in 986 Series Part Number Requests
The part number for 986's after 1999 is 996.107.122.00, costs about $4.00. Regards, Maurice. -
:cheers: ! Regards, Maurice.
-
Is A123 the same company that just filed for bankruptcy and is being bought out by a Chinese company? If that's the case, it may be difficult to get warranty coverage if it's needed. Regards, Maurice.
-
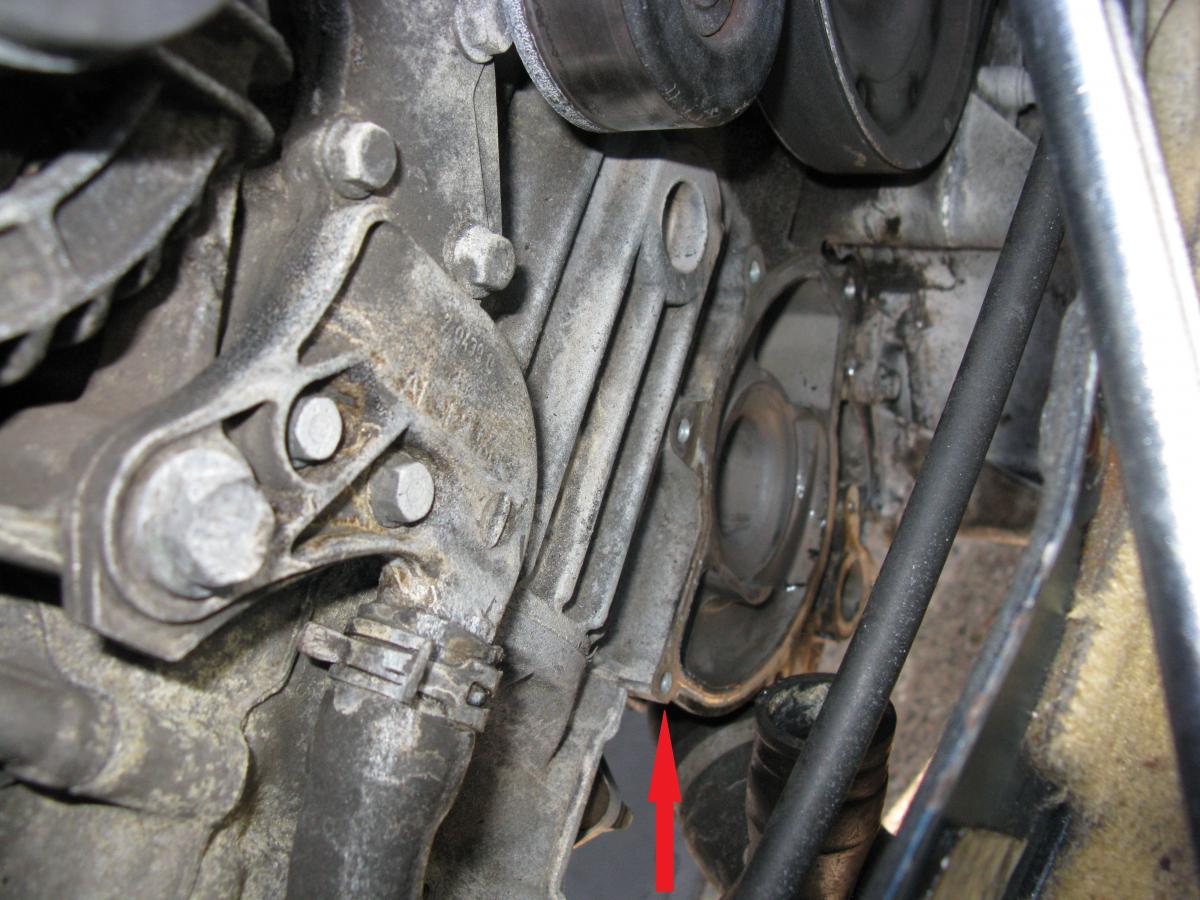
Two thoughts: 1. By removing the water pump, you may find that there is enough of the bolt left to clamp on a Vise-Grip which will then allow you to unbolt the stud. If that is the case, I would first apply some PB Blaster liberally and let it soak for a good while, then use a torch to heat up the surrounding case before attempting to unscrew the bolt. 2. If there isn't enough of the bolt sticking out, you may still be able to drill it out without dropping the engine. The red arrow points to the hole in which your bolt is broken. If you loosen or unbolt the front engine mount you can jack up the face of the engine closest to the front such that it will rotate up enough to get you a straight shot to use a drill comfortably. You may have to loosen the transmission mounts, but if just that side of the engine goes up, it will angle up enough. You may also have to remove the top engine cover before jacking up the end of the motor. If you don't do it, your mechanic should be able to use that same method with the car up on a lift. Regards, Maurice.
-
It's difficult to tell from the angle of the photograph, but is it possible to get access to that broken stud with a drill? If so, although it's precise work, it's not difficult to drill into the center of the stud and remove it. First step would be to remove the water pump. Regards, Maurice.
-
Convertible top question
1schoir replied to venturawildes's topic in 996 Series (Carrera, Carrera 4, Carrera 4S, Targa)
If it's identical to the front of the canvas top on a 986, it's only a matter of a few screws and peeling back ("un-glueing") the canvas up to that point. On the DIY for the 986 top that you will find at this link, it's only up to step #4: https://sites.google.com/site/mikefocke2/replacingthetop-adiy Take a look at the photos and instructions there and compare the setup with that of your 996 and see if it's the same. If so, it will only take about 1 hour to get that far, and a little longer to put it back together. BTW, if you take it apart that far and find that the cable is broken and can't be repaired, you should be able to pull out the inner metal cable (after unscrewing the screw at the B-Pillar end) and replace it with a new one. You will probably have to use a rivet to attach the little spring to the aluminum shoulder plate. Regards, Maurice. -
Convertible top question
1schoir replied to venturawildes's topic in 996 Series (Carrera, Carrera 4, Carrera 4S, Targa)
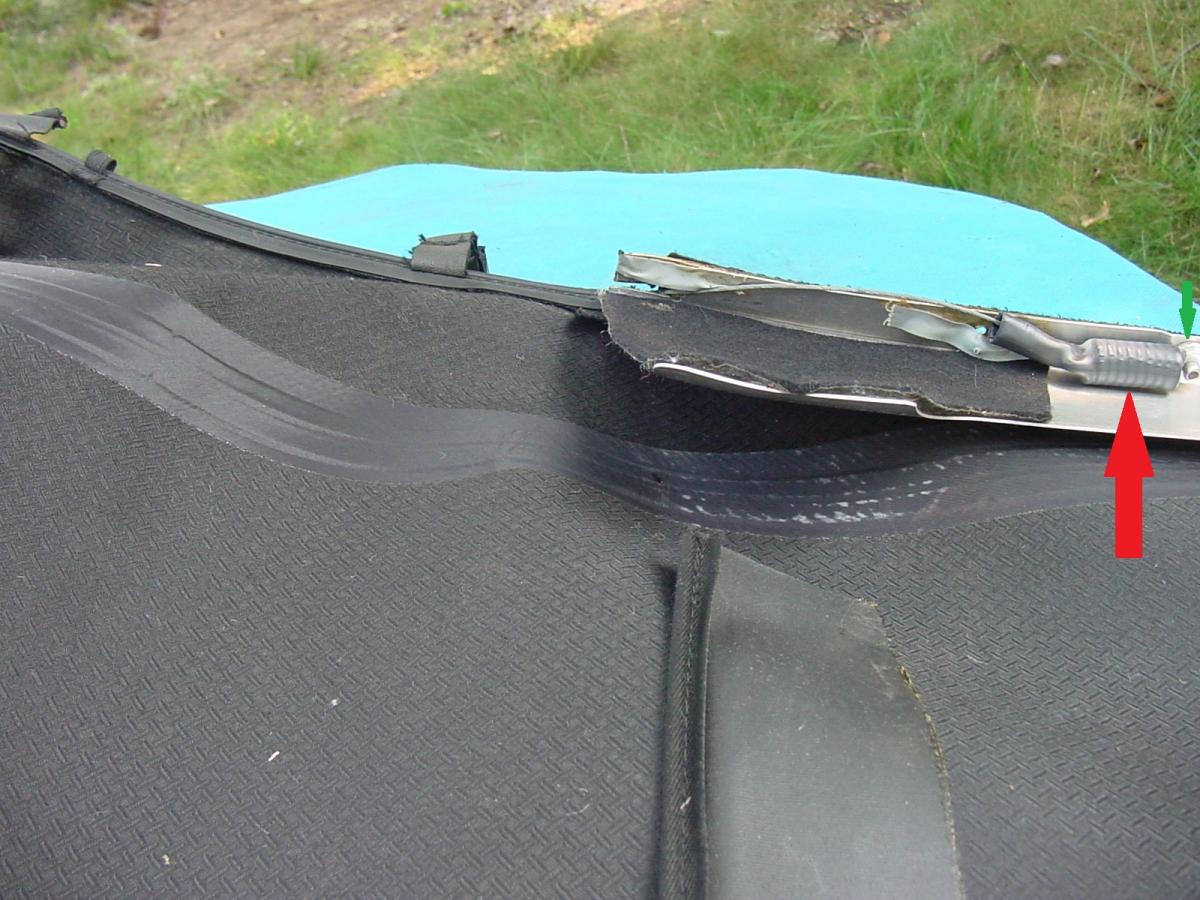
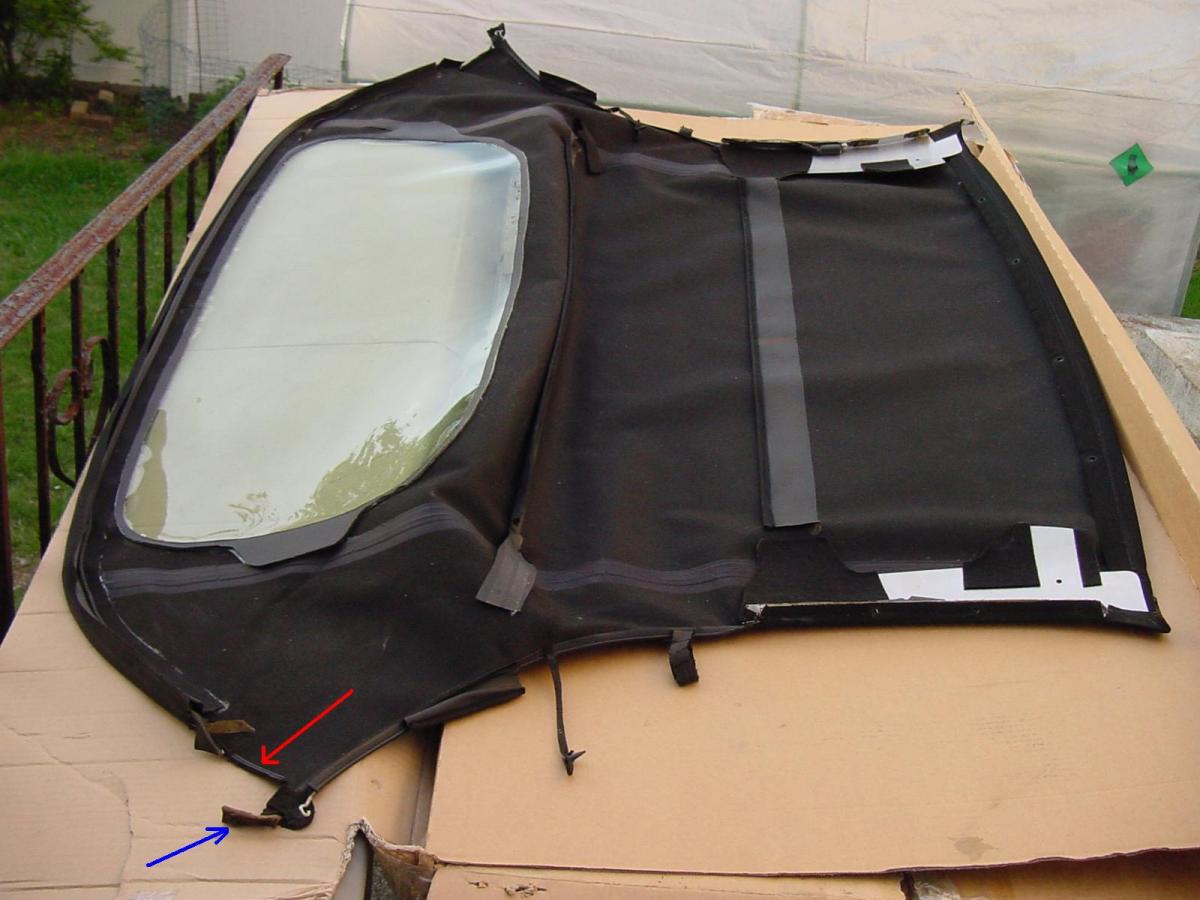
Here is a photo of the setup with the aluminum shoulder plate and the spring holding the forward end of the cable (note that these photos are from a 986, but the setup is similar for 911's): The red arrow is pointing to the spring (which is covered by factory heat-shrink tubing to prevent squeaking), and the small green arrow shows the point on the aluminum shoulder plate where the spring is anchored. . . The other end of the cable can be seen in this photo and you can also see where the aluminum shoulder plates are located relative to the rest of the canvas top: (The end of the cable is near the red and blue arrows) Regards, Maurice.
-
15% Ethanol Will Damage Your Classic Porsche
1schoir replied to Ag_Boxster's topic in 911, 912 Series
Signed today. Regards, Maurice. -
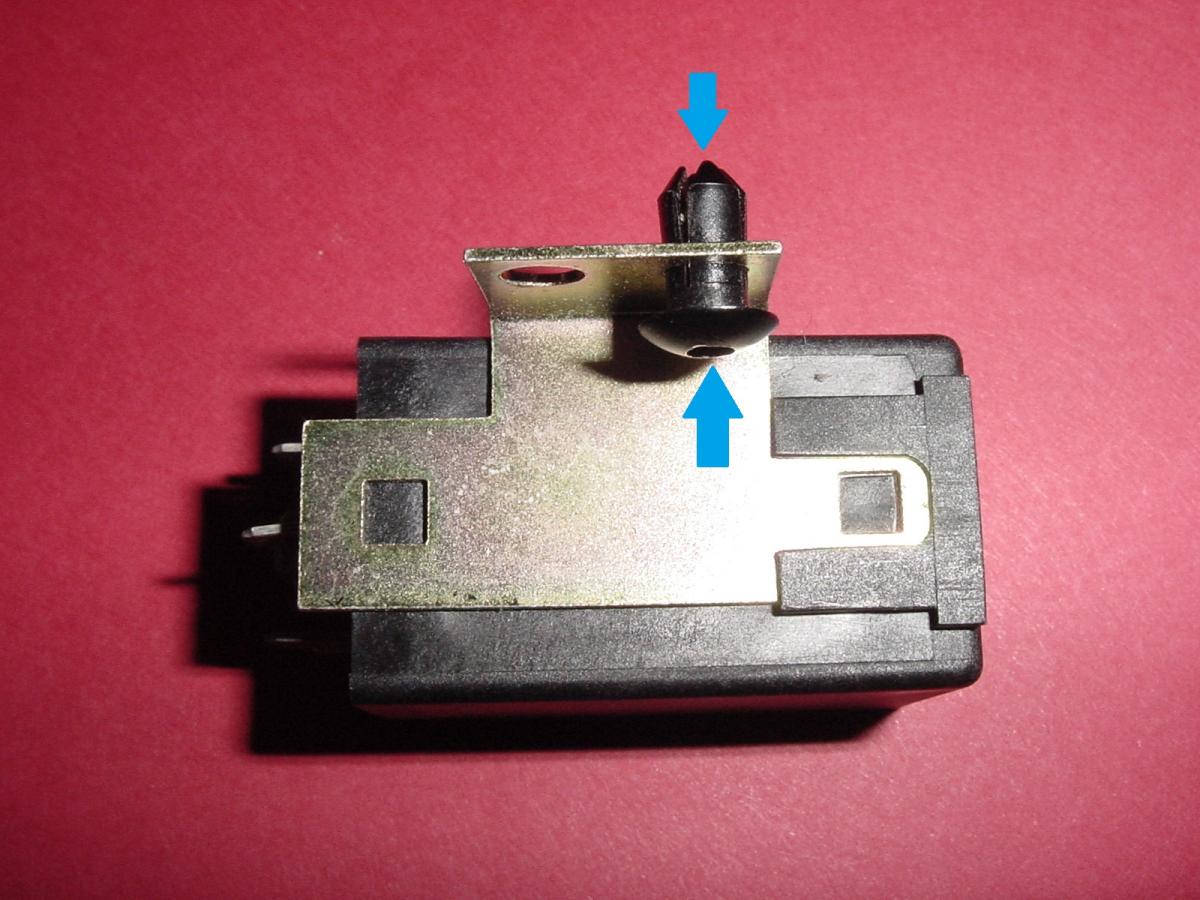
To remove the rivet, you have to push out the inner plastic rod that sits inside the plastic rivet body. Here is a photo of the seat heater relay, bracket and rivet. Use a pick tool to press it out from either direction, as shown by the arrows in the photo: The little inner plastic rod will pop out, and you can retrieve it and use it again for re-installation of the bracket. BTW, if you are going to permanently swap the relay, you will have to flip the bracket around 180 degrees to get it to fit properly on that side. Regards, Maurice.
-
Convertible top question
1schoir replied to venturawildes's topic in 996 Series (Carrera, Carrera 4, Carrera 4S, Targa)
Depending on your model year, there are a total of three possibilities that can cause the (piping) edge to fall out of the guide channel when you close the convertible top: 1. The inner metal cable is broken, stretched, or has come loose either where it is anchored at the back under the B-Pillar frame member or at the front where it attaches to the spring on the aluminum shoulder plate (one on each side). 2. The center ("shoestring" type) elastic lace has broken in the middle (under the canvas, in its sleeve) or become separated from either the strap in the middle of the canvas or one of the edges of the top. 3. The velcro straps surrounding one of the convertible top frame members on each side of the top have come undone or have torn away from where they are sewn in. Regards, Maurice.