Welcome to RennTech.org Community, Guest
There are many great features available to you once you register at RennTech.org
You are free to view posts here, but you must log in to reply to existing posts, or to start your own new topic. Like most online communities, there are costs involved to maintain a site like this - so we encourage our members to donate. All donations go to the costs operating and maintaining this site. We prefer that guests take part in our community and we offer a lot in return to those willing to join our corner of the Porsche world. This site is 99 percent member supported (less than 1 percent comes from advertising) - so please consider an annual donation to keep this site running.
Here are some of the features available - once you register at RennTech.org
- View Classified Ads
- DIY Tutorials
- Porsche TSB Listings (limited)
- VIN Decoder
- Special Offers
-
OBD II P-Codes - Paint Codes
- Registry
- Videos System
- View Reviews
- and get rid of this welcome message
It takes just a few minutes to register, and it's FREE
Contributing Members also get these additional benefits:
(you become a Contributing Member by donating money to the operation of this site)
- No ads - advertisements are removed
- Access the Contributors Only Forum
- Contributing Members Only Downloads
- Send attachments with PMs
- All image/file storage limits are substantially increased for all Contributing Members
- Option Codes Lookup
- VIN Option Lookups (limited)


1schoir
-
Posts
2,739 -
Joined
-
Last visited
-
Days Won
8
Content Type
Profiles
Events
Forums
External Paint Colors
Downloads
Tutorials
Links Directory
Collections
Classifieds
Store
Everything posted by 1schoir
-
If you leave the car unlocked, it will drain the battery in that state more quickly than if you lock the car with the remote. Regards, Maurice.
-
The 40 digit code (along with a bar code) is usually on a label on the small clear plastic bag that the key comes in, or on a small cardboard tag attached to the key with a piece of string. Regards, Maurice.
-
Driver window does not drop when door handle is opened
1schoir replied to jborchel's topic in 986 Series (Boxster, Boxster S)
There is a separate microswitch behind the inner door handle and another behind the outer door handle. There are also a number of microswitches INSIDE the door lock assembly. Regards, Maurice. -
Driver window does not drop when door handle is opened
1schoir replied to jborchel's topic in 986 Series (Boxster, Boxster S)
Does this happen with both the inner AND the outer door handle, or only one or the other? The answer to that question will help narrow down the cause. Regards, Maurice. -
:clapping: :cheers: :clapping: Thanks for confirming the fix! Regards, Maurice.
-
There is a small white plastic cup shaped like a small funnel directly under the drain hole and the foam liner. Sometimes that cup/funnel gets separated from the drain tube, and sometimes the cup/funnel develops a hairline crack due to age and vibration. In either case, it will cause a leak into the cabin. In order to properly seal it, you have to remove the foam drain tray liner. You can remove the foam liner only after removing the top frame assembly. If you look at the other parts of the DIY from where you got the photo that you posted, you will find instructions on how to remove the complete top and frame assembly. It's not overly complicated as it basically involves removing three 13mm bolts from each side of the frame base. Also, if there is no crack or tear in the foam drain tray, and there is a good seal between the foam drain tray and the drain tube (at the little "funnel"), the water can stay in there almost indefinitely as the drain tray material is waterproof. Regards, Maurice.
-
+1 Try bypassing the clutch interlock switch by installing a temporary jumper wire at the switch. You will find the switch directly behind the metal arm of the clutch pedal. Regards, Maurice.
-
Dead or weak Battery issues ?
1schoir replied to britdave's topic in 996 Series (Carrera, Carrera 4, Carrera 4S, Targa)
Connect the positive lead from the amp meter to the positive terminal on the battery and the negative lead from the amp meter to the negative terminal on the battery. Then, pull off one fuse at a time from the fuse tray and observe the reading on the amp meter each time that you pull off a fuse. If there is no change in the reading after you pull off a certain fuse, re-install that fuse and move on to the next one. Regards, Maurice. -
The "gas-pressure spring", as Porsche calls these trunk lid shocks or supports, has different part numbers for 986's and 987's. For 986's, it's listed as 986 512 951 01 and shows that 2 are required. For 987's, it's listed as 987 512 551 01 and shows only 1 as required. Not sure if the parts are actually different. If you have a 987, you can verify whether there is only one strut required. eBay has the part listed for 987 as well: http://motors.shop.ebay.com/i.html?_nkw=Boxster+987+trunk+lid+shock&_sacat=&_dmpt=Motors_Car_Truck_Parts_Accessories&_odkw=Boxster+986+trunk+lid+shock&_osacat=0&bkBtn=&_trksid=p4506.m270.l1313 Regards, Maurice.
-
-
:thumbup: :thumbup: :thumbup: Regards, Maurice.
-
Hi Bill! John: If your double relay has a black square, it is the correct version for your year Boxster and you have the "B Version" transmissions and set-up. That also means that you don't have the traditional B-Pillar microswitch and don't have the black lever microswitch. Both of those have been moved to the INSIDE of the driver's side (left side) transmission in the B-version set-up. If the electric motor is not spinning, apply 12 volts directly to the electric motor. If it does not spin, the motor is faulty or has a dead spot. If it spins but does not spin when you depress the switch, either the switch is faulty, the double relay is defective, or there is a fault/short in the wiring from the switch to the electric motor. Here is a procedure I previously wrote up for manually lowering the top if it's stuck in the completely closed position (note that there are some symptoms that don't apply to your case, but the procedure is the same): The easiest way I have found to access the 'works' if the top is stuck in the closed position is to partially and gradually open the top by using a cordless drill. Since you described the power drain and the loud cracking sound, your drive cables are probably intact and thus you can use this method after unlatching the top latch. First, reach under or through one of the roll bar hoops so that you can grab the thin metal bar that runs from left to right and that is attached to the rearmost edge of the black vinyl apron under the rear bow of the convertible top frame. That long bar (flat metal bar with a 90 degree bend, about 2 1/2 feet long) is attached to the rear firewall in the convertible top well by means of two small plastic brackets or receptacles, one on each side, about 1 foot to each side of center, 8 to 10 inches from the level of the clamshell when it is in the closed position. Reach for one side at a time and twist it off the brackets by turning it down and rotating it towards you. That will free the vinyl apron from the firewall and give you access to the sides of the electric motor. The electric motor is located exactly in the center of that rear firewall and, in a '97 also has a small lever mounted on the top of it. (Your 2000 will not have this small black lever) You will see the black vinyl sheath of each of the two drive cables going into the sides of the electric motor. There is a brass colored upside down U-shaped clip preventing each cable from being pulled out of the side of the electric motor. The U-shaped clip has a little tiny shelf at its top surface and that is what you should push upwards on to remove the clip. Once you have pushed the clip up and off, grab the cable where it goes into the side of the electric motor and pull it in an outboard direction. Do that on each side. Once you have pulled the vinyl sheath off, you will see the inner steel (speedometer-type) cable sticking out by about 3/4 of an inch. Put one of the inner cables into the drill chuck and set the power drill on a LOW TORQUE setting. Now operate the drill while observing the direction of rotation of the V-lever on that side. The V-lever is located just behind the base of the B-pillar, below the level of the top surface of the rear-quarter panel. If you are spinning the drill in the wrong direction, you will hear that loud cracking noise again as the black "hydraulic" pushrod pulls the half-moon gear past its last (50th) tooth and the top will NOT start to open. In that case, spin the drill in the opposite direction and you will see the top start to open slowly (Your B Version transmissions have teeth going all the away around the complete 360 degrees). Just spin that side for a few seconds, then disconnect the drill from that side and insert the other drive cable into the chuck. Repeat the same procedure as above until the other side of the front edge of the top has reached the same spot at the side you did first. Then go a little further with that side. Now just repeat, alternating each side and that will allow you to open the top until you get the clamshell in the 45 degree position. That will give you clear access to the electric motor so that you can re-insert the drive cables and then install the U-shaped clips to lock them in. If for some reason your cables will not spin the V-levers, you will have to unbolt the 19mm Loctited bolt from the center of each V-lever. That will release both front and rear pushrods on each transmission and you can manually operate the canvas top and the clamshell. You can then install your hardtop. Take a look at page 19 of the Part II PDF at this link for a good photo of the 19mm bolts at the center of the V-Levers: https://sites.google.com/site/mikefocke2/installinga'03-'04glasstopandframeona'97 That should do it. Regards, Maurice.
-
The top not going back down and only going up could still indicate a dead spot on the electric motor if the top is now permanently in the fully closed position and will not budge. Again, there could also be a problem with the dashboard switch itself, possibly being intermittent. Since yours is a 2000 Boxster, you probably have the "B Version" transmissions and set up, so the only other possible cause for the behavior you describe above would be a faulty double relay. You can only easily check that with a double relay that is known to be good (the one from eBay may or may not be). I'm assuming your 2000 Boxster is not one of the "transition" Boxsters from the A Version to the B Version top mechanism and that you don't have either the B-pillar microswitch or the black lever microswitch on top of the electric motor housing. Take a look at the symbol on the visible top surface of the double relay in the relay tray. If there is a solid black square, you have the B Version (with no external microswitches). If the double relay has a solid black triangle, you have the A Version. BTW, I'm assuming that the double relay that you got from eBay is the correct, identical version to the one that was originally on your Boxster. You might want to double check that they both have the same symbol (i.e., black square or black triangle). Regards, Maurice.
-
There are two areas to eliminate in order to try to resolve the problem with your top. Even if your top is in the completely closed (up) position, you can check out those two areas, even though you will have to contort yourself to reach back there: First, you may have a "dead spot" on the electric motor. Second, one or both of your drive cables may be frayed or broken inside their respective vinyls sheaths, or the cables may not be engaging the gear on the transmission end of the cables. To check out whether the motor is spinning when you press the top button, disconnect the drive cables from both sides of the electric motor. If your top is up, reach back and unclip the black bar that is at the end of the black vinyl apron from the clips that are on the rear firewall (left and right). Then, at the electric motor, where the drive cables enter it on each side, pull up on the upside down U-clip and pull each drive cable outboard and leave them disconnected. Use a light and a mirror to look into either side of the electric motor. You will see a small square female flange. That flange should turn at a high rate of speed when you press the button. If it doesn't turn, either the motor is defective (or has a dead spot) or the switch or wiring is at fault (since you have already replaced the fuses). If the electric motor spins, then check the drive cables for operation. Insert the end of each inner (speedometer-type) metal cable into a cordless drill set on the LOWEST torque setting. Then, after you have released the latch, spin the cable with the drill and observe the V-lever on that side for rotation. If the V-lever is turning but the roof on that side is not opening, reverse the direction of the drill. Repeat on the other side. That will tell you if your drive cables are intact and whether they are engaging the worm gear inside the transmission on that side. Before you spin the drive cables with the drill, take careful measurements and note the position of the V-levers. Take a few photographs as well so that you will know the starting position. Report back with any results. Regards, Maurice.
-
Which "Top microswitch" did you replace, and what year is your Boxster? Could you also describe, in detail, the symptoms that your top exhibited before or during the failure, and exactly what happened? Regards, Maurice.
-
If your lug nuts are not loose, you should check out your wheel bearings. Do you get the same "rattle" on the left front and on the right front? What about the rear wheels. Regards, Maurice.
-
"... I guess with the driver side working we can rule out a bad micro switch in the top latch...correct?..." That is correct. If one side window is dropping the normal aprroximately 4 inches, you can rule out the one of the two microswitches inside the latch assembly that triggers the window drop. Also, the other microswitch in the assembly has no effect on the window drop. The problem lies elsewhere. Regards, Maurice.
-
Glass window to replace plastic ?
1schoir replied to Dgrange's topic in 986 Series (Boxster, Boxster S)
D: You can install a complete OEM top and frame assembly from a 2003 or 2004 onto your '97 Boxster. Unless you also replace the convertible top transmissions with the "B Version" of the 2000 and later Boxsters, you will also have to devise a way to trip the B-Pillar microswitch at the appropriate time in the cycle. You cannot just replace the canvas with the canvas from an OEM '03 or '04 because there are differences in the frame (3-bow vs. 4-bow). Here's a DIY that should answer all of your questions:https://sites.google.com/site/mikefocke2/installinga'03-'04glasstopandframeona'97 Regards, Maurice. -
Topping up brake fluid or Change it?
1schoir replied to redcab's topic in 996 Series (Carrera, Carrera 4, Carrera 4S, Targa)
+1 The hygroscopic nature of brake fluid causes the fluid to absorb moisture from the atmosphere. Even in drier climates than California (Nevada, for example), the fluid will still absorb moisture. Regards, Maurice. -
That sequence is correct. Whenever there is a possibility that air was introduced into the system, I like to bleed the entire system, including the bleeder valves at each of the brake calipers. If you just bleed the clutch, you should be able to tell whether there is any air in the system when you step on the brakes. If the pedal feels "spongy", you will know that you have the to bleed the entire system. Regards, Maurice.
-
Without the bleeder valve open, the rod will keep pushing out and that will make it very difficult to get it back in position to bolt it in place. If you don't want to open the bleeder valve (and then have to bleed the system, etc...), you can wire it in the depressed position. Take a small flat disc (think of a something like a bottle cap)and drill a hole on two sides, then attach a short length of wire to each side and tie it around the sides of the base while the rod is depressed . Then install the slave cylinder. After you have it bolted in place, cut and remove the two wires and the "cap". Regards, Maurice.
-
The parts diagram shows that bolt's part number as 999.072.032.01. It is described as an M10 bolt, 75mm long. Regards, Maurice.
-
Here is the diagram... If I follow your description, it looks like the bolt is a stud that is pressed into the aluminum support brace. The nut which goes onto it is part #8 in the diagram, the gauge of the stud and the nut is M10. Regards, Maurice.

-
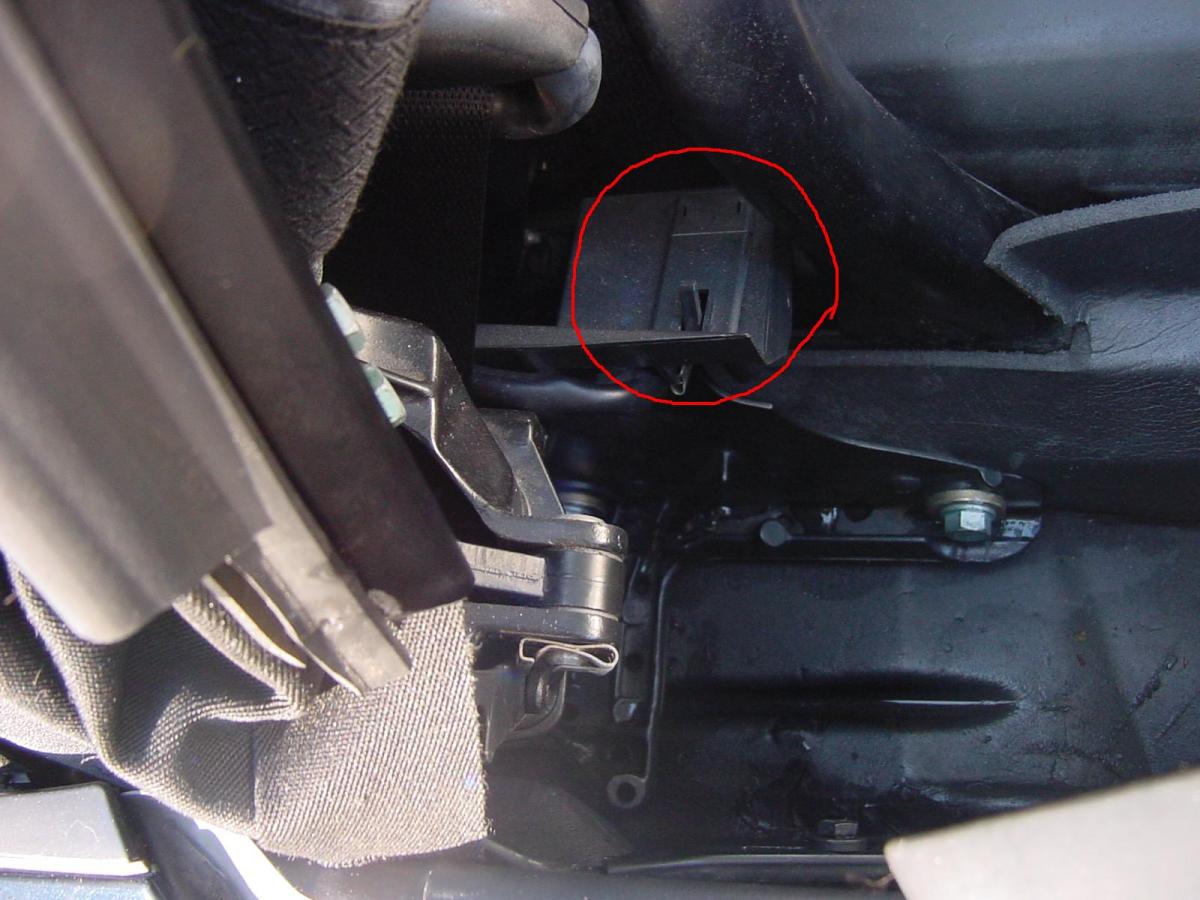
1999 Boxster Rear Window Defogger
1schoir replied to KFH2818's topic in 986 Series (Boxster, Boxster S)
AFAIK, there all Boxsters came pre-wired for the rear window defroster. This is because the removable hardtop was offered as an option and it had to have a defroster. Take a look at the area where the driver's side rollbar, where it meets the carpeting that surrounds the engine cover, all the way to the outboard wide of the rollbar. You should find what looks like a small black plastic box with a hinged tab on it. Pull up on the hinged cover and you will expose the connector into which you can plug in the wiring from your glass-windowed top. Here is a photo of what it looks like, circled in red: Regards, Maurice.
-
Top stopped working
1schoir replied to bwillis's topic in 986 Boxster Convertible Top Issues and Solutions
Way to go! You will thank yourself repeatedly for having made the conversion. When you source your used OEM '03 or '04 top and frame assembly, installing it and adjusting it will only be a 2 to 3 hour DIY. The trickiest part about the electrical conversion is sourcing the correct spades with the little locking tab that is shown in the article. The electrical conversion does require patience, but you have already demonstrated that you have plenty of that! :cheers: Regards, Maurice.