Welcome to RennTech.org Community, Guest
There are many great features available to you once you register at RennTech.org
You are free to view posts here, but you must log in to reply to existing posts, or to start your own new topic. Like most online communities, there are costs involved to maintain a site like this - so we encourage our members to subscribe or donate. All subscriptions and donations go to the costs operating and maintaining this site. We prefer that guests take part in our community and we offer a lot in return to those willing to join our corner of the Porsche world. This site is 99 percent member supported (less than 1 percent comes from advertising) - so please consider an annual subscription or donation to keep this site running.
Here are some of the features available - once you subscribe RennTech.org
- View Classified Ads
- DIY Tutorials
- Porsche TSB Listings (limited)
- VIN Decoder
- Special Offers
- Paint Codes
- Registry
- Videos System
- View Reviews
- and get rid of this welcome message
It takes just a few minutes to register, and it's quality Porsche information at a low cost.
Contributing Members also get these additional benefits:
(you become a Contributing Member by subscribing or donating money to the operation of this site)
- No ads - advertisements are removed
- Access the Contributors Only Forum
- Contributing Members Only Downloads
- Send attachments with PMs
- All image/file storage limits are substantially increased for all Contributing Members
- Option Codes Lookup
- VIN Option Lookups (limited)


1schoir
-
Posts
2,739 -
Joined
-
Last visited
-
Days Won
9
Content Type
Profiles
Events
Forums
Exterior Paint Colors
Downloads
Tutorials
Links Directory
Collections
Classifieds
Store
Everything posted by 1schoir
-
Muffler clamp replacement
1schoir replied to jimmy3530's topic in 996 Series (Carrera, Carrera 4, Carrera 4S, Targa)
Let us know how you make out, as this is a common problem that anyone doing exhaust mods will run into. Regards, Maurice. -
That's certainly good news! Often the adjusters that work for the automobile service contract companies have very limited knowledge about specific marques or specific engines. When you have an expert Porsche mechanic with decades of experience who stands ready to testify about the cause of the engine failure and that it was a covered cause, the company will back down. They have no interest in a losing legal battle, just an interest in seeing which of their contract holders will just go away without a fight. Congratulations on your outcome. Regards, Maurice.
-
Muffler clamp replacement
1schoir replied to jimmy3530's topic in 996 Series (Carrera, Carrera 4, Carrera 4S, Targa)
Using a cut-off wheel with a 3" metal cutting disc will make short work of the rusted clamps, even if the bolts have "become one" with the nuts. Here is one from Harbor Freight: http://www.harborfreight.com/3-inch-high-speed-air-cutter-47077.html Just make sure to wear eye protection and position the tool so the sparks are flying away from you and not towards any gas lines, etc... Also, be careful to only cut through the bolts and/or the clamps, and not the exhaust pipes themselves. It works pretty quickly. Regards, Maurice. -
Need engine rebuilder in NYC area
1schoir replied to jeffg2020's topic in 996 Series (Carrera, Carrera 4, Carrera 4S, Targa)
Give Bill Rudtner of Rudtner's European Auto a call. His phone number is (516) 378-8769. He's located on Long Island and is a true Porsche fanatic with many, many years of experience. He's also an avid Porsche racer. Regards, Maurice. -
You can get a somewhat larger glass rear window by installing the 4 bow top frame from a 2003 or 2004 Boxster. The easiest and most economical solution is to source a used OEM complete top and frame assembly from an '03 or 04 and install it on your 2000. It's a direct replacement. It does change the profile of the top slightly (from 3-bow to 4-bow) and it is definitely not the size of the plastic window (for the reason cited by Magic Imagination), but it is an improvement over the GAHH or Robbins tops. The two brands of tops are very good quality, but it's the limitation of the 3-bow design that mandates the small window. Here is a link to more information on advantages and disadvantages of both, with a detailed DIY: https://sites.google.com/site/mikefocke2/installinga'03-'04glasstopandframeona'97 Regards, Maurice.
-
Top stopped working
1schoir replied to bwillis's topic in 986 Boxster Convertible Top Issues and Solutions
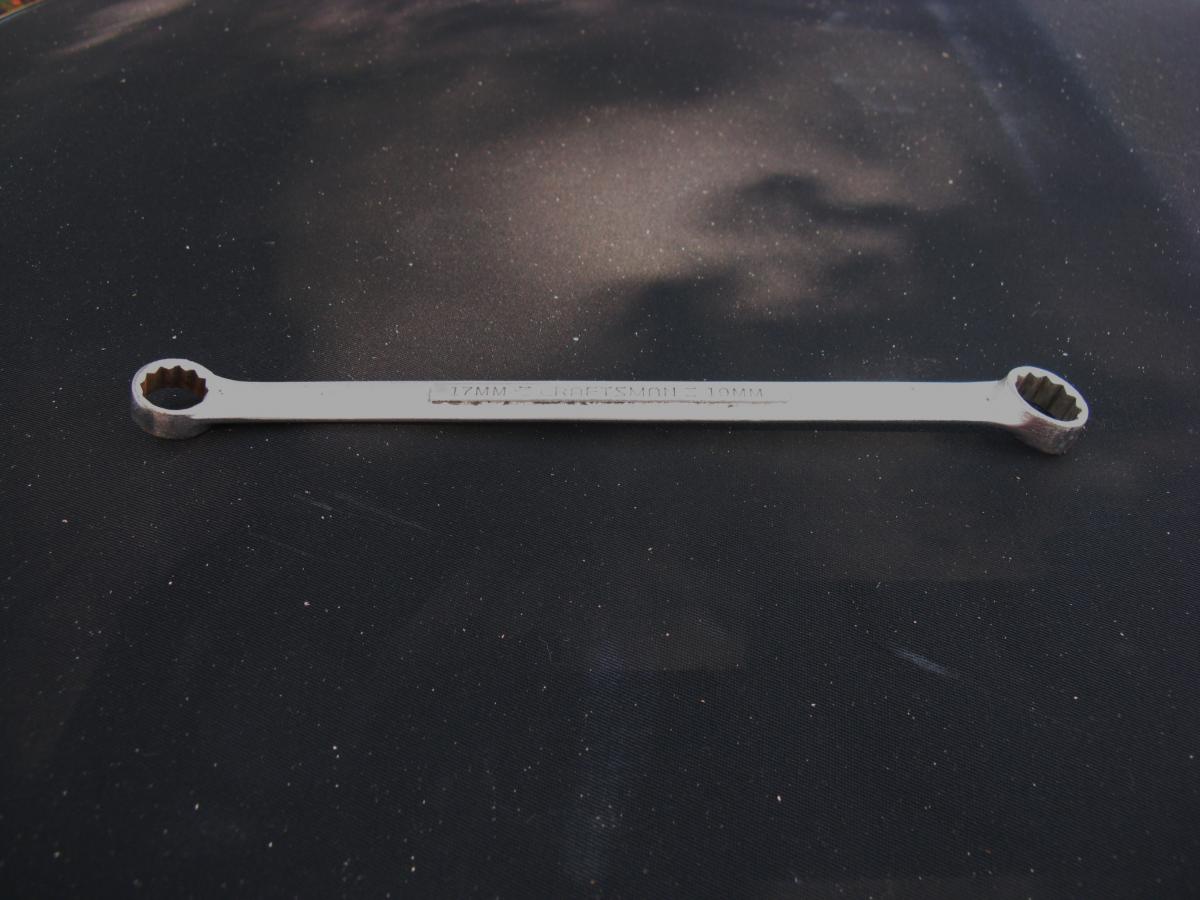
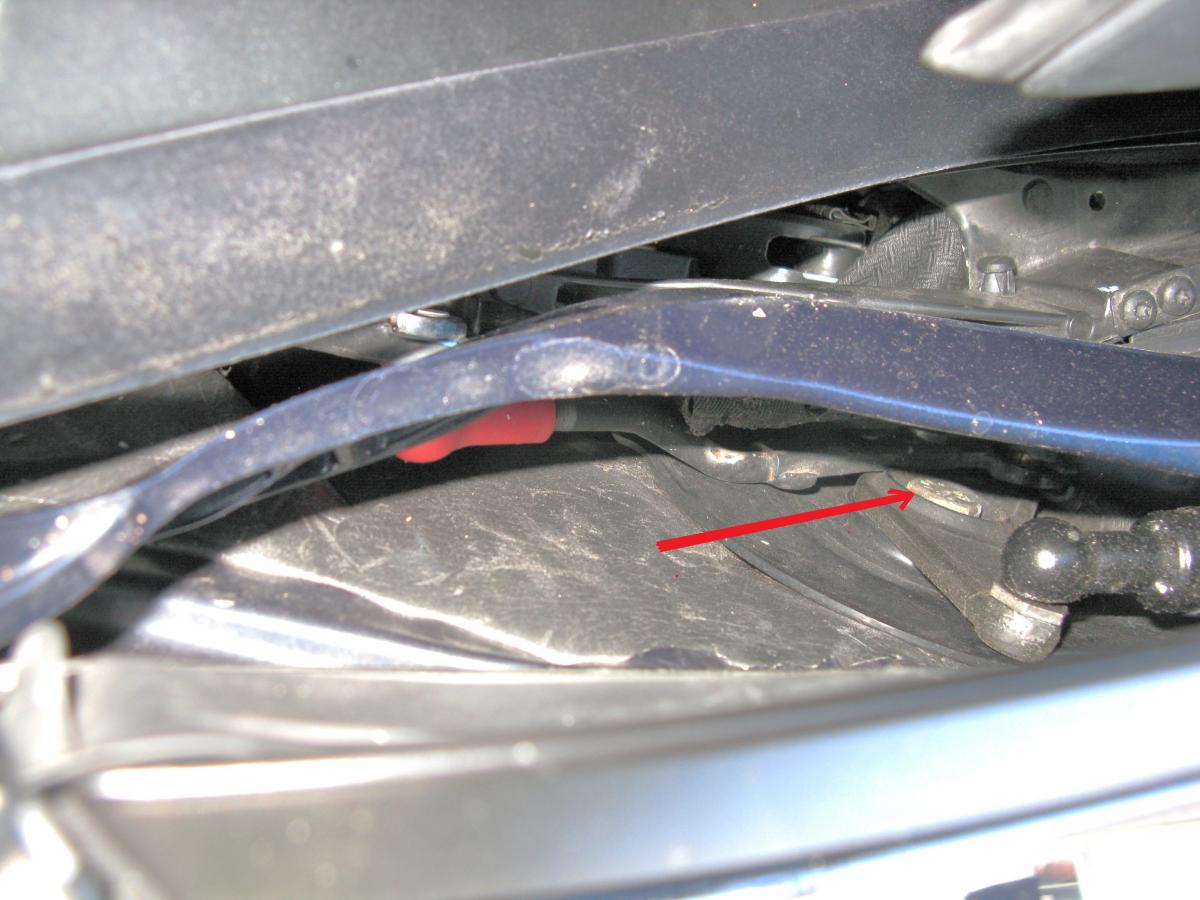
Tony: I think I misunderstood, and that you are asking about how to release the clamshell when the top is completely closed, and the clamshell won't move. If your top is in the completely closed position, you can use the same method, except that to access the 19mm bolt you have to contort yourself a little to reach through the rollbar hoops to reach them. It's actually a little easier because you can use a ratchet and socket to unbolt that 19mm bolt. To be able to see the 19mm bolt in this case, you first have to reach all the way to the rear firewall in the convertible top well and unhook the vinyl apron from the clips that are on that rear firewall, one rear, one left. To unhook the vinyl apron, grab it near one end (left or right) of the hard vinyl edge and rotate it up from the bottom (i.e., if you imagine yourself outside the car on the left side staring at one end of that vinyl edge, you rotate the bottom of that edge clockwise...If you are standing on the right side staring at the other end, you rotate that end counterclockwise). Once you move that curtain out of the way, you will be able to see the 19mm bolt in the middle of each V-lever. Here is a photo showing the 19mm bolt where the red arrow is pointing. For perspective, the green arrow is pointing to the bottom of the roll bar. Note that this is a photo of the right side (click on the photo for a larger view): There are two other ways to release the black "hydraulic" pushrods so that you can pick up the clamshell manually, but those pushrods, when the clamshell is closed, are under tremendous pressure holding the clamshell securely down. This method of unfastening the V-levers works every time, but again, make sure you take lots of photos so that you don't install the V-levers upside down when you are re-assembling everything. Regards, Maurice.
-
Top stopped working
1schoir replied to bwillis's topic in 986 Boxster Convertible Top Issues and Solutions
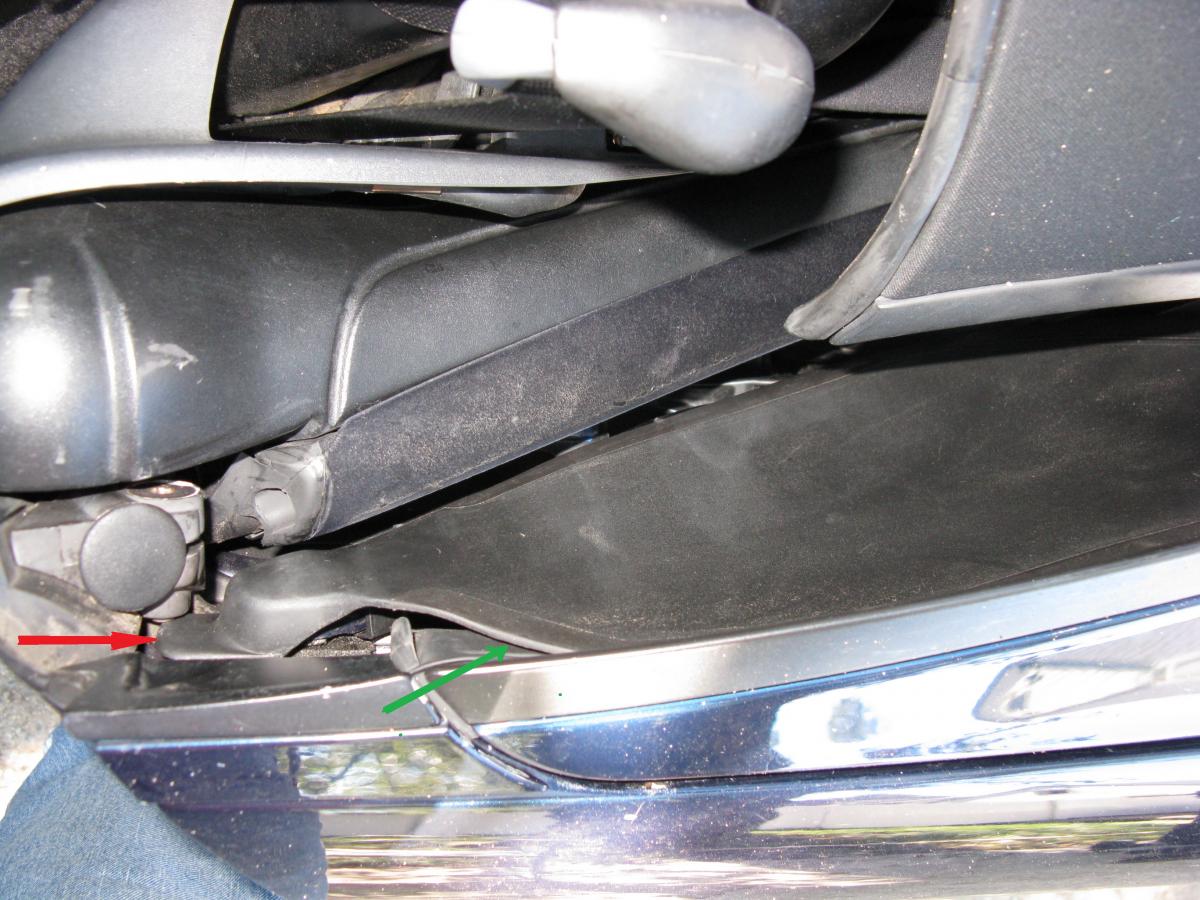
Tony: You can get the clamshell to release from the completely closed position fairly easily, although it is a little tricky to access. All that is required is a 19mm box wrench with the proper offset, such as this one: With the top completely open and the clamshell locked down on top of it, you can stand by the side of the car, just to the rear of the rear vertical edge of the door (you can start on either the left or the right side). If you still have the cosmetic black plastic cover that hides the clamshell support arm, you will have to first remove that. Here is a photo of that black cosmetic cover (don't forget to click on the photo for a better look): Pull inboard on the plastic tab end of the cover where the red arrow points until that end pops off the nut onto which it is pressed. Then then insert your finger behind the black cover where the green arrow points and pull the top edge of the cover up and rotate it inboard at the same time. That will release the two metal angled tabs from where they are clipped onto the clamshell support arm. Now, look straight down and you will see a slightly recessed 19mm bolt head in the middle of the V-lever. If you insert the box end wrench so that it surrounds the 19mm bolt and turn the bolt counterclockwise, you will be able to loosen it and you will then be able to pull off the V-lever. Here is a photo of the 19mm bolt in the center of the V-lever, indicated by the red arrow: Note that the 19mm bolt is on there with Loctite, so it will require some force to release. That will release the rear pushrod tension and you can then manually raise the clamshell after disconnecting the now-loose and accessible black "hydraulic" rear pushrods. Once the clamshell is released, with the V-levers removed, you can try the switch again and observe the center slot of the transmissions (into which the 19mm bolt was fastened) and see if each one is rotating when you press the switch. Be very sure to note the position of the V-levers before you take everything apart because the V-levers have a slot that make it possible to install them 180 degrees off (i.e., upside down). Also note the position of the slots before you press the switch to try to rotate them. Take a couple of photos and measurements. Regards, Maurice.
-
Convertible top latch house bolts broke!
1schoir replied to Metrochamber's topic in 986 Series (Boxster, Boxster S)
Blair: Bill Hall ("whall") recently posted this link, which is a comprehensive DIY fix for your latch bolt problem: https://f66b4128-a-6...&attredirects=0 Regards, Maurice. -
Softop problems ...
1schoir replied to HDman's topic in 986 Boxster Convertible Top Issues and Solutions
If you succeed in having someone fabricate and weld the lug that has broken off, make sure that you check that the other side's steel ball is tight. The lug onto which the steel ball is bolted is susceptible to breaking off if the thin nut which secures the steel ball onto the lug is loose. If you need instructions on how to remove the top and frame so that you can take the top and frame to a welder/fabricator, take a look at this link: https://sites.google.com/site/mikefocke2/removingthetopandframe Regards, Maurice. -
After you disconnect the electrical plug, the coolant level sensor is easily removed by pressing it in slightly and turning it counterclockwise by 1/4 of a turn. Regards, Maurice.
-
The gaudinporscheparts.com website shows the pushrods (part #6 in their diagram) for sale at an online price of $53.68 each: http://www.gaudinporscheparts.com/Porsche/Parts/Browse-Parts.shtm Did they have a special sale on the pushrods? Regards, Maurice.
-
Make sure to regularly check the two drains I mentioned to make sure that they are not clogged. If water backs up, it ends up under the seats and there is an immobilizer under the driver's seat that will get fried. Enjoy many trouble-free miles of permagrin in your new Boxster! Regards, Maurice.
-
That flap is a vinyl curtain that is supposed to channel water that enters behind and in front of the clamshell into the convertible top drains that are located in the area under the V-levers. The "long clip" is supposed to be fastened onto the two clips, one left and one right, that are mounted on the firewall at the rear of the convertible top well. Regards, Maurice.
-
Long Islander, The two white caps on my push rods broke yesterday. The Ebay page for the seller is closed. Do you have contact info I can use to order them directly? Thanks. Monroe Monroe: PM Sent. Regards, Maurice.
-
Top stopped working
1schoir replied to bwillis's topic in 986 Boxster Convertible Top Issues and Solutions
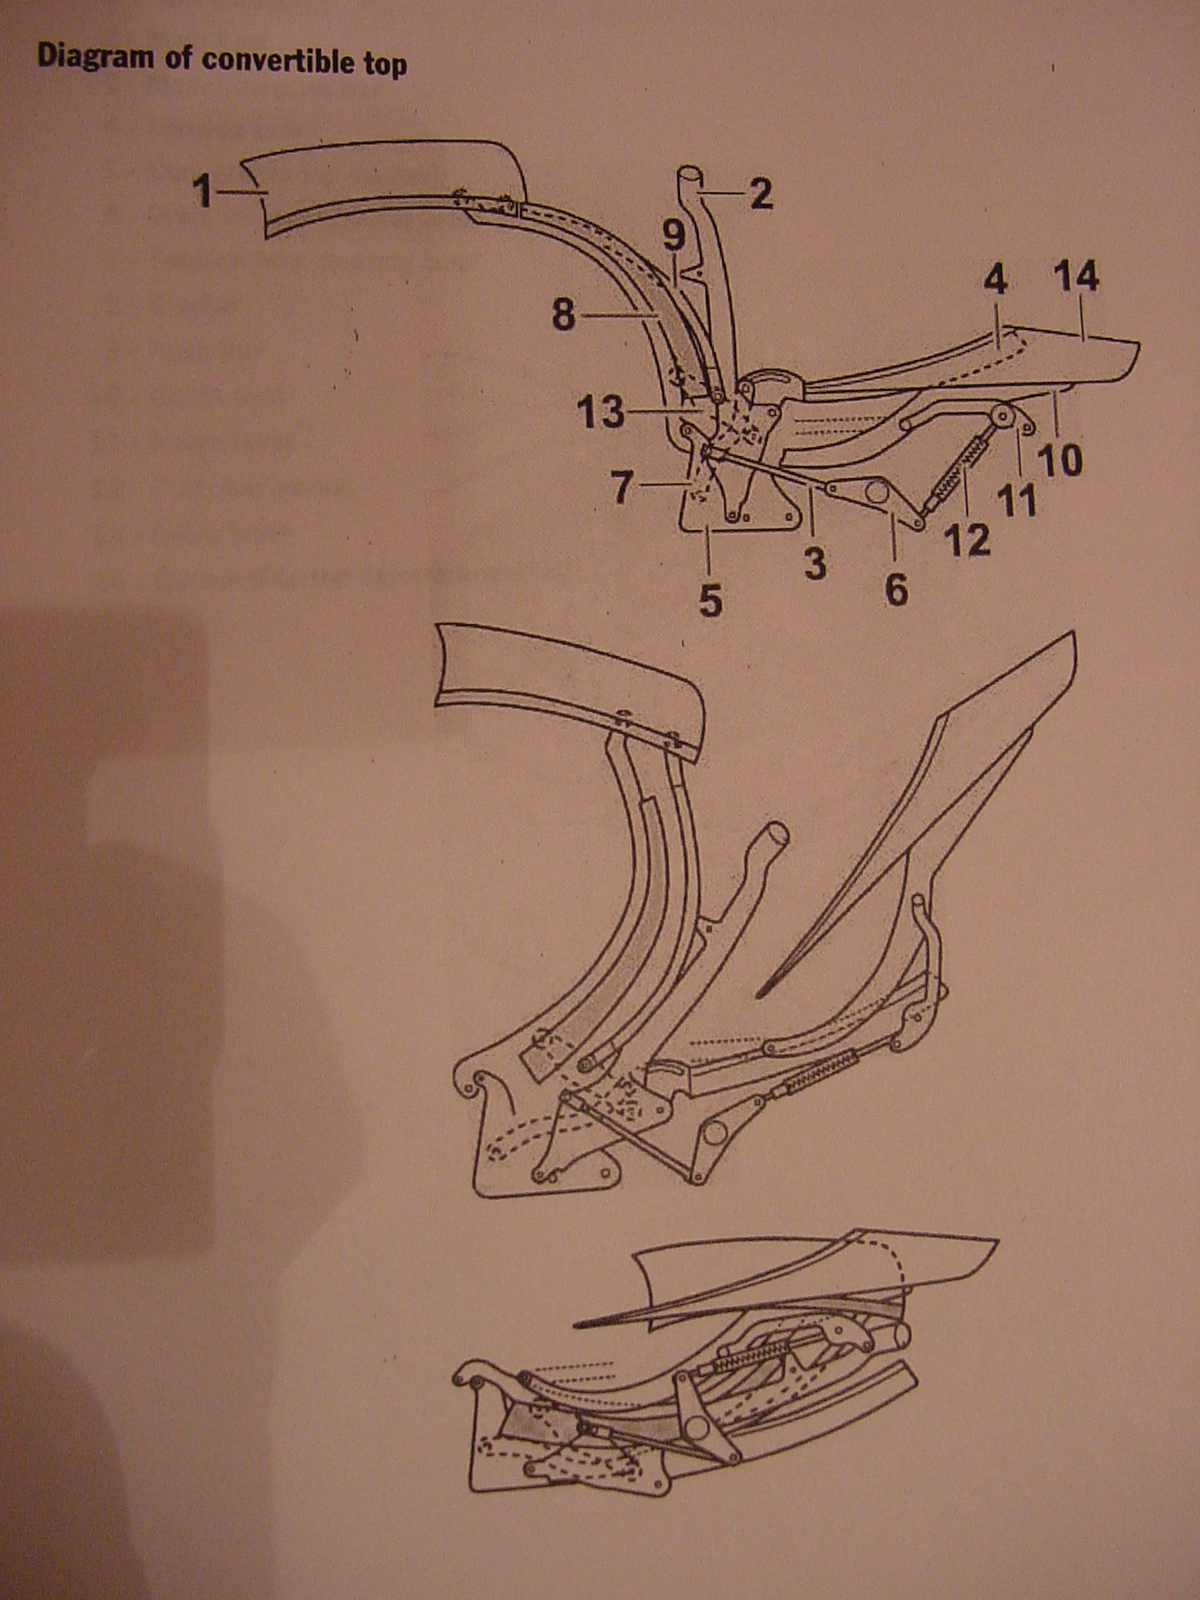
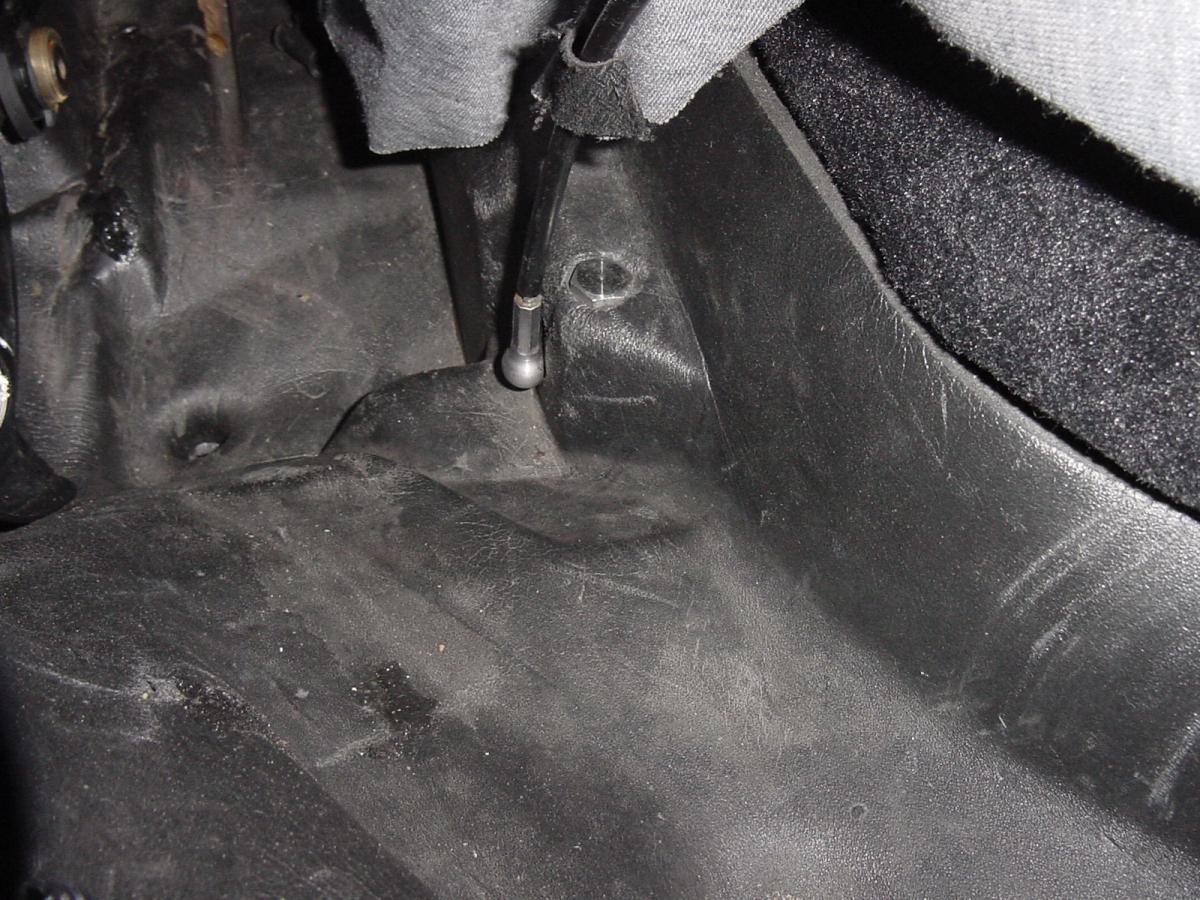
Tony: To make sure you are getting the correct double relay for your year Boxster, take a look at pages 40 and 41 of the Part III PDF at this link: https://sites.google...frameona'97 If you are having a problem where the top is stuck in the up position, you have to open it manually in order to access the parts to repair it. If that is what you have to do, here is a procedure I wrote up a while ago for disconnecting the push rods from the V-levers so that you can get good access when your top won't go down: First, unlatch the latch of the convertible top at the top center of the windshield frame. To get the top to open manually, you must disconnect the white (or red if yours are original and have never been replaced) plastic cups at the base of the B-Pillar and the black hydraulic pushrods where they connect to the V-levers. Disconnecting the white plastic cups will allow you to operate the convertible top manually. Disconnecting the black hydraulic pushrods will allow you to operate the clamshell manually. Here is a diagram of the mechanism, which should help you orient yourself as to what you are looking for: The V-lever is part #6, the black hydraulic pushrod is part #12, and the white (or red) plastic cup is located on the forward end of part #3. Part #14 is the clamshell, and Part #1 is the canvas top. To have a better chance to see the parts that must be disconnected, you will have to pull aside the (vinyl) rain curtain. That curtain is loosely held in place by yet another cable that is located at the rearmost corners of the (carpet-covered) engine compartment lid (on the car body, not on the lid). That cable is held on to a small metal ball and you must pry it apart from that metal ball. Here is a photo of the flexible cable that leads to the metal ball (hidden under the metal cup at the bottom of the cable) at the side of the curtain: That particular connection is easy to separate, unlike the black hydraulic pushrod. Once you have the curtain's cable separated, you may also have to remove the black plastic cosmetic covers that are simply clipped onto the arms that support the clamshell (those arms are part #10 in the diagram, and extend from where it is numbered all the way to the front towards part #3 in the diagram). . To access the white plastic cups, sit sideways in the driver's seat with the door open and your feet on the ground. Look down from above the side of the car (just behind where the rear quarter panel meets the rear of the door if the door were closed) and you should be able to see the white (or red) plastic cup. Pry that cup off by levering it outboard. You will nee a fat screwdriver or pry bar. Then you will have to reach between the roll bar hoops, or possibly reach through them, to get at the connection of the hydraulic push rod to the V-lever. That connection is a real bear, so you will have to apply a great deal of pressure to separate it. Be careful not to hurt yourself there, but you just have to get the connection apart, again with the red plastic capped tool in the tool kit, a fat screwdriver or, preferably an angled screwdriver-type pry bar. I have also had success using a non-automotive tool called a cat's claw, which is usually used to pull nails. Once you have the various parts disconnected, DO NOT press the dashboard switch without CAREFULLY marking (and photographing) the position of the V-levers relative to the sides of the body that they are mounted on. Otherwise, it will be much more difficult to re-sychronize the V-levers (part # 6 in diagram). Also, be very careful if you decide to operate your top manually because the push rod arms (part #3 ins diagram) that are normally connected to the steel balls at the base of the B-pillars will be dangling from the V-levers. When they are dangling and you move the convertible top V-levers, those push rod arms can dig into the foam liner and tear it, which will cause leaks into the cabin later on. Those push rod arms can also dig in and prevent the V-levers from turning. Regards, Maurice.
-
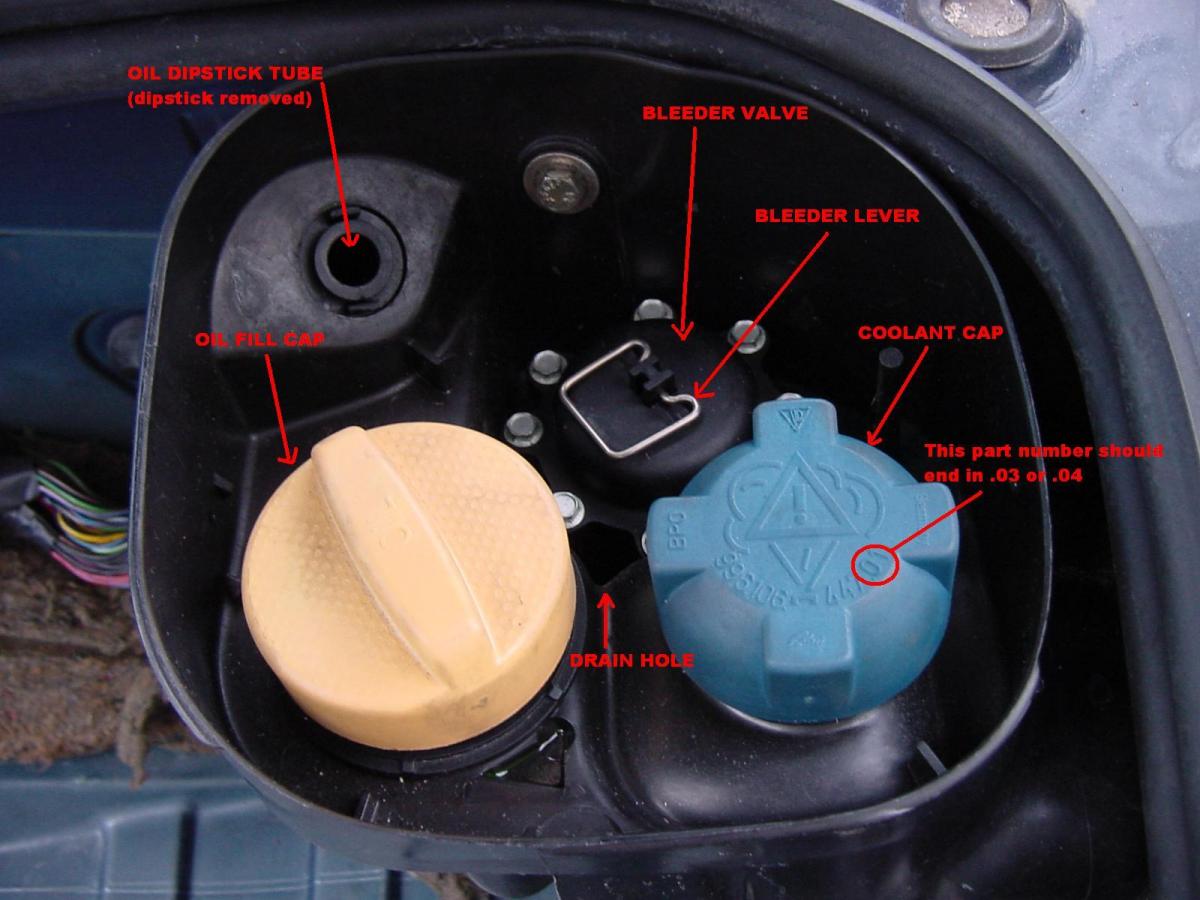
If the coolant is ending up behind the right rear wheel, that usually means it is getting there via the overflow hole that is located on top of the expansion tank, underneath the thin black plastic trim cover plate. Unless you filled the system using a vacuum tool, you will get overflow a number of times until the air burps out. If you want to try to burp the air out without using the vacuum method, you should drive around for a few days with the lever that sits on top of the bleeder valve in the vertical or "up" position. Here is a photo that will show you what is under that thin black cover plate which shows the location of the drain hole and the bleeder lever. Note that in the photo, the bleeder lever is in the "down", normal position. You have to pull up on that lever and get it in the vertical position. (click on the photo to blow it up for a clearer view) Regards, Maurice.
-
From your description, it sounds like you are just not getting enough juice from the battery, even with the jumper cables. Take the battery out and get it recharged. If you can't do that right now, get another set of jumper cables and hook those up in addition to the first set of cables that you have already tried to use. Then, let the company car run on a high idle (2,000 RPM) by putting a small weight on the gas pedal (like a brick) or wedge a stick between the front seat and the gas pedal to get the desired RPM range. Let the company car run for about 10 minutes with the two sets of cables hooked up and then try to start the Boxster. Make sure all accessories are OFF, including any lights, and set the climate control to the "Manual" OFf" as well. If you get more than clicking, you will have confirmed that you were not getting enough power to the starter, either because your battery was too far dead or because the jumper cables were of too small a gauge or not well enough connected. Regards, Maurice.
-
HVAC possessed, no air
1schoir replied to 987_RDC's topic in 996 Series (Carrera, Carrera 4, Carrera 4S, Targa)
:clapping: Thanks for sharing the solution. It should prove helpful to someone else who comes along with the same symptoms. Those little fingergrip socket adapters look like a "must-have" for any tool box! Regards, Maurice. -
Top stopped working
1schoir replied to bwillis's topic in 986 Boxster Convertible Top Issues and Solutions
Tony: Assuming your parking brake light goes on when you pull up on the emergency brake, the most likely suspect is one of the two microswitches that are located in the latch receptacle in the windshield frame. There are two microswitches in the latch receptacle assembly. There is one on the left side of the assembly (has a large plunger that juts out when the latch is open). That one controls the 4" window drop that occurs immediately when you pull down the latch to open the top. There is another one on the right side of the assembly, and that is the one that activates the convertible top double relay. My guess is that the latter switch is faulty, even though it may appear to be intact when you visually inspect it, and sometimes even when you test it with a multimeter. Specifically, take a close look at the solder joints where the leads attach to the plug. This can be hard to detect, so check it with a magnifying glass for hairline cracks in the solder joint and for corrosion. If necessary, heat up the connections with a soldering iron and flow a tiny bit of solder onto the suspect joint(s). Believe it or not, the temperature (sun light, A/C blowing on it, etc...) can affect it to the point where the connection is broken and then re-established. To gain access to the microswitch you have to remove the latch plate at the center of the windshield frame. Pop out the two little black plastic "eyes" by carefully prying them off with a very small flat blade screwdriver or borrow one of those "orange sticks" that women use on their fingernails to pry them out. Remove the small torx bolt that you will find under each one of the two eyes. Remove them and then pull down the latch plate carefully until you can see and access the wires for the switch and for the light. Unplug the wires and the latch plate will come off. You will find two fragile retaining clips that attach the switch to the underside of the latch plate. These are easy to break, so use a pair of small needle nose pliers to pull them off, very gently. You can reuse these if you are careful by squeezing the cross sections that are located at the center of the clips until they are flattened. Also double check the two fuses at B6 and D3 (even if you have already visually checked them) by using a multimeter there as well, as one of them also provides power to the double relay. If all of the above check out okay, then the most likely remaining possibilities are a dead spot on the electric motor or the convertible top double relay in the relay tray above the fuses. Before you go out an buy a new double relay, pull out the old one and clean the terminal spades on it as well as the female receptacles in the relay tray. You can do the latter with a small piece of emery cloth draped over the end of a small flat-blade screwdriver. Also, rap the double relay sharply on the ground a couple of times. That will sometimes revive one of those relays. Let us know if you have any success with these fixes. Regards, Maurice. -
Lug bolt size
1schoir replied to Makulu's topic in 996 Series (Carrera, Carrera 4, Carrera 4S, Targa)
The only factor to consider when choosing the size (length) of lug bolts is the distance from the outside face of the center of the wheel (the surface against which the bolts exert pressure) to the outside surface of the disc rotor. If that distance has not changed, there is no reason to change the size of the lug bolts. Longer bolts are needed when you install spacers, which necessarily increase the distance. Regards, Maurice. -
Yes, that would alleviate some pressure between the glass and the outer weatherstrip, but if your window is now otherwise properly aligned you may throw things out of adjustment. Instead, you can first try to treat the weatherstrip with "gummipflege" or a similar product. That works well for solving the problem your are describing. Regards, Maurice.
-
Did the replacement fuse blow after a day of NOT operating the windows at all, or did it blow after (or during) moving one of the windows up and down? If it blew (or continues to blow when replaced again) only during or after operating one of the windows, you may have a loose wire that is getting caught and shorted against a section of the window when it moves up and down. If that is the case, you will have to remove the door panel to inspect the wiring, especially the connections leading to the electric motor on the window regulator. Regards, Maurice.
-
HVAC possessed, no air
1schoir replied to 987_RDC's topic in 996 Series (Carrera, Carrera 4, Carrera 4S, Targa)
Cleaning the ignition switch usually does not produce any results, but if you want to try that route stick one of those red "straws" that go on the end of a spray can into the cylinder and spray away. You can use a can of electrical contact cleaner. If that does not yield any improvements, you will have to replace the ignition switch. If you are not getting that familiar "clunk" sound when you remove the key, that is usually a sign that the switch is on the way out. The good news is that it's an inexpensive part and fairly easy to remove and replace (if you are a contortionist :blush: . Here's is a link to a DIY on the ignition switch: https://sites.google.com/site/mikefocke2/ignitionswitchreplacement Regards, Maurice. -
HVAC possessed, no air
1schoir replied to 987_RDC's topic in 996 Series (Carrera, Carrera 4, Carrera 4S, Targa)
Here is a comprehensive DIY on how to access all of the components in the console: http://www.renntech.org/forums/index.php/tutorials/article/242-mp3-player-through-cr-210-with-cd-changer/ Use the pertinent sections to help you understand how to remove the HVAC unit. Another note...Sometimes, when there are unexplainable electrical gremlins, it turns out to be the electrical portion of the ignition switch. Your symptoms sound different, but keep that in mind nonetheless. Regards, Maurice. -
There is a fix for a stretched regulator cable which involves installing a bicycle brake line adjuster in line with the cable in the regulator. I had posted a link here to the 986forum.com poster who had devised this ingenious fix a couple of years ago. If I find the link, I'll post it again. Regards, Maurice. Update: Here is the link for that magical fix: http://986forum.com/forums/general-discussions/25704-window-regulator-permanent-fix-stretched-cable.html