Welcome to RennTech.org Community, Guest
There are many great features available to you once you register at RennTech.org
You are free to view posts here, but you must log in to reply to existing posts, or to start your own new topic. Like most online communities, there are costs involved to maintain a site like this - so we encourage our members to donate. All donations go to the costs operating and maintaining this site. We prefer that guests take part in our community and we offer a lot in return to those willing to join our corner of the Porsche world. This site is 99 percent member supported (less than 1 percent comes from advertising) - so please consider an annual donation to keep this site running.
Here are some of the features available - once you register at RennTech.org
- View Classified Ads
- DIY Tutorials
- Porsche TSB Listings (limited)
- VIN Decoder
- Special Offers
-
OBD II P-Codes - Paint Codes
- Registry
- Videos System
- View Reviews
- and get rid of this welcome message
It takes just a few minutes to register, and it's FREE
Contributing Members also get these additional benefits:
(you become a Contributing Member by donating money to the operation of this site)
- No ads - advertisements are removed
- Access the Contributors Only Forum
- Contributing Members Only Downloads
- Send attachments with PMs
- All image/file storage limits are substantially increased for all Contributing Members
- Option Codes Lookup
- VIN Option Lookups (limited)


ar38070
-
Posts
544 -
Joined
-
Last visited
Content Type
Profiles
Events
Forums
External Paint Colors
Downloads
Tutorials
Links Directory
Collections
Store
Everything posted by ar38070
-

Caliper cylinder seals
ar38070 replied to Jean-Marc's topic in 996 Series (Carrera, Carrera 4, Carrera 4S, Targa)
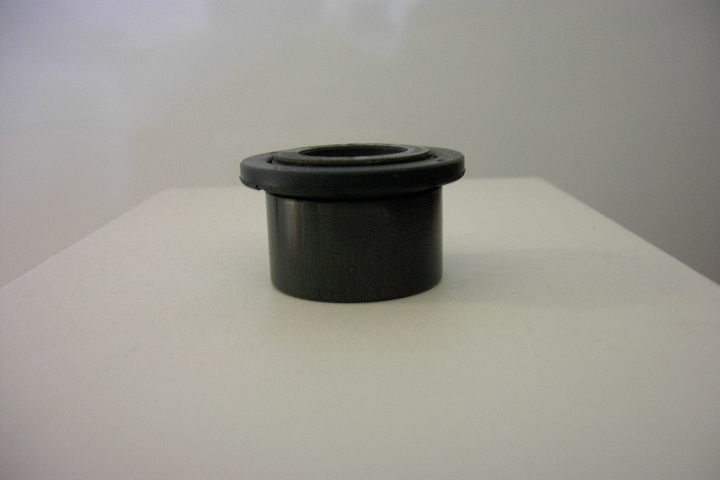
You do not want to take the pistons out unless you plan on bleeding and refilling the brake fluid. The fluid is right behind the piston. Also it is very hard to get both pistons out without disconnecting the caliper from the brake line. You do not want to grab the piston with a pair of pliers as the material is not that hard. I have been told that you usually use compressed air to pop them out. Again I would not do this. Attached are two pictures. These show the piston out but again you do not need to do this. The piston just needs to extend far enough out so that you can get to the groove. If the piston is not out far enough so that you can see all of the groove then have someone press gently on the brake pedal to get the piston to extend. Alternately usually if you push one of the pistons in the other will extend. Once you have replaced the seal on the first piston push it back in and the other one will extend. The first picture shows the new seal installed on the piston. In the second picture I pushed the outer part of the seal down so that you can see that the inner part of the seal is seated in the groove in the piston. When you first put the seal in the groove on the piston it will probably be twisted, just grab the outer ring and spin the seal around the piston and the seal will straighten itself out. Now press the outer part of the seal down against the caliper to seat it in the groove that is there.
-
The fronts are easy. Just push down hard on the control arm. There should be more than plenty of clearance.
-
Here is a long shot. A friend of mine just recently had a problem with rat/mice taking up residence in his cars. They like to eat wires and insulation. Caused $6500 damage in his new GT3 as they ate the O2 sensor wire harness. He has to wait for a new one to be made and shipped from the factory. Have you noticed any droppings in or around the car?
-
Caliper cylinder seals
ar38070 replied to Jean-Marc's topic in 996 Series (Carrera, Carrera 4, Carrera 4S, Targa)
You just pop them off and put the new ones on. I have heard of people doing it without removing the caliper. I remove the pads and then take the caliper off the wheel carrier. It makes it easier to get at the seals. If you look at the new one you will see that the outer lip is stiff as I think that there is a metal stiffener embedded in it. That lip is a press fit in a groove in the caliper. The middle of the seal is flexible rubber. There is a groove around the caliper piston. The flexible rubber part of the seal seats in this groove. You need to work the outer part of the old seal out of the caliper. A flat head screwdriver works fine. Just push it into the side of the seal that you should be able to see and pry it up. Then work it loose all the way around. You can then stretch the inner part of the seal away from the piston and then lift it off the piston. Be careful when you are removing the seal from the piston. You do not want to pull the piston out of the caliper. Makes a huge mess. -
Gas Mileage
ar38070 replied to mdillian3690's topic in 996 Series (Carrera, Carrera 4, Carrera 4S, Targa)
Miles to go is a function of how hard you push the go pedal. You are driving harder/faster than when you first bought the car. If you want a dramatic demonstration take your car to the track. Miles to go plummets. Then when you take the car home Miles to go increases at least for a while. You "make" gas. :D -
Adjusting the door window height
ar38070 replied to J9000's topic in 996 Series (Carrera, Carrera 4, Carrera 4S, Targa)
Also Gummiphlege (sp?) available at BMW dealers. -
If I remember correctly there are two types of fasteners used. One is a plastic nut/washer that just screws off and the other is a push pin spreader like that used on the spoiler. The difference is that the instead of pushing the pin out, you just pull the pin out by putting a flat head screwdriver underneath the "head". The pin does not come all of the way out, just pull it out until it stops, about 1/2". You can then pull the whole fastener out.
-
0W-40 improves gas mileage and consequently lowers emissions (thinner oil, less friction). I do not know how much, probably not much more than 1 mpg, but anything helps with regard to CAFE. I think that that is the major reason manufacturers are recommending 0W-40. I will agree that for 90%+ of the porches out there, 0W-40 is okay. If your car spends a lot of time at redline (track or really, really agressive street driving, like redlining the car every 5 minutes) then 15w-50 is the better choice. Oil consumption is also probably a bit higher too with 0W-40.
-
boxster bearing
ar38070 replied to mrslva's topic in 996 Series (Carrera, Carrera 4, Carrera 4S, Targa)
You also need a press and a torque wrench good to 348 ft-lbs (to reinstall the nut on the axle). The hard part is getting the old bearing out. Pressing in the new one is easy if you freeze the bearing and heat the wheel carrier. When I did it we took the strut and wheel carrier off of the car. -
The spec that I have for my cobra seat is 35 nt-m or about 25 ft-lbs. In should be in the docs for the seat. It has also been suggested that this is a good place to use some loctite as the bolts may have a tendency to loosen. I have not had that problem. YMMV. The only other electrical thing that needs to be reset is the automatic up/down function of the windows.
-
Valmet production means what?
ar38070 replied to my99boxster's topic in 986 Series (Boxster, Boxster S)
Makes no difference. All of the parts and sub-assemblies come from the same sub-contractors. They are just assembled in different place. The only thing unique that I can think of is the painting. -
Definitely disconnect the battery. I do that anytime I touch the electricals. You do not have to worry about reconnecting the wire harness under the seat. The heated seat switches wont do anything unless they are hooked up so pressing them wont hurt anything. You will need to either buy another seatbelt receptacle or transfer the existing one to the sparco. If you buy the B&K side seat mounts then they provide a hole to which you can mount the receptacle. The porsche electical connectors are well over-engineered. They can be tricky to disconnect the first time you see one. Once you remove the connector from where it is attached to the bottom of the seat, hold the connector by the sides so that the wires are coming out the top and bottom, then pull the two sides sideways and connector will separate (this is hard to describe). If you are using the seat belt connector from the seat you will then have to remove its connector from the connector bundle. This should be the blue 4 pin connector. To get this one out you have to remove a U shaped plastic retainer that is on the side of the connector bundle. When you remove this note the orientation of the connector (the connector is 4 pins in a square. One side of the connector has a tab.) The tab points to the "outside". When you hook the connector to the wire harness that is attached to the car make sure you put it back in correctly. After you put the sparco seat back in hook up the seat belt connector. I tape the connector to the in car wire harness to keep it from coming apart. Now you can hook the battery back up. If you are planning on using harnesses then when you do so the seatbelt warning light will not go out. You can defeat the light by either plugging in the 3 point belt to the seat belt receptacle and routing the belt behind the seat, buying another seat belt tongue to plug in or making a tongue out of a piece of plastic (I used an old hotel plastic card key).
-
Lexol seems to do the job. You want both the cleaner and the conditioner.
-
Caliper Swap DIY?
ar38070 replied to LVDell's topic in 996 Series (Carrera, Carrera 4, Carrera 4S, Targa)
Use anti-seize not loctite. If you torque the bolt correctly it will not come loose. Also I use anti-seize on all of the bolts. Another purpose of the anti-seize is to provide lubrication so that when you torque the bolt you get a good reading. When you use it do not get carried away. You only need to put a thin layer on the first 5 or so threads. Put a dab on your finger and spin the tip of the bolt in it. Right before I start reassembling I sit down and put anti-seize on all of the bolts. New bolts are not expensive @$8 each. They come coated not in the sense of being smeared with paste but the finish is not that of an ordinary steel bolt. However it is not necessary to replace them especially if is is the first time that they have been reused IMHO. I have been told by several Dealer Porsche mechanics that it is not necessary. I have removed my calipers numerous times (at least 4) and have not yet replaced the bolts (though I have a set in case I notice anything amiss). I have tracked my car 30+ days a year for the last 3 years and not had a failure. YMMV -
Caliper Swap DIY?
ar38070 replied to LVDell's topic in 996 Series (Carrera, Carrera 4, Carrera 4S, Targa)
You forgot to take off the wheel. :lol: When you put the wheel back on the torque for the bolts is 96 ft-lbs 1) Instead of disconnecting the sensors you can just hang the brake pads in the wheel well with a piece of wire. 4) Instead of a bungee you can use a coat hanger. 5) A pencil or sharpened piece of dowel also works as a plug. Brake fluid is nasty stuff. Do not splash any on the paint. Also you can put down paper or cat litter to soak up any that you spill 10) I have also reused the bolts without any problems. -
Caliper Swap DIY?
ar38070 replied to LVDell's topic in 996 Series (Carrera, Carrera 4, Carrera 4S, Targa)
This is straightforward just messy. Once you remove the caliper from the wheel carrier you disconnect the brake line and then attach the new caliper. The torque for the two bolts that hold the calilper to the wheel carrier is 63 ft-lbs. The torque for the brake line to the caliper is 9 ft-lbs. Now you need a power bleeder to purge the air from the system and a liter of fresh brake fluid. With the power bleeder hooked up you start with the caliper furthest from the reservoir and work your way closer. Do not forget that there is a bleed screw on each caliper (8 total). You start with the right rear, then left rear, right front and finally left front. -
These are good instructions. However this method shows removing the axle nut for the rears in order to remove the wheel carrier and strut from the car. Keep in mind that the torque on this nut on reinstall is 348 ft-lbs.
-
ROW 030 Installation Instruction
ar38070 replied to rsk4today's topic in 986 Series (Boxster, Boxster S)
Here is a link to another post for a 996. The boxster is similar: http://www.renntech.org/forums/index.php?showtopic=2532&hl= The important torques in ft-lbs: front: Control arm to wheel carrier 55 Spring strut to wheel carrier 63 track rod to steering arm 55 Top of strut to body 27 Brake caliper to wheel carrier 63 Rear: top of strut to body 27 strut to wheel carrier 63 control arm to wheel carrier 55 toe control arm to wheel carrier 55 Drive shaft to transmission 29 brake caliper to wheel carrier 63 -
Here is a recent post with pictures. It is for a 996 but the procedure is similar: http://www.renntech.org/forums/index.php?showtopic=2532&hl=
-
If you know what you are doing then this is a 4-6 hour job. It helps to have another pair of hands at times. Theoretically you could change the springs without fully removing the strut from the car. You could just tip them out, undo the nut at the top of the strut that holds the spring, replace the spring and bolt it all back in. I took the wheel carrier and strut completely off of the car. To pop the ball joints apart you need the porshe ball joint tool $80. There are other ways of getting them apart (you can whack on the control arm, you can use a hex bit in the head of the ball joint and whack on that, etc.) You need 18mm tools (socket, wrench) which is not common to most tool sets. Also an 18mm crow foot is useful when retorquing one of the ball joints. You need 8mm (I think) hex bit to remove the bolts that hold the drive shafts to the transmission. The fronts come out easy as you can depress the control arm far enough to swing the top of the strut out of the wheel well. The rears are a pain which is why you have to disconnect the drive shafts from the transmission. Once you have disconnected the drive shafts then you can push down on the control arm enough so that you can swing the top of the strut out of the wheel well. I also like to loosen the nut at the top of the strut that holds the spring in place while the strut is still in the car. Trying to do this on the bench with the strut out of the car is a lot harder.
-
First gear going out?
ar38070 replied to RandallNeighbour's topic in 986 Series (Boxster, Boxster S)
It is probably the transmission. Shop around and you can probably find a used transmission for under $2k. There was one listed on the racing board a little while ago for $1200. If you have the transmission replaced/repaired then do the clutch too. Eight hours for the replacement work is the same as what I paid two years ago. Some people have said it should be half that. -
1999 Boxster Transmission Question
ar38070 replied to danjen's topic in 986 Series (Boxster, Boxster S)
As all the other gears are working it is probably not a linkage adjustment problem. Does he grind the gears? I know that on a turbo transmission, if you grind the gears, you can do something to the gears that will not allow shifting. I do not know if the same situation would occur in the boxster transmission but if he frequently grinds the gears that could be the problem. Can the car be shifted into 5th with the engine off and the clutch engaged? Or under no situation can the car be shifted into 5th? If you cannot get the car into 5th under any condition then I would say that something is broken in the gear box and it will have to be replaced/repaired. FYI there was a 5 speed transmission for sale on the boxster racing board for $1200. -
If the car is brand new take it to the dealer and let them fix it.
-
If you did not have a hardtop before then you need to add the spin lock pieces to the car body. The two pieces plus the two bolts is about $80. If you know what you are doing, it takes less than an hour to install.
-
When to change the spark plugs - that is the ?
ar38070 replied to Tool Pants's topic in 986 Series (Boxster, Boxster S)
Assuming you are careful when you remove them from the packaging then no.