Welcome to RennTech.org Community, Guest
There are many great features available to you once you register at RennTech.org
You are free to view posts here, but you must log in to reply to existing posts, or to start your own new topic. Like most online communities, there are costs involved to maintain a site like this - so we encourage our members to subscribe or donate. All subscriptions and donations go to the costs operating and maintaining this site. We prefer that guests take part in our community and we offer a lot in return to those willing to join our corner of the Porsche world. This site is 99 percent member supported (less than 1 percent comes from advertising) - so please consider an annual subscription or donation to keep this site running.
Here are some of the features available - once you subscribe RennTech.org
- View Classified Ads
- DIY Tutorials
- Porsche TSB Listings (limited)
- VIN Decoder
- Special Offers
- Paint Codes
- Registry
- Videos System
- View Reviews
- and get rid of this welcome message
It takes just a few minutes to register, and it's quality Porsche information at a low cost.
Contributing Members also get these additional benefits:
(you become a Contributing Member by subscribing or donating money to the operation of this site)
- No ads - advertisements are removed
- Access the Contributors Only Forum
- Contributing Members Only Downloads
- Send attachments with PMs
- All image/file storage limits are substantially increased for all Contributing Members
- Option Codes Lookup
- VIN Option Lookups (limited)
Leaderboard


-0001-0001.thumb.png.17f5bb25bf8ec261a17c21e6321c8492.png)
Popular Content
Showing content with the highest reputation on 05/16/2025 in all areas
-
If the cluster has ever been taken out there is a chance that they did not get all the plugs re-inserted properly (making poor contact). I would start with that and re-test.1 point
-
I haven't seen on these forums anyone who has rebuilt their 997.1 using LN Engineering nickies. I just thought I'd share my experiences. I had a stock 997.1 2006 Carrera S. At 132,000 i scored a cylinder in the middle of nowhere in Kansas. the rebuild consisted of: 1. LN Engineering 4.0 “nickies”, ceramic hybrid ball-bearing IMS retrofit, and JE Pistons2. LN Engineering low temperature thermostat3. 997.1 "Competition" Carrera IPD Plenum & GT3 throttle body 4. third radiator 5. replaced water pump the ever so quick summary: low end power--amazing. mid range--amazing. high range rpms--amazing. for those of use that like the “feel” of a 996 and 997.1 (the 997.2 and the 991 are, to my mind, fundamentally different in this regard), this rebuild results in an intoxicating drive. I haven’t put this thing on a dyno and to be honest i’m not all that interested. the horsepower gains are so prominent, it would simply be an academic exercise to establish that I have from +60hp to +75hp--it’s that impressive.Things to keep in mind This turned out to be a very long process. if you are deciding on doing this, please check with LN Engineering to understand what tools are required. I had my car rebuilt twice by a nationally renowned porsche mechanic (he has won several awards on his expertise in building porsche race engines) at a porsche dealer. the first time didn’t go well as there was a chip in one of the pistons that required them to do it again. what went wrong? i don't really know. on the one hand, upon looking at the old water pump after the second rebuild, all the "fins" were chipped away and indeed the pieces may have found a way to the piston. on the other hand, there appears to have been special tools that even they didn’t have to properly install the pistons the first time around (this is my interpretation of what representatives at JE Pistons and LN Engineering told me). they purchased the necessary equipment the second time around and the result is amazing. Ladies and Gentleman, there aren't many porsche shops in the United States that have opened up a 997.1 engine and put it together again successfully. This particular shop had three mechanics who regularly open up 997.1 engines. The mechanics at Aristocrat Motors in Kansas City are excellent at what they do and sill we had to do it twice to get it right. we learn from making sense of the unknown and I have no doubt that Aristocrat Motors would do an excellent job on your car if you decided to go this route. I’m only mentioning this to emphasize that no matter how good that mechanic is, check with LN Engineering to make sure that the place where you are having this done has the proper equipment. if not, there is a more than probable chance that mistakes can happen during the tuning.1 point
-
I need to replace the handbrake on my 2008 C2S. Right now it's engaged and won't disengage without significant effort (button basically doesn't work without extreme force and lifting it slightly). I know how to remove the center console (here's a good video for future readers 2008 Porsche 911/997 Turbo Center Console Removal Airbag Light and Shift Cable End Links - YouTube), but are there any specific instructions for replacing the handbrake itself? Also, I'm worried this handbrake is going refuse to disengage at any time. Is there a way to disengage it if I end up in a pinch? Finally, while I'm going through all of this is there anything else I should correct/replace? I had the Function First Shift-Right Solution installed a few years ago.1 point
-
To anyone that ever finds this, this was actually a really easy job. The video on YouTube (referenced above) for removing the center console (a trim removal kit helps a ton) was all I needed. Once I was down to the hand brake it was actually quite obvious how to replace it. The hardest part is a couple of the bolts are partially obstructed by the brake lever, but a wrench with an angled head did the trick. That part was slow going but ultimately successful. It only took two hours, I can't believe the dealership wanted $1800.1 point
-
congratulations! "i almost got into a fight with my mechanic"--brings back memories…i am sure he did an excellent job. one thing i did experience was MAF and Cat and sensor and knocking issues (check engine lights, sometimes blinking, sometimes not, codes such as P420, p1097, p2195) i used a bottle is isoheet every tankful for a month and everything went away. has not come back since. is this new config engine more sensitive to water in the fuel? i dunno. thought i would mention it as your car is being put away for the season, something like this may arise when you start to play again come spring. congrats again. all is well that ends...1 point
-
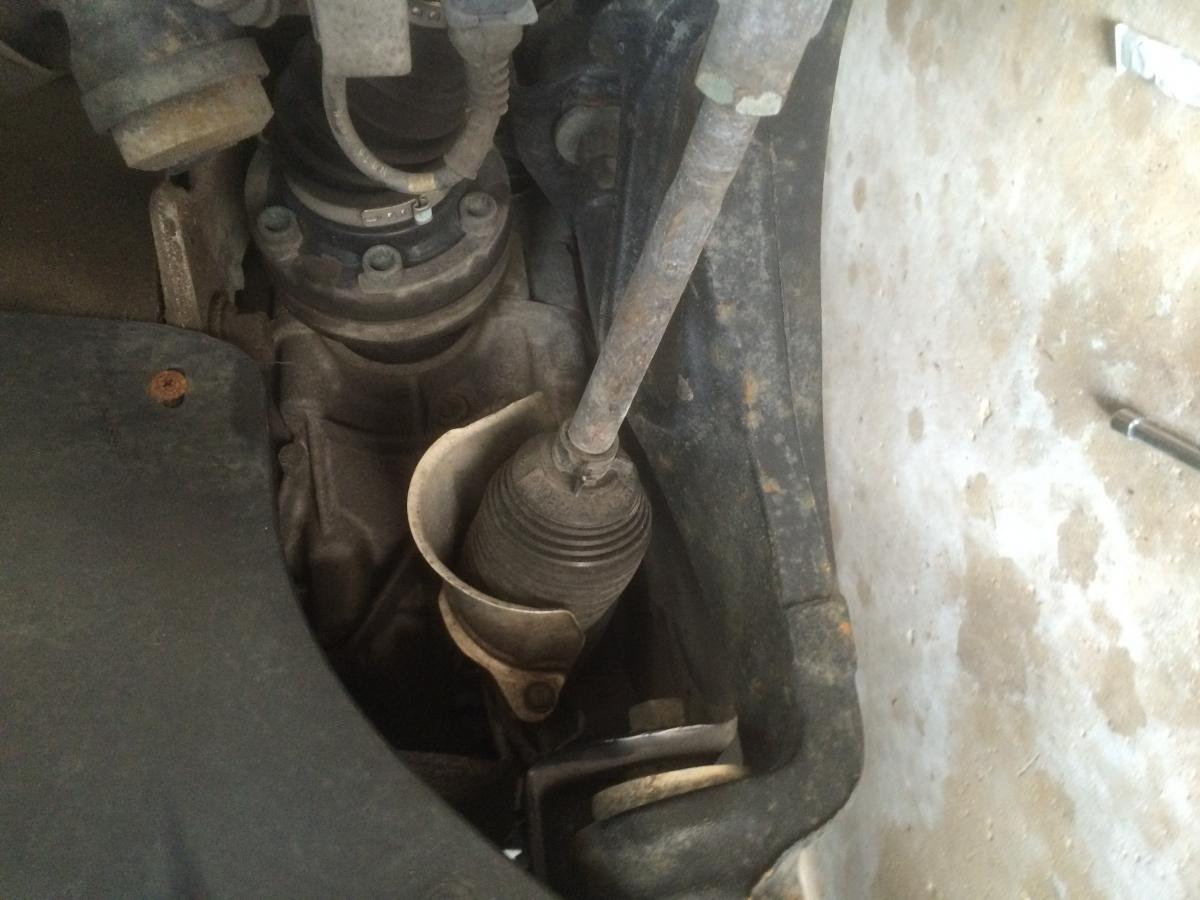
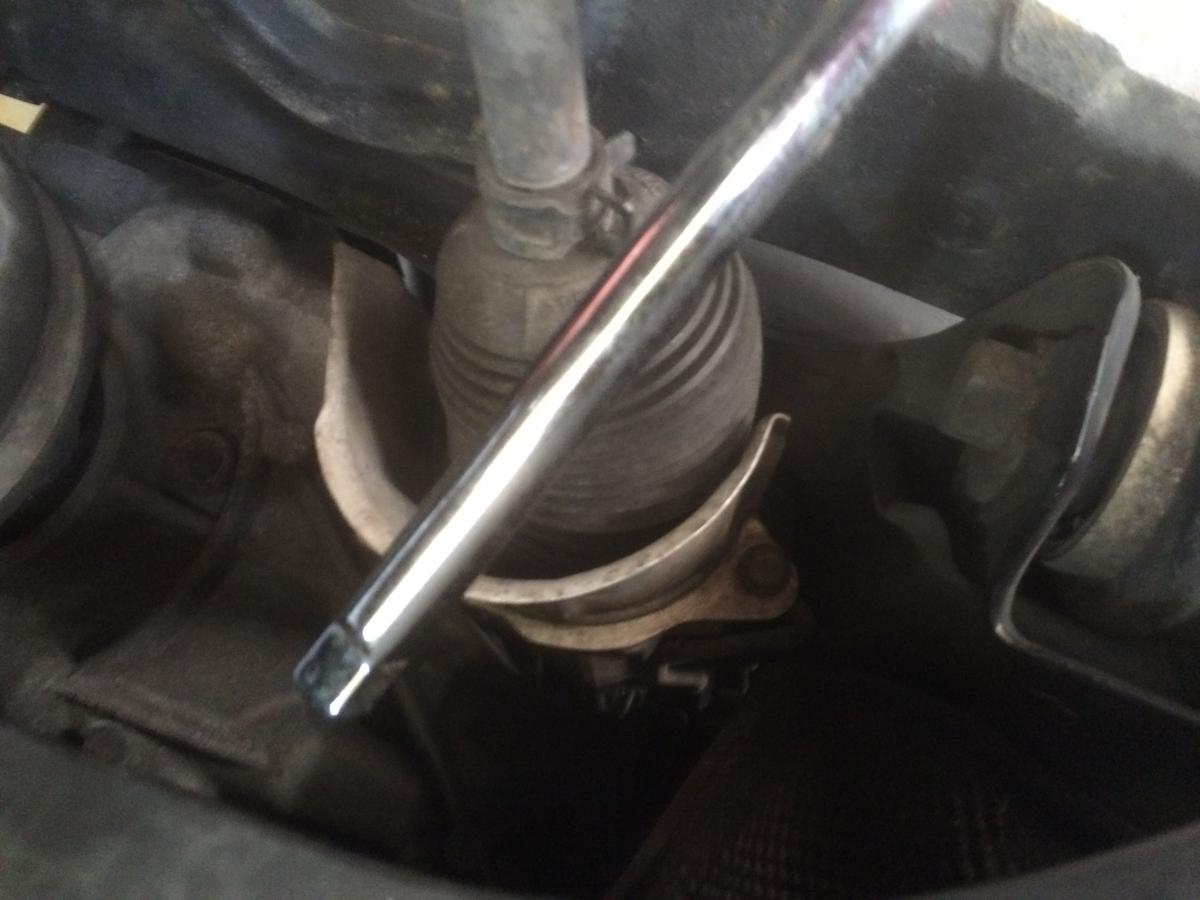
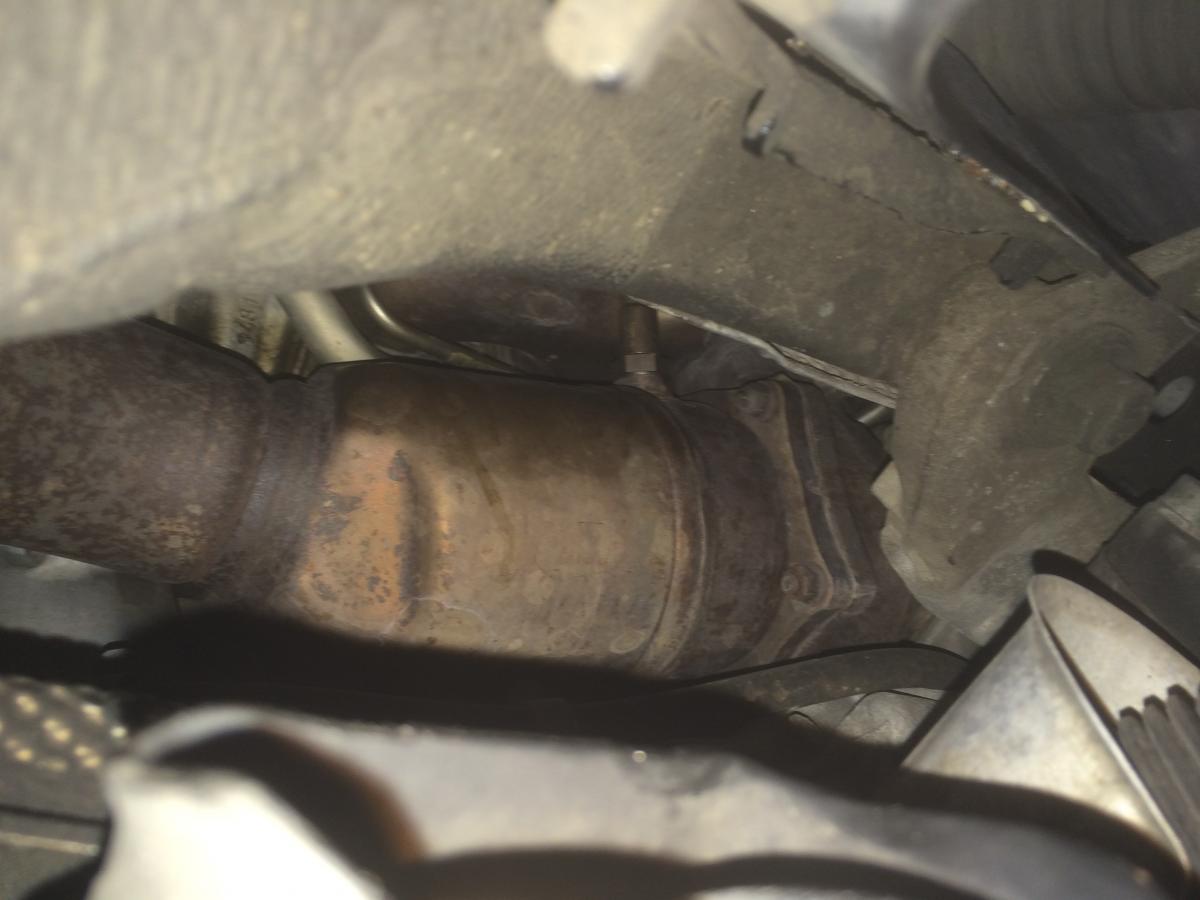
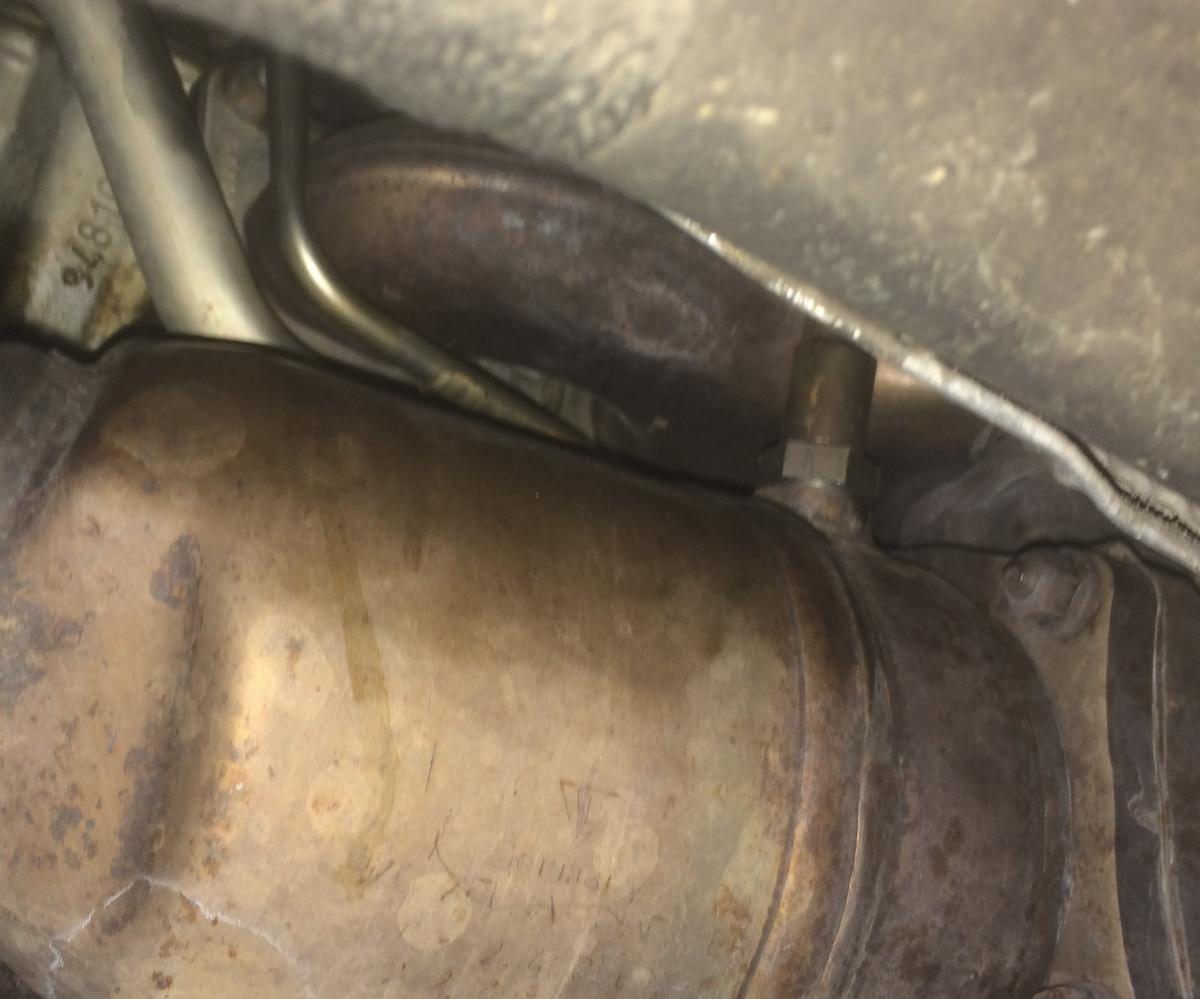
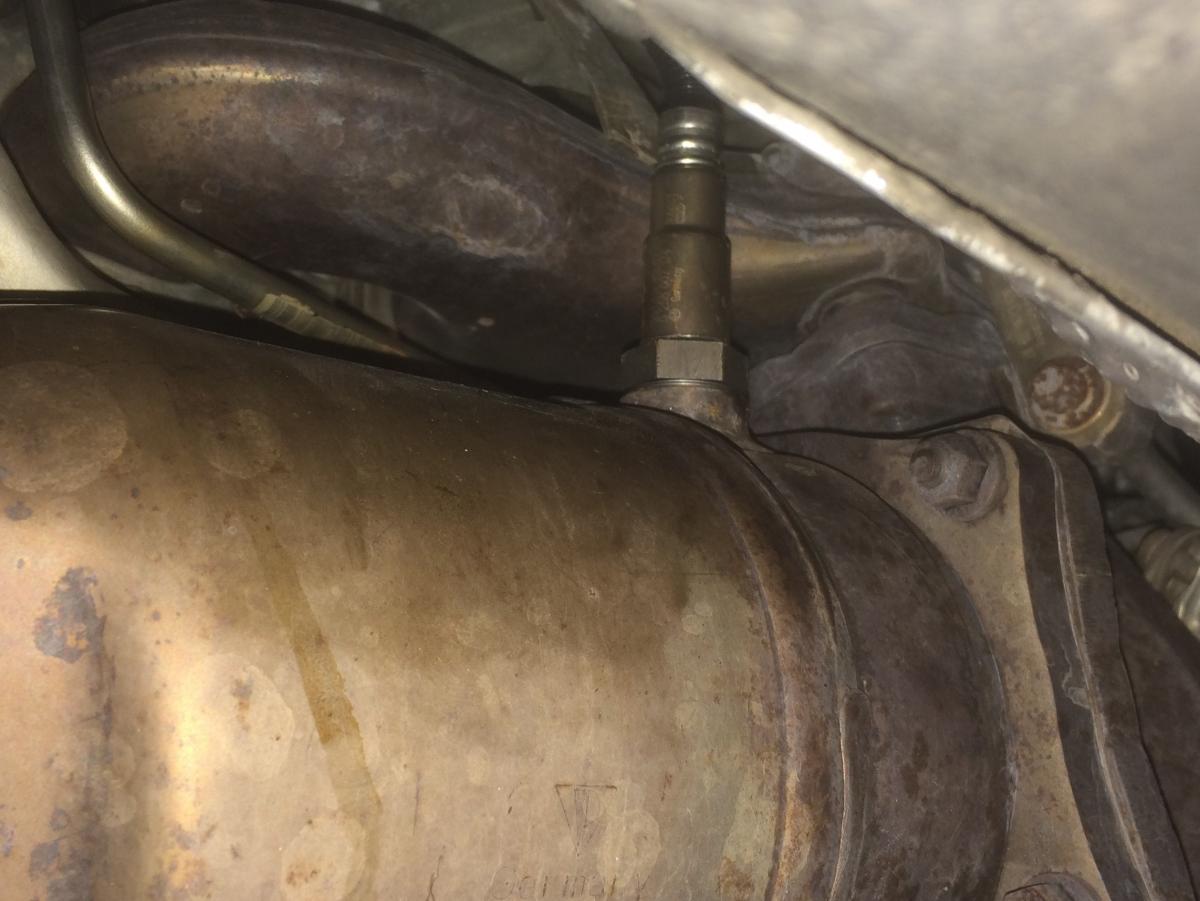
Hi Everyone, Well, I finally managed to purchase my first Porsche - a 2004 Turbo Cayenne with 86k miles and most of the normal out of warranty work already done (coolant tubes, cardan shaft, etc) and am thrilled to be a member of the Porsche community! Prior to purchasing it, I read through many articles on Porsche ownership to get an idea of normal problems and remedies. Renntech has been a treasure of information and I would now like to give back a little bit to the community. The dreaded CEL arose after 2 months of ownership and I took the CTT into O'Reillys (thanks O'Reillys) to get a fault code read out. It showed that my passenger side pre-cat O2 sensor was bad so I order a new one and proceeded to read through as many DIY articles as I could find on the topic. This one and the one on Pelican Parts were most helpful and are what I used as my basis. My initial plan was to remove the inner wheel well per sswong98"s good details above. I started down this path, took off the wheel and decided to take a peek underneath before removing the wheel well simply to assess how much room I had to work with. To make a long story short, I ended up being able to remove and replace the O2 sensor within the very confined space given and without removing the wheel well. In all, it took 90 minutes after jostling about quite a bit and trying different tools. I thought this might be another alternative of value to offer to this community so I'll describe it briefly here. 1) Follow SSwong98's steps of: a) jack up vehicle B) turn wheels right to wheel lock c) remove front passenger tire d) remove 02 sensor electrical connection at firewall. At this point you can see how much room I had to work with between the body, suspension, etc. The photo with the end of the 3/8 ratchet extension shows where to view and then subsequent photos show the amount of clearance and the 02 sensor. Basically, I was able to use a 22mm open ended wrench and get it into the space shown in the photos. Lying on my back, I was able to get the wrench between the suspension and inner wheel well and break the 0@ sensor loose. Once I had it broken loose, I could use my fingers to unscrew the O2 sensor, again lying on my back and from underneath the vehicle. Unscrewing the )2 sensor was not difficult but took about 5 minutes as I could only turn it slightly, then re-grip the sensor so that the wire did not cause it to screw back in, and then continue this process until it was removed. I could have also cut the sensor wire which would have eliminated some of the torque produced by the wire and made it slightly easier to unscrew the sensor. Once the sensor was out, I removed the original heat shield from the original O2 sensor wire by cutting it lengthwise. My goal was to reuse it on the new sensor. I then drilled 4 small pilot holes on both side of this heat shield (sorry, forgot to take photos) and placed a pop rivet into each in order to have it hold in place around the O2 sensor wire. The most challenging part was getting the new 02 sensor started into the mounting hole. I dropped the sensor in from the top of the engine and was able to locate the sensor quite easily. I was also able to reach up from underneath the vehicle, grasp the sensor with a thumb and finger and get the O2 sensor into the mounting hole. However, once again, the sensor wire created a torque that prevented me from being able to start the sensor correctly into the threading. After trying various options for 5 minutes, I called in the calvary... I asked my son to hold the sensor wire from the engine bay side and to turn the wire slightly in a clockwise manner so that the sensor wire torque worked in my favor. I also repositioned myself so that I could get a much better grasp of the sensor. Instead on lying on my back looking up at the sensor, I sat down in front of the caliper and was able to reach the sensor through the same opening as before. While I could not see the sensor, I had it placed into the mounting hole from before so all I needed to do was to get it to start threading properly. In this seated in front of the caliper position, I was able to much more easily grasp and turn the sensor and got it threaded within a few seconds. At the same time, I told my son to slowly keep tuning the sensor wire. Once the sensor was hand tight, I used the 22mm open ended wrench to tighten it. All told, it took about 90 minutes from wheels up to wheels down. Some other notes: I ordered the special O2 sensor socket from Pelican (same one shown in SSWONG98's write up) but, very oddly, could not get enough room from the top or bottom to be able to get it onto the sensor. Removing the inner fender well would have helped here. I also would suggest getting a stubby 22mm open ended wrench as this would allowed more freedom for movement. The one I had was about 14 inches long. I also had a line wrench (shown in one photo) that was a bit shorter in length and worked very well. Well, I hope that this is some value to this great community
 1 point
 -
Uwon, 1. i'm not particularly patient. at some point, it became evident to me that the problem was beyond my control 2. first water pump failed and was replaced around 32,000 miles. 3. the low-temp thermostat: oil temps appear to heat up just as quick but the oil temp is much quicker to cool down when things get hot (>225 degrees Fahrenheit) .1 point