Welcome to RennTech.org Community, Guest
There are many great features available to you once you register at RennTech.org
You are free to view posts here, but you must log in to reply to existing posts, or to start your own new topic. Like most online communities, there are costs involved to maintain a site like this - so we encourage our members to subscribe or donate. All subscriptions and donations go to the costs operating and maintaining this site. We prefer that guests take part in our community and we offer a lot in return to those willing to join our corner of the Porsche world. This site is 99 percent member supported (less than 1 percent comes from advertising) - so please consider an annual subscription or donation to keep this site running.
Here are some of the features available - once you subscribe RennTech.org
- View Classified Ads
- DIY Tutorials
- Porsche TSB Listings (limited)
- VIN Decoder
- Special Offers
- Paint Codes
- Registry
- Videos System
- View Reviews
- and get rid of this welcome message
It takes just a few minutes to register, and it's quality Porsche information at a low cost.
Contributing Members also get these additional benefits:
(you become a Contributing Member by subscribing or donating money to the operation of this site)
- No ads - advertisements are removed
- Access the Contributors Only Forum
- Contributing Members Only Downloads
- Send attachments with PMs
- All image/file storage limits are substantially increased for all Contributing Members
- Option Codes Lookup
- VIN Option Lookups (limited)

-0001-0001.png.112c13ee97acfad0cb1e70d195cc9a0e.png)
Loren
-
Posts
37,849 -
Joined
-
Days Won
638
Content Type
Profiles
Events
Forums
External Paint Colors
Downloads
Tutorials
Links Directory
Collections
Classifieds
Store
Everything posted by Loren
-
Try 542` or 5419
-
-0001-0001.thumb.png.17f5bb25bf8ec261a17c21e6321c8492.png)
Are bird's following me?
Loren replied to bgreene1's topic in 996 Series (Carrera, Carrera 4, Carrera 4S, Targa)
See if you can get someone local to read your fault codes for you. Autozone will loan you a reader - write down the codes and report back here. -
Boxter engine is not repairable?
Loren replied to car5car's topic in 987-1 Series (Boxster, Boxster S)
I think you need to shop around for a replacement engine. Try Sunset Imports in Oregon - they sell Porsche Parts ar Dealer Cost plus 15%. There is a link at the top of the page. You will still need to find someone local to install your new engine but I doubt you will find a better price than Sunset Imports. I have worked on Porsche's (primarily my own) for over 30 years. They are very easy to work on provided you have the right tools and knowledge. -
Factory 18" GT3 wheels 8" fronts and 10" rears.

-
Becker North America Direct Phone Number for Parts: 201-961-1309
-
Brake rattle (I think)
Loren replied to yavor_tsolov's topic in 996 Series (Carrera, Carrera 4, Carrera 4S, Targa)
Yes, you could feel it under braking. If you don't know where the swaybar is (and it's mount then you best take it to a good Porsche shop. -
Boxter engine is not repairable?
Loren replied to car5car's topic in 987-1 Series (Boxster, Boxster S)
The only engine that I know that are "not repairable" are the ones with porous cases. Technically everything other than the case could be reused. I don't think Porsche are any different than any other engine. If parts are overheated and stressed they should be checked and or replaced. IMHO... they are all rebuildable it just depends on how many parts and how time is involved. Porsche's factory rebuilt engines are really a good deal because they are rebuilt to the same specs by people that do that every day -- and (this is big AND) they give warranty on that rebuilt engine. It depends on what you are looking for in your Boxster - but you could buy an engine from a salvage yard too. But that is a crapshoot in my opinion. -
Brake rattle (I think)
Loren replied to yavor_tsolov's topic in 996 Series (Carrera, Carrera 4, Carrera 4S, Targa)
Look for loose swaybar mounting bolts. That is fairly common. -
Are bird's following me?
Loren replied to bgreene1's topic in 996 Series (Carrera, Carrera 4, Carrera 4S, Targa)
Sounds like you should have the fault codes read then. Where are you located? -
I run 32/36 on my Bridgestone S03's. The car handles much better (for my driving style) at those pressures. So far I have not had any unusual wear pattern. But then I really don't expect to get much more than 10,000 miles out of the rears...
-
Check the tires first - that is pretty low miles for a wheel bearing problem.
-
Thank you, I can't seem to find the e-mail address at the main page. I am new to this site. Can you tell me the email address? Thanks again. Pete That is a third party that gives RennTech.org members a special price. You can email them at: htverheyen@aol.com
-
2007 987 water temp gauge not working
Loren replied to fgilty's topic in 987-1 Series (Boxster, Boxster S)
My car is an '04 986S (anniv. model) and today a red light started flashing in the temp gauge along with a "failure indicator" message. Does this TSB also apply to the 986 models? FYI: The gauge isn't reading at all. Thanks in advance. No, the TSB is for the MY2005 production run of 987 cars only. You should check for leaks or a bad sensor. -
Yes, you can buy one DVD -- it is listed on the more info page. $39.95 on PayPal or your credit card. You can email the seller (see the main page) for any special delivery options.
-
spark plug change
Loren replied to zokman's topic in 9PA, 9PA1 (Cayenne, Cayenne S, Cayenne Turbo, Cayenne Turbo S)
I was asking the original poster.... -
spark plug change
Loren replied to zokman's topic in 9PA, 9PA1 (Cayenne, Cayenne S, Cayenne Turbo, Cayenne Turbo S)
Model year please? -
part # & price for throttle body
Loren replied to porscheneer's topic in 986 Series Part Number Requests
P1502 Throttle Jacking Unit, Spring Test – Above Limit It says: Replace throttle part. Perform adaptation. 1. Switch on the ignition. 2. Wait one minute. Do not press the accelerator. 3. Switch off the ignition for at least 10 seconds. 4. Read out the fault memory. -
About 8.2 kg (18.08 lbs.) each for the fronts and 9.7 kg (21.38 lbs.) each for the rears
-
Loren, As if you don't do enough around here, could you please take a minute to send the diagram to me as well? I have a NOS PSE that didn't come with the switch or the wiring. The diagram would be a big help, Thanks. Um... for what model and year of car?
-
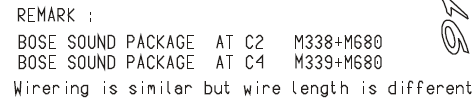
Bose Amp (M680)
Loren replied to rwmdouglas's topic in 996 Series (Carrera, Carrera 4, Carrera 4S, Targa)
-
Homelink replace US to Europe
Loren replied to enaor's topic in 997-1 Series (Carrera, Carrera 4, Carrera 2S, Carrera 4S)
I show the 433 MHz control box as 997.618.225.03 It has a US MSRP of $450.15 It mounts behind the front bumper - so that would need to come off to get access.
-
Rear valence and diffuser
Loren replied to jeremy77's topic in 9PA, 9PA1 (Cayenne) Part Number Requests
According to the parts list that should fit any Cayenne MY03-06. -
http://www.renntech.org/forums/index.php?a...code=_9x6_Werks Buy DVD #1
-
Car won't start, no fault codes
Loren replied to Sheriff John's topic in 986 Series (Boxster, Boxster S)
No swapping DME won't work because you would need to reprogram the immobilizer each time. You should however check to see that the connections to the DME are tight. I had one once that was 3/4 of the way unplugged. -
http://www.homelink.com/training/print.taf?i=first