Welcome to RennTech.org Community, Guest
There are many great features available to you once you register at RennTech.org
You are free to view posts here, but you must log in to reply to existing posts, or to start your own new topic. Like most online communities, there are costs involved to maintain a site like this - so we encourage our members to donate. All donations go to the costs operating and maintaining this site. We prefer that guests take part in our community and we offer a lot in return to those willing to join our corner of the Porsche world. This site is 99 percent member supported (less than 1 percent comes from advertising) - so please consider an annual donation to keep this site running.
Here are some of the features available - once you register at RennTech.org
- View Classified Ads
- DIY Tutorials
- Porsche TSB Listings (limited)
- VIN Decoder
- Special Offers
-
OBD II P-Codes - Paint Codes
- Registry
- Videos System
- View Reviews
- and get rid of this welcome message
It takes just a few minutes to register, and it's FREE
Contributing Members also get these additional benefits:
(you become a Contributing Member by donating money to the operation of this site)
- No ads - advertisements are removed
- Access the Contributors Only Forum
- Contributing Members Only Downloads
- Send attachments with PMs
- All image/file storage limits are substantially increased for all Contributing Members
- Option Codes Lookup
- VIN Option Lookups (limited)

Ahsai
-
Posts
2,804 -
Joined
-
Last visited
-
Days Won
10
Content Type
Profiles
Events
Forums
External Paint Colors
Downloads
Tutorials
Links Directory
Collections
Store
Everything posted by Ahsai
-
2000 996 - Brake Fluid Reservoir
Ahsai replied to Philip54's topic in 996 Series (Carrera, Carrera 4, Carrera 4S, Targa)
Thanks for your note. The brake fluid in my car has been replaced not too long ago. I have excess of fluid in my reservoir and i would prefer to take some fluid out Just use a couple of those eye glass screwdrivers (facing each other at 180) to pry around the edge of the cap and it should come out. -
Unsmooth clutch operation
Ahsai replied to FlashingBlade's topic in 996 Series (Carrera, Carrera 4, Carrera 4S, Targa)
Are you using a pressure bleeder? Also, do you top off your brake fluid reservior to MAX before bleeding? -
Thanks for the reply and that's exactly what I plan to do to finish the job. Ahsai: +1 on the over-torquing. With respect to the refilling of the coolant, you may have to use a vacuum device if you end up with any air pockets. You have the fact that you have only drained a little more than a gallon of coolant, so you may get away with either no or very little "burping". Regards, Maurice. Thanks, Maurice. I ended up not using the gasket and just replaced the plate with a new one and refilled from the coolant tank without vacuum tool. It took all the coolant that was drained out. I left the bleeder valve open and drove it a bit with some 5k rev, the coolant level is now a tad lower than MIN. Since I spilled some so that makes perfect sense. So it seems I got by this time w/o vacuum refill. Will monitor/refill in the next few days with the bleeder valve OPEN.
-
Thanks for the reply and that's exactly what I plan to do to finish the job.
-
Thanks for the reply. No, the plate already has a rubber gasket around it. My engine is stock and the plate worked for 8yrs and I'm hesitant to have double gasket.
-
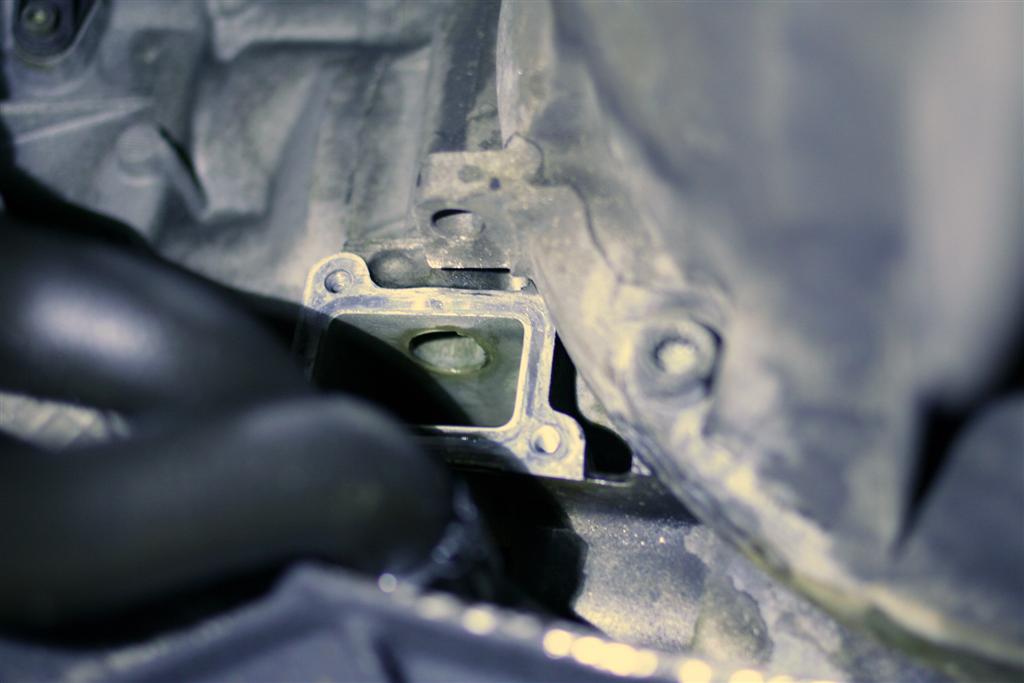
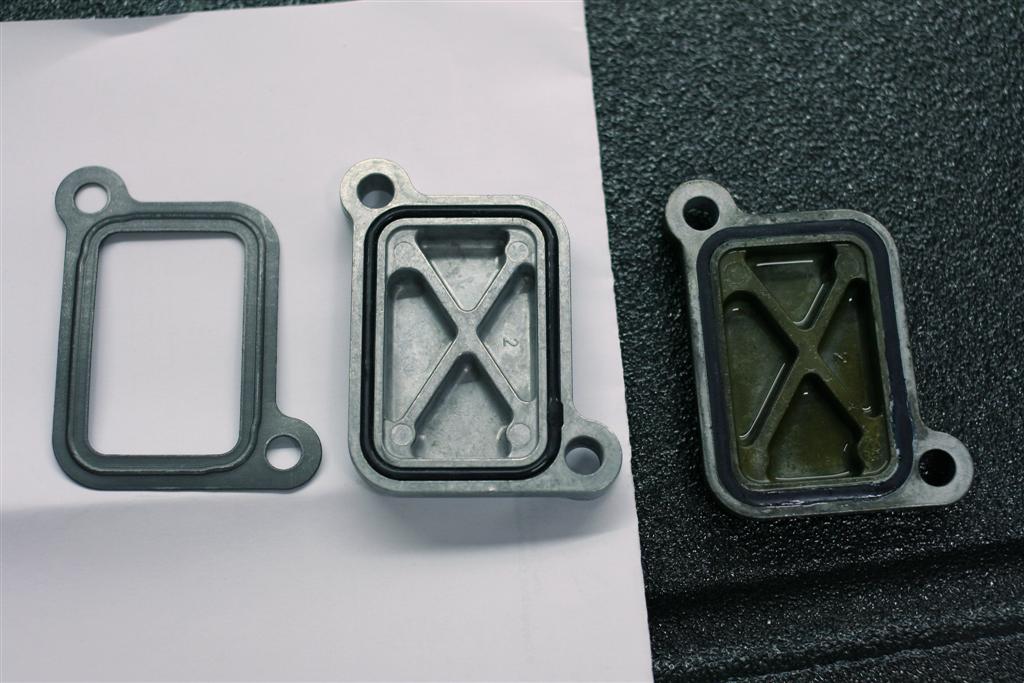
So I have this coolant leak around a metal plate on the engine block close to where the transmission meets the engine Pic of the plate => I removed the plate and about 1.2 gallon of coolant gushed out :eek:. I caught almost all of it. What's behind the plate => Now I'm left with TWO PROBLEMS: 1) Per the Porsche catalogue, there is a gasket between the plate and the engine block but I don't have this gasket at all and my engine is stock. Left to right, new gasket, new plate, old plate. So should I add this new gasket in between or just replace the old plate with the new one? The old one worked for 6yrs afterall => 2) With a full coolant tank, how do I refill the coolant?? Turn on the engine momentarily and the coolant from the tank should be sucked back to the engine? Any insight or tips will be much appreciated!

-
Loose Steering
Ahsai replied to cab713's topic in 996 Series (Carrera, Carrera 4, Carrera 4S, Targa)
I would check the tire pressure and wear first (is it even?). Then, have a shop SPECIALIZED in alignment to go through all the suspension components and check for wear, then do an alignment. Even your car has a low mileage, suspension parts may wear out/deteriorate due to age too. Compared to a 325i with modified suspension, your stock suspension (I assume it's stock) may not give you that secured feel. You can switch to M030 which will give you big improvements with minimal lowering. I swapped to x74 and can't be happier (but may be too low for your driveway). -
Where to buy Voltage Regulator?
Ahsai replied to dirkydiggler's topic in 996 Series (Carrera, Carrera 4, Carrera 4S, Targa)
If it makes you feel any better, mine failed at <40k miles also. $500 for a reman from Porsche sounds about right. I had to pay out of pocket ~$100 even I have a 0 deductible aftermarket warranty They have a database that put a "reasonable" maximum cost on every single part of your car and they only cover up to ~$300 for alternator so I had to pay the difference. They cover all the labor though. The site I had above ships the same day (not sure how long to get to you) but since no one is 100% sure if the regulator is indeed the culprit, althought likey (for all we know, it could be some shorts inside the alternator), you are still gambling :( -
Where to buy Voltage Regulator?
Ahsai replied to dirkydiggler's topic in 996 Series (Carrera, Carrera 4, Carrera 4S, Targa)
Tons of info here on a 996 (non-TT though) http://forums.rennli...ad-alt-reg.html Google found at least one vendor http://www.americanenginesco.com/servlet/the-141/Porsche-911-Boxster-Cayenne/Detail GL -
+1 on smoke machine since your code is indicating a small leak so it's hard to detect even if they were to vacuum test every single EVAP line. Otherwise, I'm afraid it's a fishing expedition :( Oh on the bright side, at least it can be reproduced and it's not intermittent so hopefully easier to track down.
-
Oil leak - what is this part?
Ahsai replied to Ahsai's topic in 996 Series (Carrera, Carrera 4, Carrera 4S, Targa)
Thanks, RFM! Yikes. I was hoping to relpace the seal myself. I don't have a vacuum coolant changer so probably I'll just take it to the shop. I don't think much will come out. Just catch what comes out (in a clean container) and put it back in. Then drive around with the bleed valve open for a couple of days. Thanks again, Loren! Will give it a try. -
Oil leak - what is this part?
Ahsai replied to Ahsai's topic in 996 Series (Carrera, Carrera 4, Carrera 4S, Targa)
Thanks, RFM! Yikes. I was hoping to relpace the seal myself. I don't have a vacuum coolant changer so probably I'll just take it to the shop. -
Oil leak - what is this part?
Ahsai replied to Ahsai's topic in 996 Series (Carrera, Carrera 4, Carrera 4S, Targa)
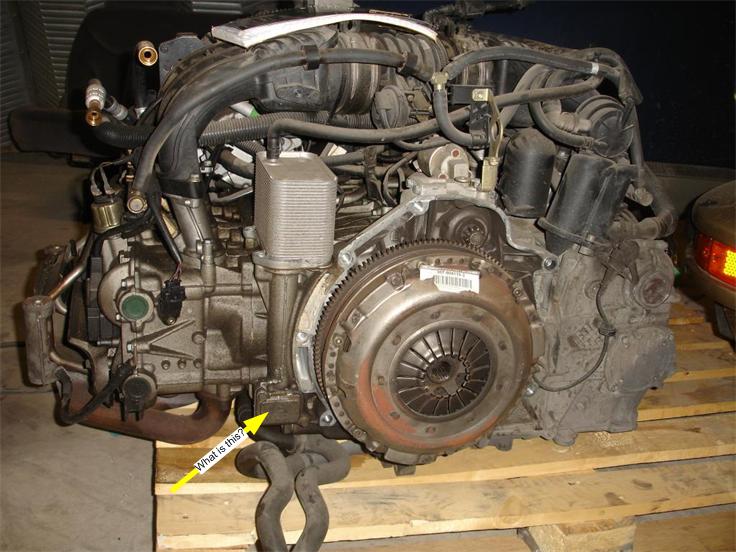
Got it. What's the engine and what year is it? My car is an '03 C2. The engine photoed is not my engine but the part in question is the same as mine. The part has part # 996 101 216 52 printed on it. That part has been updated. New number - 996.101.016.00 Cover -- US MSRP $18.52 also use 996.101.336.50 Gasket -- US MSRP $3.96 Thanks, Loren! Any idea what's behind the part? I don't want to have oil or coolant gushing out when I remove it... -
Oil leak - what is this part?
Ahsai replied to Ahsai's topic in 996 Series (Carrera, Carrera 4, Carrera 4S, Targa)
Got it. What's the engine and what year is it? My car is an '03 C2. The engine photoed is not my engine but the part in question is the same as mine. The part has part # 996 101 216 52 printed on it. -
HELP rt front axle nut removal tips?
Ahsai replied to ratdog33!'s topic in 996 Series (Carrera, Carrera 4, Carrera 4S, Targa)
I have this, rated at 1,000 ftlb. http://www.tooltopia.com/titan-12048.aspx?utm_source=googlebase&utm_medium=cse&utm_term=TIT12048&utm_campaign=googlebase_18u I used it without any cheater bar to remove an axle nut on an '03 A4 AWD with ease. I pre-soaked the nut with PBblaster overnight plus I used an impact socket (3/4" drive) and a 4" impact extension (3/4" drive) with a jack stand to support the extension. BTW, people also rave about CRC freeze off. Good luck. -
Oil leak - what is this part?
Ahsai replied to Ahsai's topic in 996 Series (Carrera, Carrera 4, Carrera 4S, Targa)
Sorry the photo is not good. If you blow up the photo, I was referring to the rectangular cover that the yellow arrow points to. -
Oil seems to be leaking from this rectangular part which is held by two bolts. What is this part and is there a seal behind it? TIA
-
Hi all, Happy New Year! I'm helping a friend to replace the throttle cable, only the half that connects to the throttle body (the other half that connects to the gas pedal is fine). I tried to trace the cable but it just disappears behind the engine... The WSM says there's a sleeve that the two halves of the cable can be disconnected so the engine can be removed. Does anyone know where exactly this sleeve is located? Also, do I need to lower the engine for this job? TIA
-
Have they checked the DME side of both the coil and the fuel injector connection/power for cylinder #2?
-
Clutch Noise When Car Is Warm
Ahsai replied to raywe's topic in 996 Series (Carrera, Carrera 4, Carrera 4S, Targa)
Subscribed. I also have this clutch noise. It's intermittent and can't be reproduced by will. When it happens, the car is warmed up and I'm starting a little agressively from a stop. I have an '03 with almost 40k miles. Clutch replaced at 10k miles (due to distorted clutch material. Nothing with my driving). -
Check out this post, that has a link to a site with the specs... other than that get creative at your local hardware store with a 3" outside diameter PVC fitting and another section of pipe to fit inside as a stop... there are other threads out there describing what parts to get. Then you can gently tap in place with a dead blow until it reaches the stop. Optionally place a plank of wood on the back side of the tool, drill some holes that will fit into the shaft, and use bolts to draw the RMS in similar to how the factory tool does it. Thanks for the info!
-
Nice custom RMS tool! Could you please share how to fabraicate it?
-
997 Oem Shifter
Ahsai replied to Rob001's topic in 996 Series (Carrera, Carrera 4, Carrera 4S, Targa)
That's right. It comes with the shifter assembly. It's a piece of plastic that mounts on the top of the shifter housing to center the shifter BEFORE connecting to the two cables. Works like a charm. -
997 Oem Shifter
Ahsai replied to Rob001's topic in 996 Series (Carrera, Carrera 4, Carrera 4S, Targa)
I like the 997 oem shifter. You can check out my review here http://forums.rennlist.com/rennforums/showthread.php?t=435850&referrerid=32590 I had factory 996 SSK installed before but it's too stiff for my liking. The 997 oem shifter throw is in between stock and the SSK and it eliminates ALL slopiness (assuming the rest of your shifter cables/linkage are in good shape). Note that the 997 oem shifter comes with the two black linkage that connects to the male plastic thread of the shifter cables. So unless your threads are worn, there should be no slop. Once you remove yours, it will become clear. Also, the shifter comes with a centering tool so you don't have to worry about adjustment/alignment of it. -
Coolant Issues - Is It Serious?
Ahsai replied to adam.w's topic in 996 Series (Carrera, Carrera 4, Carrera 4S, Targa)
There's a black rubber gasket on your old cap. Maybe it's crumbling. Hopefully, that's where the black residue came from.