Welcome to RennTech.org Community, Guest
There are many great features available to you once you register at RennTech.org
You are free to view posts here, but you must log in to reply to existing posts, or to start your own new topic. Like most online communities, there are costs involved to maintain a site like this - so we encourage our members to subscribe or donate. All subscriptions and donations go to the costs operating and maintaining this site. We prefer that guests take part in our community and we offer a lot in return to those willing to join our corner of the Porsche world. This site is 99 percent member supported (less than 1 percent comes from advertising) - so please consider an annual subscription or donation to keep this site running.
Here are some of the features available - once you subscribe RennTech.org
- View Classified Ads
- DIY Tutorials
- Porsche TSB Listings (limited)
- VIN Decoder
- Special Offers
- Paint Codes
- Registry
- Videos System
- View Reviews
- and get rid of this welcome message
It takes just a few minutes to register, and it's quality Porsche information at a low cost.
Contributing Members also get these additional benefits:
(you become a Contributing Member by subscribing or donating money to the operation of this site)
- No ads - advertisements are removed
- Access the Contributors Only Forum
- Contributing Members Only Downloads
- Send attachments with PMs
- All image/file storage limits are substantially increased for all Contributing Members
- Option Codes Lookup
- VIN Option Lookups (limited)


xmac
-
Posts
178 -
Joined
-
Last visited
-
Days Won
2
Content Type
Profiles
Events
Forums
External Paint Colors
Downloads
Tutorials
Links Directory
Collections
Classifieds
Store
Everything posted by xmac
-
Rattling Headliner Support?
xmac replied to Bk4205's topic in 996 Series (Carrera, Carrera 4, Carrera 4S, Targa)
I too have found the 996 to be very easy to work on. Funny thing is that I am perfectly comfortable pulling an engine but stupid things like headliners give me the willies. If you are going to pull the alternator, I would highly recommend doing the air oil separator at the same time. A bunch more work but worth doing. Here's a link to the procedure I followed: http://www.renntech.org/forums/tutorials/article/238-air-oil-separator-replacement-aos/ If by chance you can take and post pictures when they do the headliner work, that would be helpful. -
Rattling Headliner Support?
xmac replied to Bk4205's topic in 996 Series (Carrera, Carrera 4, Carrera 4S, Targa)
I have had a very annoying rattle/creak too. I haven't been brave enough to tackle the removal. I researched and decided to live with the rattle than have to deal with a torn or damaged headliner, broken clips, or panels. You have to consider that the vinyl is 14+ years old. Sorry to post from another forum but this is the best pictured reference I was able to find while doing my research. If you look at the picture after bullet #7 in the post (finger pointing to clip with metal rod out of the pocket), you can see how the rod fits into the plastic pocket. Some people have been able to tug at the rod towards the front of the car without the headliner removal and snap it back into place. Unfortunately, mine seems to be in the pocket but creaking constantly. http://forums.rennlist.com/rennforums/996-forum/736939-diy-fixing-headliner-rattles.html -
Advice on AOS replacement job
xmac replied to Ntracing777's topic in 996 Series (Carrera, Carrera 4, Carrera 4S, Targa)
I followed the tutorial and it worked well. The hardest part for me was removal and reinstallation of the alternator. Take your time because you will have to remove, unclip, disconnect quite a few parts lines, hoses to get to the AOS using this procedure. You don't want leaks in the intake after putting it back together. Take pictures as you do the work and make sure you put the check valves in the correct orientation. There are some small diameter hard plastic lines that go into the large rubber sleeves connecting the upper intake parts. They can break or people forget to put them back in. This is not an easy or quick job, I did it over the course of a 3 day weekend. Don't take the following list as necessary, but I replaced: - the oil filler tube 996.107.150.61 and ~$50 - newer model oil filler cap - newer dipstick with double o-ring seal - the small diameter coolant lines that go to the top of the AOS - the o-rings for the flex/ribbed lines that connect to the AOS - the large diameter rubber sleeves that connect the upper intake sections - new hose clamps that tighten the large rubber sleeves - throttle body to intake tee gasket - I replaced the oil/water heat exchanger and the orings (I noticed there was seepage of coolant when I removed the upper intake and replaced the heat exchanger due to corrosion on the mating surface) - new serpentine belt - air filter - small vacuum lines going to the check valves - replaced the fixed pulley on the alternator with the newer free-wheeling type While in there I did the following : -checked that the nuts holding the cables to the starter were tight -checked for any cracked hoses -checked for any frayed wires (especially the knock sensor cables) -cleaned all of the oil/residue inside the upper intake -cleaned the throttle body -vacuumed the top of the engine to remove grass/dirt/leaves that had accumulated (make sure the lower intake runners are covered up to protecting from flying debris) Since I had done it before, I did not include: - water pump/thermostat replacement - coolant reservoir replacement - fuel filter (much easier to get to on C4's with the left upper intake removed, C2's have the fuel filter underneath the car) -
Motor mounts and transmission mounts
xmac replied to MiamiC70's topic in 996 Series (Carrera, Carrera 4, Carrera 4S, Targa)
I installed the WEVO's and although you definitely notice more noise and vibration at idle, they got rid of some slop in the rear end when doing spirited driving. If you don't push it hard and want to keep the daily driver feel and quieter cabin, go with the stock units. -
Just for reference, when were the spark plugs last replaced?
-
Magnetic oil drain plug dilemma ?
xmac replied to britdave's topic in 996 Series (Carrera, Carrera 4, Carrera 4S, Targa)
just google "Inverse Square Law" -
Magnetic oil drain plug dilemma ?
xmac replied to britdave's topic in 996 Series (Carrera, Carrera 4, Carrera 4S, Targa)
There is only so much a drain plug can do. I had a stripped drain plug which is why I bought the LN model with the larger allen size, the magnet was just a minor bonus. In my opinion, the better gauge is cutting your oil filter open to see what debris is in it. It is a game of statistics where more oil is going through the filter vs. the random fleck that happens to pass by and get captured by the drain plug. If you find chunks of metal on a magnetic plug, it may already be too late but at least you know. Having a stronger magnet may help in capturing the the random metal flake that would have gotten away but don't expect it to suck all the metal out of your oil. -
Updated chain tensioner
xmac replied to Cefalu's topic in 996 Series (Carrera, Carrera 4, Carrera 4S, Targa)
Cefalu, thanks for this post. I tackled the IMS tensioner today with a 5/16" dowel in the crank pulley. It is amazing how much smoother the startups are and overall the reduction in engine noise (the bad kind). -
Rear ended this morning by Termite truck
xmac replied to xmac's topic in 996 Series (Carrera, Carrera 4, Carrera 4S, Targa)
Thanks for the recommendation. I have been to these two so far: Mathews-Carlsen Body Works - Palo Alto German Auto Body - near San Jose Airport -
Rear ended this morning by Termite truck
xmac replied to xmac's topic in 996 Series (Carrera, Carrera 4, Carrera 4S, Targa)
Absolutely correct! -
Rear ended this morning by Termite truck
xmac replied to xmac's topic in 996 Series (Carrera, Carrera 4, Carrera 4S, Targa)
The purpose of the thread was to get recommendations for where to take it. -
Rear ended this morning by Termite truck
xmac replied to xmac's topic in 996 Series (Carrera, Carrera 4, Carrera 4S, Targa)
Thanks, Looks like ~$1700 in damage. Now I need to deal with the insurance company. -
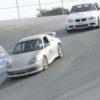
I know there is a joke somewhere in that title, but I am not laughing yet. Got rear ended while at a stop light this morning. Looks like the driver side bumperette took the brunt of the hit. Since it is easy to miss hidden damage, anyone out there have suggestions on what to look for? I noticed that it was a little harder to put it into second gear when shifting and I seem to hear more drivetrain whine than "normal" after the hit. My car is a C4 so I guess it would be affected more by a rear end jolt than C2's in terms of drivetrain. Of course I plan to take it to a shop to evaluate it. If anyone has recommendations for where to take it in the South San Francisco Bay Area, please let me know. -THANKS!
-
Why were you replacing the alternator? It sounds like you were having electrical troubles prior to this.
-
Seafoam is something I would use in a used car that has been sitting for a long time, but in the fuel to get rid of water and and gunk in the fuel system. It will also clean carbon deposits but you have to inject it into the intake. I know you can put it in the oil, but it is not something I would do in my 996 - just my 2 cents. Before you try a liquid repair, take a look at this link. http://www.renntech.org/forums/topic/41236-updated-chain-tensioner/
-
Not saying it is the problem with your car, but here is a great example of some fine electrical troubleshooting where the problem was found in an unusual place. You may have to follow the bundles to look for frayed/fried/rubbing wires: http://www.renntech....est#entry138634 ... and here is a link to quickly test a coil pack to make sure it is in spec: http://www.renntech.org/forums/topic/39900-2000-996-coil-pack-question/ edit: added link
-
Haven't tried it myself, but I have seen people use Plasti-Dip spray cans to change the colors of the wheels. What you can do is coat them in black and see if you really like the color. Unlike paint, with Plasti-Dip, you can peel the film off if you don't like it. If you do like black, it is a matter of either getting them professionally refinished, cleaned, sprayed or there are many DIY spray products. I don't recommend the use of cheap spray paint because it will not stand up to the brake dust, washing, temperature. Here is a video demonstrating the plasti-dip process:
-
Cup Holder Question for 996
xmac replied to barlowdo's topic in 996 Series (Carrera, Carrera 4, Carrera 4S, Targa)
I went with the clip-on style that clips into the 3 holes in the outermost vents. Works great. http://www.suncoastparts.com/product//clipon.html -
-deleted
-
Updated chain tensioner
xmac replied to Cefalu's topic in 996 Series (Carrera, Carrera 4, Carrera 4S, Targa)
Forgive my igonorance, but can the tensioners be replaced one-at-a-time without having to lock the cams, etc...? I have the same 1-2second noise if my car sits for a few days also that makes me cringe. 29,025 miles on the car. -
Sounds like a great reason to drive from SoCal to NorCal! At least your engine oil will be up to proper temperature ^_^ I bought my 911 too late (last week). I'm looking forward to trying to attend the next one. Congrats on the purchase. Not sure when the next one will be.
-
Header Improvement For 996
xmac replied to donlycan's topic in 996 Series (Carrera, Carrera 4, Carrera 4S, Targa)
Cheap headers, although they may have nice sweeping bends and shiny bling can actually rob horsepower. This guy dyno tested a set and got a loss of 10Hp over stock. Just mentioning it here to be cautious when upgrading. -
The half-shaft on pops into differential and is held in place by a circlip. Make sure the seal on the differential is not damaged where the shaft goes into - Simple $30 swap. Don't forget to top off with approved gear oil. link
-
Door hinge pin replacement
xmac replied to hustler911's topic in 996 Series (Carrera, Carrera 4, Carrera 4S, Targa)
Take a look at this page, it appears the hinges can be replaced (#2 or #3) in the diagram.
