Welcome to RennTech.org Community, Guest
There are many great features available to you once you register at RennTech.org
You are free to view posts here, but you must log in to reply to existing posts, or to start your own new topic. Like most online communities, there are costs involved to maintain a site like this - so we encourage our members to donate. All donations go to the costs operating and maintaining this site. We prefer that guests take part in our community and we offer a lot in return to those willing to join our corner of the Porsche world. This site is 99 percent member supported (less than 1 percent comes from advertising) - so please consider an annual donation to keep this site running.
Here are some of the features available - once you register at RennTech.org
- View Classified Ads
- DIY Tutorials
- Porsche TSB Listings (limited)
- VIN Decoder
- Special Offers
-
OBD II P-Codes - Paint Codes
- Registry
- Videos System
- View Reviews
- and get rid of this welcome message
It takes just a few minutes to register, and it's FREE
Contributing Members also get these additional benefits:
(you become a Contributing Member by donating money to the operation of this site)
- No ads - advertisements are removed
- Access the Contributors Only Forum
- Contributing Members Only Downloads
- Send attachments with PMs
- All image/file storage limits are substantially increased for all Contributing Members
- Option Codes Lookup
- VIN Option Lookups (limited)


1schoir
-
Posts
2,739 -
Joined
-
Last visited
-
Days Won
6
Content Type
Profiles
Events
Forums
External Paint Colors
Downloads
Tutorials
Links Directory
Collections
Store
Everything posted by 1schoir
-
Here's the link for the gradually worsening convertible top problem for a 996: http://www.renntech....409#entry220409 Regards, Maurice.
-
For your "top problem", you probably have to refill and bleed the hydraulic fluid: http://www.renntech.org/forums/topic/6967-cabrio-top-hydraulic-fluid-step-by-step/page__st__20__p__220409#entry220409 Regards, Maurice.
-
air fan condenser not working
1schoir replied to jose's topic in 996 Series (Carrera, Carrera 4, Carrera 4S, Targa)
Jose: That is not true...unless the coolant temperature is above a certain temperature (215 degrees F) or the A/C is already turned on. Those two factors are what turn on the high speed on the fans. Take a look at this thread, specifically reading posts #2 and #5 for a more detailed explanation: http://www.renntech....r-fan-question/ Regards, Maurice. -
:thumbup: :cheers: :thumbup: Regards, Maurice.
-
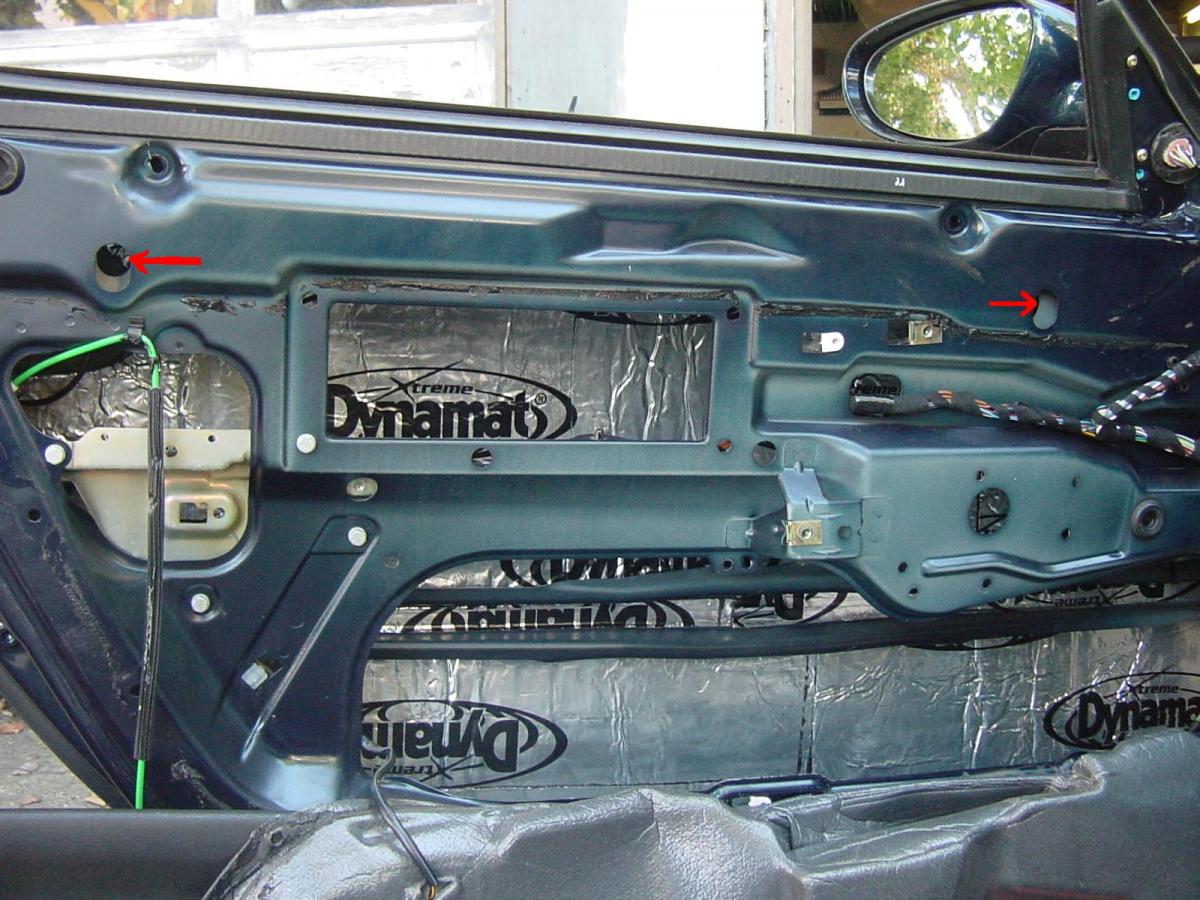
ferrugia: Thanks for posting the update. There are two bolts that hold the upper part of each of the two legs of the window regulator, and those two can be accessed by removing the door panel. Those must be where he made the adjustment. Here is a photo of the location of the access holes for the two bolts, indicated by the two red arrows, just above where the foam liner would be if it were glued on: By loosening the two bolts, you can shift the window further towards the front or further towards the back, but that adjustment also tilts the orientation of the legs of the window regulator. I guess it must have been sufficient in your case as perhaps those two bolts came loose and thus allowed the legs to shift at their upper ends. If the window goes out of alignment again, you would be wise to check that the window clamps are not the ones that got loose and allowed the window to shift out of position. Glad that you got it fixed, and even better that you enjoyed the ride! Regards, Maurice.

-
Thank you and good bye all...
1schoir replied to JamesD's topic in 996 Series (Carrera, Carrera 4, Carrera 4S, Targa)
If you decide to stick around for a while longer, I would be curious to get a first hand report from you as to the Range Rover's reliability. I have heard that each Range Rover has a permanently assigned bay at the dealer, but would like to hear your experience. I hope you'll be back in a P car and post here again, regardless of your experience with the RR. Regards, Maurice. -
New Member Intro
1schoir replied to scats's topic in 996 Series (Carrera, Carrera 4, Carrera 4S, Targa)
She's a beauty! Here's to many miles with many smiles! :cheers: :welcome: Regards, Maurice. -
Maz: I'm not sure about the cost of labor in replacing the immobilizer or the wires running to it, but here's a word of caution that may save you some $$$. IIRC, a new immobilizer can only be programmed once, so make sure that whoever is doing it (with a PST2 or a PIWIS) knows what they are doing. Otherwise you will have to buy yet another immobilizer, and that part is not cheap. That M535 immobilizer for an '01 996 is part number 99661826203 and lists for about $445.00. You will also need your IPAS codes to program your immobilizer to your keys. You can only get the IPAS codes from the dealer with proof of ownership. Regards, Maurice.
-
:thumbup: :thumbup: :thumbup: Excellent fix! That's what I call making lemonade when you get lemons! Regards, Maurice.
-
I'm not as familiar with 911 convertible tops as with the ones on the Boxsters, but you can't go wrong with using Dupont Krytox as a lubricant for all of the hinges, steel balls and cups, etc... It dries pretty quickly and does not attract dirt. Regards, Maurice.
-
Top won't raise all the way...
1schoir replied to sobefun's topic in 986 Boxster Convertible Top Issues and Solutions
Sorry. I don't know what happened to that link. Try this link: http://sites.google.com/site/mikefocke2/thetop-itsmaintaince%26replacement When you get to that page with the list of DIY's, select the one entitled "Installing an '03-04 Top and Frame on a '97-'02 Boxster" and then follow the page instructions I gave you earlier. Regards, Maurice. -
I don't know of a link to replace a 996 top canvas, but there is a good DIY for replacing a Boxster top canvas. If you want to get a general idea of what is involved, take a look here: http://sites.google.com/site/mikefocke2/replacingthetop-adiy It is time consuming and detail oriented, but definitely doable. Regards, Maurice.
-
Top won't raise all the way...
1schoir replied to sobefun's topic in 986 Boxster Convertible Top Issues and Solutions
Kevin: On a 2001, which has the "B Version" transmissions, there are two microswitches which, in conjunction with the double relay in the relay tray in the kick panel, control the cycle of the convertible top. The two microswitches are located INSIDE the front of the driver's side (left side) transmission. Inside that transmission is a 360 degree gear which trips each of the two microswitches at the appropriate time in the cycle. You will have to remove the transmission to open it up. Take a look at the photos and instructions at this link to remove the transmission, starting at page 20 of the Part II PDF: http://sites.google.com/site/mikefocke2/installinga'03-'04glasstopandframeona'97 Another possibility is that your double relay is faulty. I would also double check that the guide channels in which the black plastic sliders at the bottom of the clamshell support arms ride back and forth are well lubricated. You can use Krytox or White Lithium grease for that purpose. Regards, Maurice. -
Loren: Thanks for the further clarification. Regards, Maurice.
-
If the little electrical plug from the airbag is disconnected from the wiring harness and the ignition is turned to the "on" position, that breaks the circuit and it trips the airbag light. Regards, Maurice.
-
Thanks for posting the update. If you change your mind and decide to tackle it yourself after all, you can get the foam barrier off by using a heat gun to soften the adhesive. When you want to reinstall, you can heat it up again and it will stick and make a waterproof barrier again. That will give you better access to the two bolts to loosen the two clamps. You are correct in that if you trigger the airbag light, it can only be turned off with a PST2, PIWIS or Durametric, but you can avoid triggering the light by pre-positioning the window so that you can reach the bolts. Regards, maurice.
-
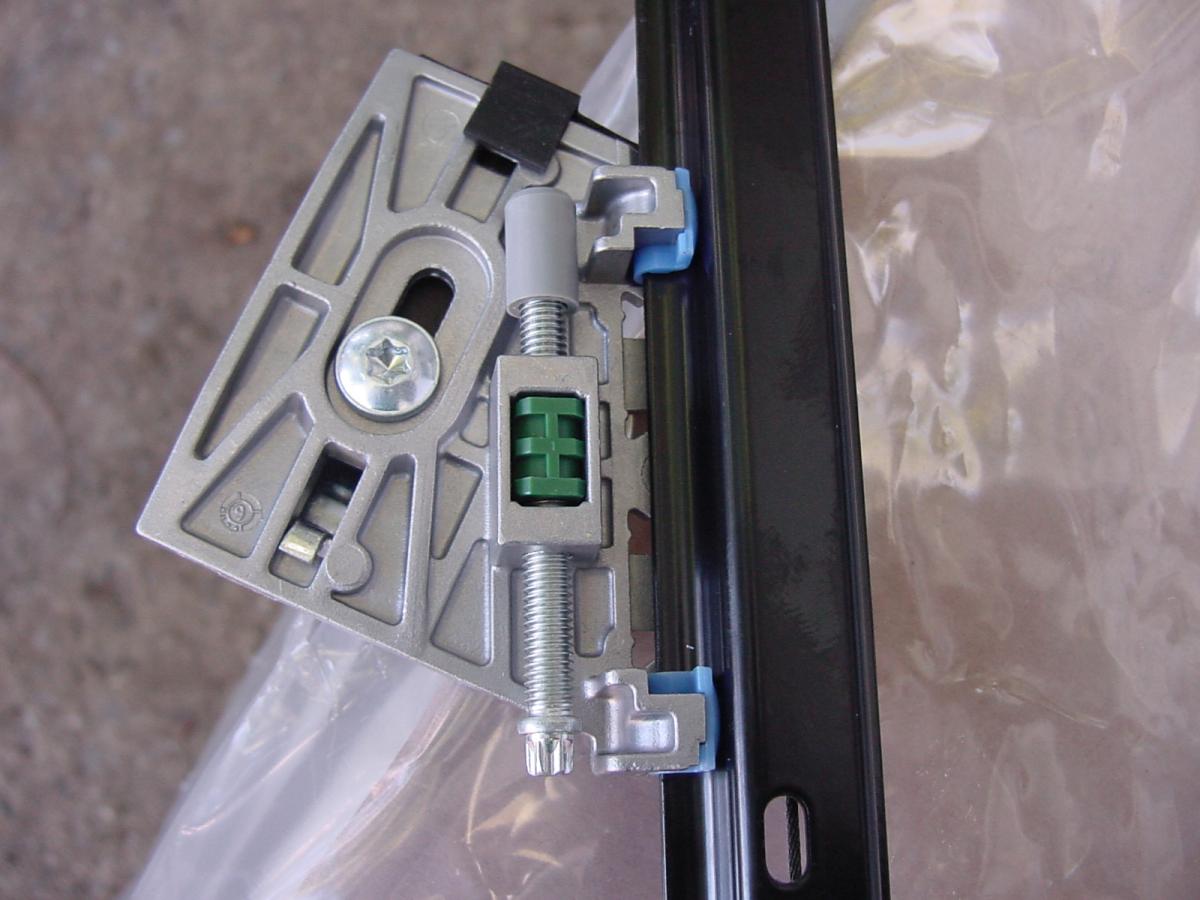
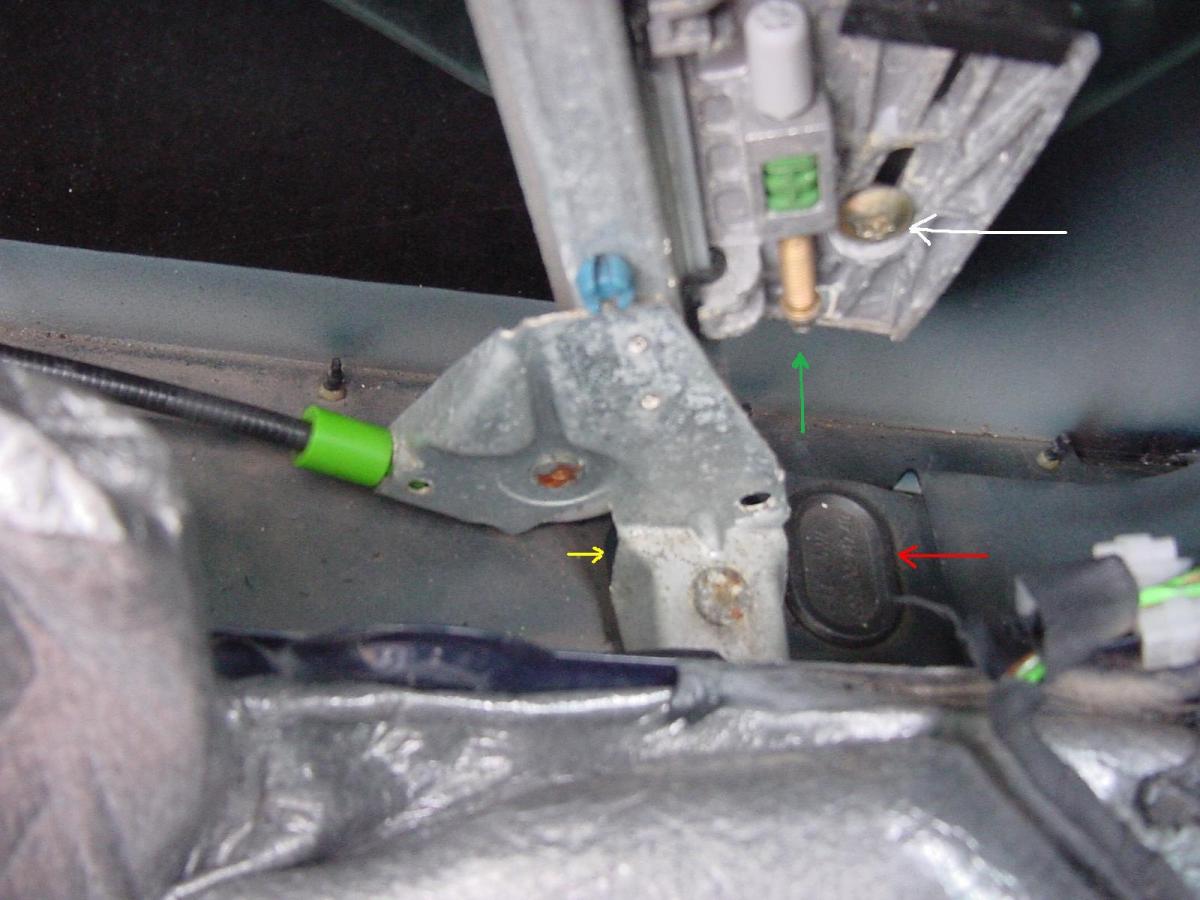
There are three possible adjustments to the position of the windows: 1) inboard/outboard, 2) up and down at the front of the window and at the back of the window, and 3) forward and backward. The access holes on the underside of the door are two near the front edge of the door and two near the rear edge of the door. The ones closest to the front edge and rear edge of the door are for accessing the adjustment for 2) above. The ones furthest from the front edge and rear edge of the door are for accessing the adjustment for 1) above. To perform the adjustment for 3) above, you must remove the door panel to get access to the window regulator glass clamps. Here is a photo that will help you visualize what you are dealing with (click to enlarge): Note that this is the forward leg of the window regulator for the driver's side door (left side) from a 986, but it's the same setup for a 996. 1) The yellow arrow points to the very edge of the access hole black rubber plug for adjustment 1) [inboard/outboard]. That adjustment is accomplished by loosening the 10mm nut that is on the opposite side of the stud whose flattened head can be seen at the foot of the regulator leg. When you loosen the nut, the stud can be moved inboard and outboard and that affects the inboard/outboard position of the window when it is closed. 2) The red arrow points to the access hole black rubber plug for adjustment 2) (up and down final position of window when it is closed). To make that adjustment, pull off the rubber plug and insert a socket with an extension to turn the torx head screw to which the green arrow is pointing. Clockwise will lower that side of the window, CCW will raise that side of the window. You can raise or lower the front of the window with the torx screw in this photo, and raise or lower the rear of the window with the torx screw that is on the rear leg of the window regulator. Even though it's a torx bolt, a 5 mm socket will work. 3) The white arrow points to the screw that tightens the rubber-lined metal clamp that holds the glass window onto the window regulator. There is one metal clamp on each of the two window regulator legs. In order to perform adjustment 3) [forward/aft], you must remove the door panel to get access to that screw on each of the two clamps. Once you loosen each of the two screws, you can move the glass forward and backward, enough to fix the problem described in the first post. Be careful not to overtighten the clamp because it is squeezing the glass through the rubber pads. Here is a closeup of the window regulator torx screw and window clamp to help you get oriented: Regards, Maurice.
-
Casper Labs Ceramic IMS Bearing
1schoir replied to valley996's topic in 996 Series (Carrera, Carrera 4, Carrera 4S, Targa)
Now that the various versions of the IMS bearings have been out there for a while, the double row bearing, which is probably the version you have in your '99 has been getting better reviews than the singe row bearing that followed. Read the posts from the beginning on this "Casper Labs Ceramic Bearing" thread for some excellent, well-informed, analysis of the IMS. Regards, Maurice. -
It's not a fool's errand and it's definitely DIY doable, but you do need a lot of patience and a willingness not to cut corners. It takes about 6 to 8 hours to do the whole job, maybe a little more if you run into any roadblocks. Make sure that you have all the little parts you need before you start, including the double-sided tape. Someone also posted on here a couple of days ago that Pelican Parts sells a complete kit for the parts that are likely to have to be replaced, but I don't know what is in their particular kit. Here's a DIY that is fairly comprehensive and easy to follow: http://sites.google....cingthetop-adiy After reviewing the DIY, if you have any questions or need any clarification on any particular points, post here again and we'll get you through it. Regards, Maurice.
-
Washing the Engine of a Boxster
1schoir replied to Pierre's Porsche's topic in 986 Series (Boxster, Boxster S)
There is a milder version of Simple Green called "Extreme Simple Green", which is ideal for cleaning engines as it will not etch any surfaces when it dries. Gunk works really well as a degreaser but it can discolor black plastic parts. Regards, Maurice. -
From your detailed description, it sounds like your transmissions are not properly synchronized. As a result, the black "hydraulic" pushrod on that side (which actually has a very large spring inside) is not pulling down hard enough to apply enough pressure to keep the clamshell "locked" down tight. The large hexagonal nuts that you mention are mostly for getting the correct height for the rear of the clamshell when it is closed and to guide the two protruding long guide pins on the underside of the clamshell. You have to adjust the pressure that is being applied to the body-colored support arms by the black "hydraulic" pushrod on the side that is loose. To adjust, first take note of the exact position of rotation of the V-lever on the "good" side when the clamshell is in the 45 degree furthest back position. Then, pull out the drive cable from the side of the electric motor on the "bad" side and put the inner steel cable into the chuck of a cordless drill. Spin the cable (in the LOWEST torque setting) long enough to get the EXACT same position of rotation on the V-lever on that side and then put the drive cable back into the side of the electric motor and reinstall the upside-down U-clip to lock it in place. If you have done it correctly, the V-lever on the "bad" side will have rotated a few degrees more, and that will cause that end of the V-lever to pull a little harder on the large spring inside the black "hydraulic" pushrod. When there is the correct tension, you should not be able to pull up the clamshell by hand once it's in the closed position. Regards, Maurice.
-
Bryan: Here is a DIY on installing the top: http://sites.google.com/site/mikefocke2/replacingthetop-adiy Make sure you have the extra small parts that are needed before starting the job. Definitely doable if have patience and don't cut corners. The GAHH top and the Robbins top are comparable if you are staying with a vinyl window. Regards, Maurice.
-
Bill: Here's a fairly simple explanation of the seat belt contacts problem and repair procedure: When diagnosing Airbag Warning Lamp on and the fault codes are DTC 44, 45, 46, or 50 Drivers side and/or DTC 47, 48, 49, or 51 Passenger side, the faults may be caused by poor connection at pins B7 and B8 of plug connections X16 and X17. The wiring connections have been corrected as of VIN WPOCA2983WS620157 and the belt buckles as of VIN WPOCA298XWS620138. The latest Porsche fix involves replacing both seat belt buckles, splicing and soldering in four leads with "gold plated and greased" contact springs and substituting them for four of the original contact springs in the 8-pin connector under the driver's (left) side seat (positions B5, B6, B7, & B8), doing the same but with only two contact springs on the 8-pin connector under the passenger's (right) side seat (positions B7 & B8), and then splicing and soldering beefier leads with cable lugs in place of thinner leads all leading to a ground point under each seat. After that, you must substitute new plug caps on the the 8-pin connectors, which now include a tab that is used to securely fasten all of the wires exiting the 8-pin connectors with cable ties, and add cable ties to the female 8-pin connectors on the undersides of the seats and you are almost done. Again, it's a straightforward job once you decipher the descriptions and language in the TSB, which is a special chore in itself. Then you have to reset the airbag light with your Durametric, PST2 or PIWIS and that provides a "permanent" fix. Regards, Maurice.
-
Airbag light NOT on
1schoir replied to Gaang's topic in 997-1 Series (Carrera, Carrera 4, Carrera 2S, Carrera 4S)
Sounds like that bulb is either loose or burnt out. Replacement is very straightforward once you remove the gauge cluster. Here is a link to a DIY on the gauge cluster removal: http://boxsters.addr.com/hacks/cluster.htm The DIY is for a Boxster, but it should be close enough to get you started. Regards, Maurice. -
Dropped a piece of plastic into engine
1schoir replied to bala's topic in 986 Series (Boxster, Boxster S)
:thumbup: