Welcome to RennTech.org Community, Guest
There are many great features available to you once you register at RennTech.org
You are free to view posts here, but you must log in to reply to existing posts, or to start your own new topic. Like most online communities, there are costs involved to maintain a site like this - so we encourage our members to subscribe or donate. All subscriptions and donations go to the costs operating and maintaining this site. We prefer that guests take part in our community and we offer a lot in return to those willing to join our corner of the Porsche world. This site is 99 percent member supported (less than 1 percent comes from advertising) - so please consider an annual subscription or donation to keep this site running.
Here are some of the features available - once you subscribe RennTech.org
- View Classified Ads
- DIY Tutorials
- Porsche TSB Listings (limited)
- VIN Decoder
- Special Offers
- Paint Codes
- Registry
- Videos System
- View Reviews
- and get rid of this welcome message
It takes just a few minutes to register, and it's quality Porsche information at a low cost.
Contributing Members also get these additional benefits:
(you become a Contributing Member by subscribing or donating money to the operation of this site)
- No ads - advertisements are removed
- Access the Contributors Only Forum
- Contributing Members Only Downloads
- Send attachments with PMs
- All image/file storage limits are substantially increased for all Contributing Members
- Option Codes Lookup
- VIN Option Lookups (limited)


Hilux2400
-
Posts
458 -
Joined
-
Last visited
-
Days Won
2
Content Type
Profiles
Events
Forums
External Paint Colors
Downloads
Tutorials
Links Directory
Collections
Classifieds
Store
Everything posted by Hilux2400
-
Spark Plug Change Instructions
Hilux2400 replied to Loren's topic in DIY Articles - Carrera (996) - Maintenance
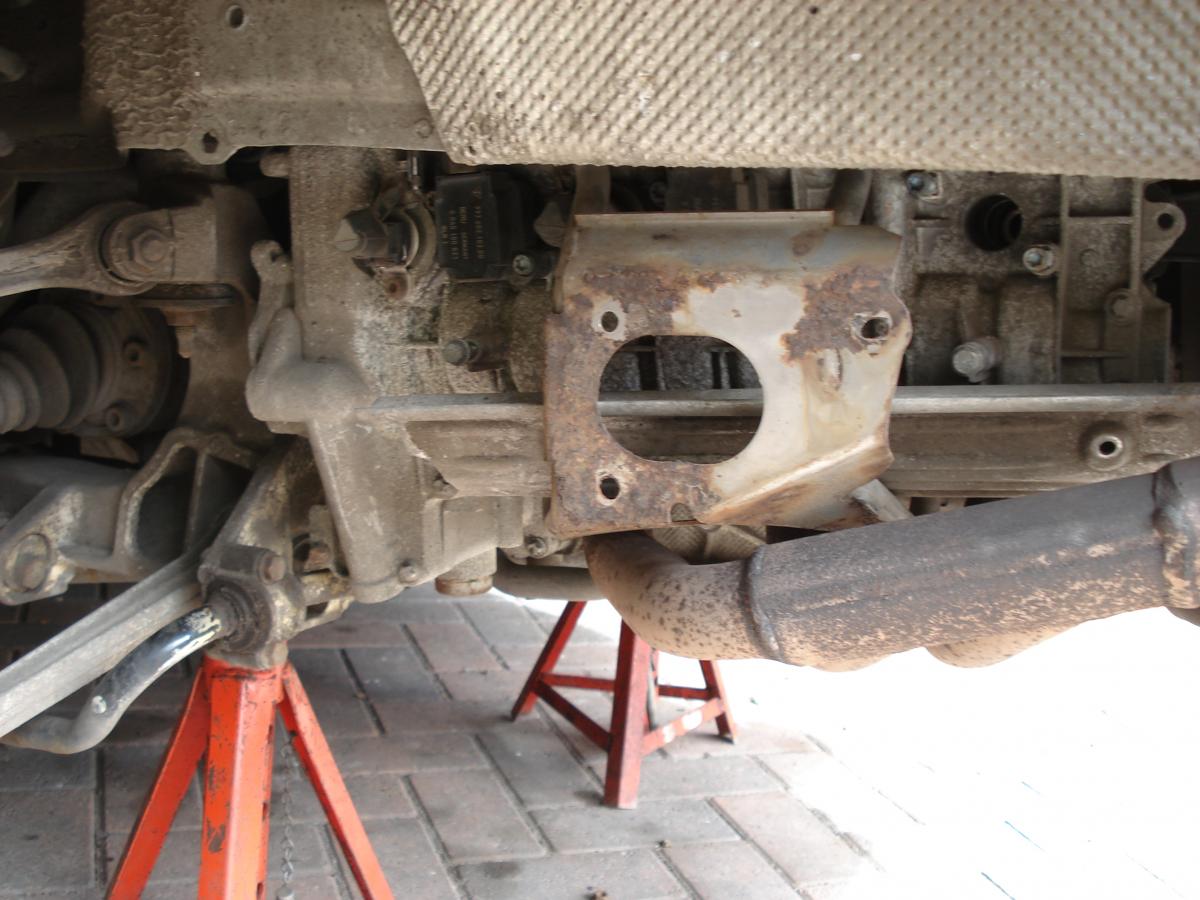
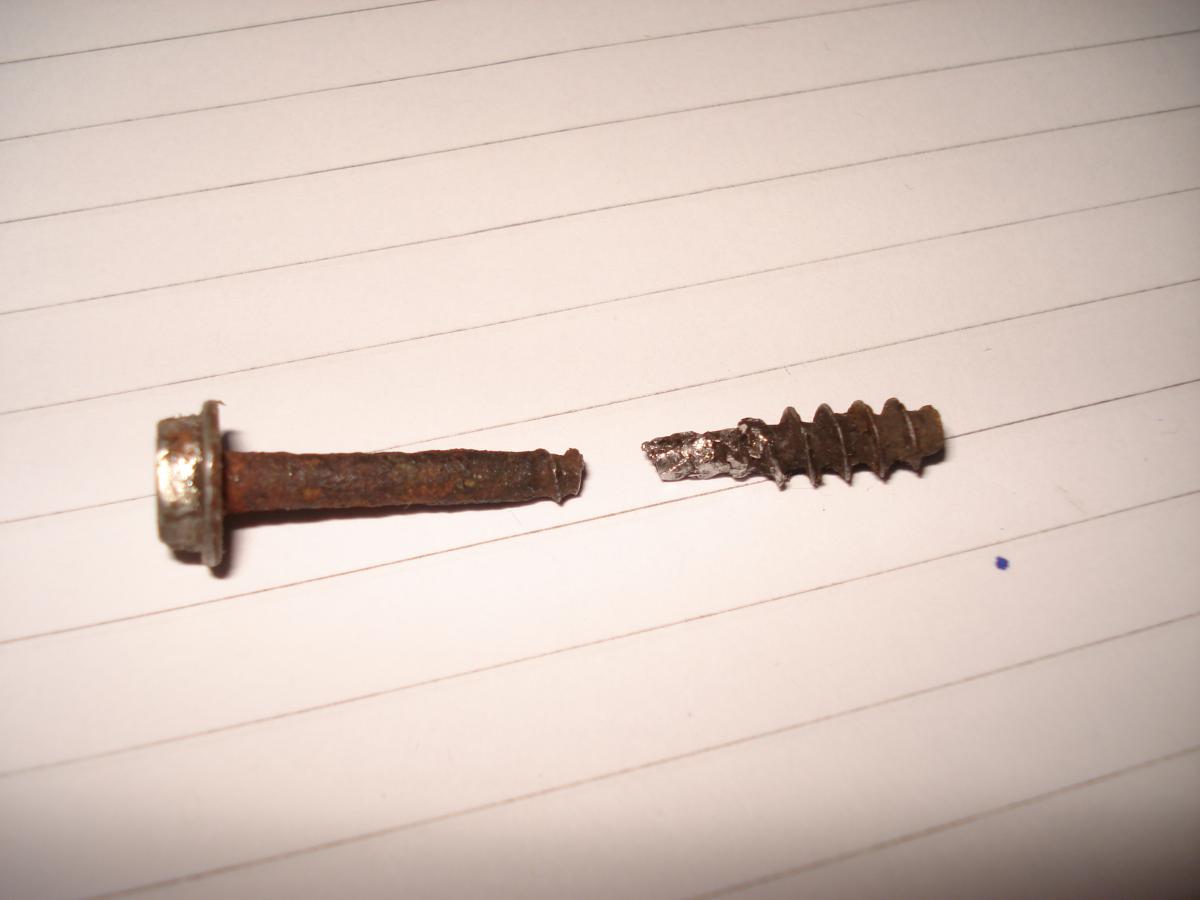
I put new plugs in and coil packs on when I put new silencers on. It's much easier with the exhaust off. Two of the captive bolts on the mounting plate sheared off, so I drilled all three out and replaced with stainless bolts with Aerotight stainless nuts. I also put the vertical bolts, the ones that pass through the anti vibration mesh, in from the bottom. This means that the next time I take the silencers off I won't have to disconnect the holding plate.
-
Droplink movement
Hilux2400 replied to GOB's topic in 996 Series (Carrera, Carrera 4, Carrera 4S, Targa)
Cut off the head of the ball so that you can get a socket on the hexagon below. Remove the lock nut. Heat the hub carrier (electric gun OK) near the through bolt with a heat gun and spray with penetrating oil. Do this a few times. Wiggle the socket and perhaps use an impact wrench. It will come out with persistence. Try not to use a hammer. On one side mine came out easily, but on the other side like yours it was solid. Don't forget that when you take the through bolt out the shock absorber clamping will be lost. Make sure you re-clamp the shock absorber in the same place or you could alter the camber angle. However, it shouldn't move too far as there is a guide ring on the strut where the bolt goes through. Good luck. -
There's a whole range of syringes with plastic tubes on Ebay for just a few £ or $. I use one for taking our older power steering fluid and top up with fresh fluid.
-
This was also the cause of one of my pressure leaks. I also replaced the tank.
-
Whobble noise
Hilux2400 replied to ekstroemtj's topic in 9PA, 9PA1 (Cayenne, Cayenne S, Cayenne Turbo, Cayenne Turbo S)
Use a stethoscope. This will enable you to focus on the location. -
I carry a few basic relays, a foam tyre inflater and an air pump.
-
There's a much easier way. First you need to cut off the head of the ball/cup so that you can get access to the hexagon with a socket. Secondly, heat the hub carrier where the through bolt goes with a heat gun. When it's hot spray with penetrating oil. Repeat several times and in between wiggle the through bolt with the socket driver or an impact driver. Eventually it will move. Mine was thoroughly stuck on the driver's side, but on the other side came out easily. Remember not to allow the shock absorber to move as it could alter the camber angle.
-
I'm looking for an IPhone 6 App that will deliver fault codes. The reason being that I might want to find fault codes when I am away from home and I might not have my lap top with me. I would also like the OBD plug to be a Wi-Fi signal generator, or Bluetooth, to avoid having to carry a cable. Can anyone recommend an App that they have found successful. Thanks for reading. H
-
Boxster Recurring Coolant Dump Problem
Hilux2400 replied to DrivingQuant's topic in 986 Series (Boxster, Boxster S)
A good low cost start. -
Jack It Up
Hilux2400 replied to waterboy's topic in 996 Series (Carrera, Carrera 4, Carrera 4S, Targa)
For the jack pad you could use lorry mudflaps. They come in fairly thick rubber and pieces can be cut to size and glued on with epoxy. -
911 996 C2 I have just had my wheels re-done at Alloy Wheel Solutions (Hereford) UK. Excellent job at £65 per wheel. This is not just a cosmetic facelift as they do the following: Wheels off, tyres off then dipped to remove old paint finishes. This is followed by shot blasting and repair of any problem areas, then powder coating and baking. They then re-fit your old tyres, or new ones, balance the wheels and refit to the car. It's less than a 48 hour turn round if you leave the car in their workshop. However, I just took my wheels in with new tyres. I have no connection with this company, but would certainly use then again. H
-
996 tire pressures revisited
Hilux2400 replied to ADias's topic in 996 Series (Carrera, Carrera 4, Carrera 4S, Targa)
911 996 C2 I have just changed all the tyres as I have had the wheels done. I too have noticed that at the back the centre wear is high compared to the edges, which normally indicates over inflation. However, I pump up to the correct specified pressure for the 285X30X18 ZR at which the suspension is very hard. It's interesting to note that lower pressures have been tried. I reckon it would run comfortably at about 35psi for road use, but I am concerned about rim damage at this pressure with such a low profile tyre. Any more views? -
1st Boxster, 1st Problem
Hilux2400 replied to StuartWaite's topic in 986 Series (Boxster, Boxster S)
Great result - well done. -
1st Boxster, 1st Problem
Hilux2400 replied to StuartWaite's topic in 986 Series (Boxster, Boxster S)
On my 996 there is a multi wire loom going to a location under the seat where there is a connector block. The input has more wires than the output, as I have only one motorised control for the back tilt mechanism. To get to this connector you really need to undo the set screws that hold the seat in place and then tilt the seat back. However, I understand that separating this under-seat connector can activate the air bag system. I have done this, but only after leaving the ignition off with the key out for about 20 minutes. -
1st Boxster, 1st Problem
Hilux2400 replied to StuartWaite's topic in 986 Series (Boxster, Boxster S)
I assume the seat memory works from instructions from the management system which would throw a relay to activate the seat motors. It could be that the management system is drawing current and is activating a relay. When is discovers that there is no message return, it goes back to non-activity mode and it continues to cycle. My seat motors (non memory) will work when the ignition is off. Just a thought, as I don't know the answer. -
1st Boxster, 1st Problem
Hilux2400 replied to StuartWaite's topic in 986 Series (Boxster, Boxster S)
If the car has only manual seats what does fuse E3 drive? Have you tried removing the fuse and finding out if everything else functions and is there still a call on the battery when it is removed? Does it have heated seats and is the switch faulty? -
Just think of the buttons like a gear shifter. It won't shift if the synchronous speed is not within an acceptable range. For example it won't shift up from 2nd through to 5th at 20mph on a flat road as 20mph is too slow for 5th. It won't shift down to 2nd at 100mph because 100mph is too fast for 2nd. When you shift using the tip buttons you will notice that the light on the clock goes left to "M" for a while to signal that you have moved to manual. It will stay there for a while and if you do nothing it will eventually move back to auto. If you want to drive completely in tip mode move the stick to "M" and then just use the tip buttons for shifts. Tip mode is also useful on slippery roads on a downhill grade as lower gears can be selected to retard the vehicle or maintain constant speed in place of braking.
-
I tried HID's for main beam and the light was much better than standard halogens. The blurb assured the buyer that that they would be compliant and not generate errors. However, I did get a few warning light flashes when I used the headlight flasher. These would stay on until I stopped and turned off the engine. They disappeared on re-starting. I have now removed them and put halogens back in.
-
Try and avoid the vehicle hunting between gears on an uphill climb, use the override to select a lower gear. A sharp depress of the gas pedal will change down and you can keep in that lower gear by maintaining the engine revs. It never selects first at a halt, always 2nd. To take off in first you have to select first. It will go well into the 70's if held in 2nd on a full throttle. At about 50 in 5th it's difficult to select 2nd with throttle alone it's best to use tip to get 2nd then floor it. The car will change up 3rd on auto. To get the full howling 0-100 stop the car. Change to 1st. get the car rolling slightly and floor it. You won't get wheel-spin and It gets to 100 very quickly. This is best done with the windows open. On a roundabout if applying too much throttle as a soon as the car senses out of rhythym speed between the back wheels it changes up.
-
I think you might be faced with extreme measures to fix this problem, it's a case of causing the least amount of damage to get the result. I notice that the outer plate and door release handle are held in place with two captive bolts with the nuts on the inside of the door on the outer side of an alloy cup. Looking from the outside, If you lift the handle and look at the dished depression beneath you will see two small holes (I think they are casting vents). These probably mark the centres of the captive bolts. It would be possible to drill these out from the outside. Start with a small diameter drill to give you a centre line and follow up with a larger one to completely free the outer face plate. I hope this would give you enough space to activate the lever and release the latch. When all this is done you will need to either replace the outer plate or repair it. You could repair it with two counter sunk stainless set screws glued in place. For security you could fill the driving slots in the heads with epoxy resin. I really hope you find a solution to this problem. When you do I am sure we would all like to know how you did it.
-
I am sorry you have this problem. As a last move you might have to cut the door panel. What about removing the seat to give more room, but you would have to take the passenger seat out first.
-
Wheels and other bits don't like being hit from the side. I have had this once on a car (not a Porsche) and even though it happened at very low speed it buckled the sub frame, but all other suspension members were undamaged. Although the cosmetic things might be OK, there may be unseen damage to cope with which might be hard to find at first.
-
Central Locking Problem - Locked shut (2000 Boxster S)
Hilux2400 replied to w47ers's topic in 986 Series (Boxster, Boxster S)
How did it get wet? I notice the drains for the hood well come out behind the front rear wheel arch liner. I took these liners out recently and the nearside one was almost solid with road muck (UK Car). They come out easily with just three plastic nuts on the captive threads. Mine's a coupe, but I could see the drain hole apertures would have been blocked if the car was a convertible. Might be worth a look in here to make sure the drain ends are clear. You will need to take the back wheel off. -
Odd front trunk problem
Hilux2400 replied to gnetwerker's topic in 996 Series (Carrera, Carrera 4, Carrera 4S, Targa)
I have extended mine to the side indicator pod as from here it's a straighter pull -
You should also be doing this on a level surface side to side. You can get away with a gentle slope front to back, but side to side is important. You can do this by running the car onto blocks which you have checked for level with a long spirit level. You only need one block which matches the floor level on the opposite side.