Welcome to RennTech.org Community, Guest
There are many great features available to you once you register at RennTech.org
You are free to view posts here, but you must log in to reply to existing posts, or to start your own new topic. Like most online communities, there are costs involved to maintain a site like this - so we encourage our members to subscribe or donate. All subscriptions and donations go to the costs operating and maintaining this site. We prefer that guests take part in our community and we offer a lot in return to those willing to join our corner of the Porsche world. This site is 99 percent member supported (less than 1 percent comes from advertising) - so please consider an annual subscription or donation to keep this site running.
Here are some of the features available - once you subscribe RennTech.org
- View Classified Ads
- DIY Tutorials
- Porsche TSB Listings (limited)
- VIN Decoder
- Special Offers
- Paint Codes
- Registry
- Videos System
- View Reviews
- and get rid of this welcome message
It takes just a few minutes to register, and it's quality Porsche information at a low cost.
Contributing Members also get these additional benefits:
(you become a Contributing Member by subscribing or donating money to the operation of this site)
- No ads - advertisements are removed
- Access the Contributors Only Forum
- Contributing Members Only Downloads
- Send attachments with PMs
- All image/file storage limits are substantially increased for all Contributing Members
- Option Codes Lookup
- VIN Option Lookups (limited)


ericinboca
-
Posts
458 -
Joined
-
Last visited
-
Days Won
1
Content Type
Profiles
Events
Forums
Exterior Paint Colors
Downloads
Tutorials
Links Directory
Collections
Classifieds
Store
Everything posted by ericinboca
-
Vertex sells just the ball joint, but I am not sure how you install it. The factory one is crimped in. I know that you can replace the 944 control arm ball joints with a kit, but it involves a circ clip and epoxy, which I am not certain I would do. You might want to ask Vertex what is involved in installing a new ball joint and see if you think that is a good way to go. I've always replaced the whole arm - new arm, with new ball joint and two new bushings.
-
Recommendations of wheels for my 986
ericinboca replied to Vigor's topic in 986 Series (Boxster, Boxster S)
I've always liked Carrera 5-spoke on the Boxster. -
Many, including me, will open it manually and lock it in the open position to allow any trapped air, after coolant system work, to escape. On my 986S track car, I never close it.
-
Camber plates Easy to install. They take the place of the stock strut mounts. You take the strut out and replace the top mount, and reinstall. Sounds easy, and it is not bad. I have aftermarket coilovers, so I can take the tension off the springs by lowering the perch. I don't remember how much tension there was with the stock set up - you may need spring compressors. I can get my coilovers in the front out without removing the wheel carrier and without having to disconnect the lower control arm, but removing everything else. Couple things on plates. I have never explored them thoroughly, so I could be wrong, but I would have thought a camber plate would give you more negative camber. How much negative camber can you get now without the plates? You likely are not, but don't mistake solid strut mounts with camber plates. Solid strut mounts often can be intalled two ways - one way gives you a range of camber something like +1 to -1.5. The other way gives you -1 to -2....just making these numbers up to illustrate. One other thing to think about on camber plates - they probably have solid mounts - which is awesome for the track, but will transfer a little more noise to the car. Lowering springs If you think you can tackle the plates, you can probably handle the springs too. Not that much extra work - same idea - you take the strut out by removing or dropping the wheel carrier clear, remove the three nuts in the front trunk, and you have a strut assembly in your hand. Compress the springs to remove the strut mount. Uncompress the springs and keep track of how everything is stacked together - the order and which side is up. Have you tried enlarging the hole where the top of the strut is to get more negative camber? On a lot of 986's, the stud for the strut hits the inside of that hole. When I first starting tracking my car, we enlarged that hole and got more neg camber that way. Worked until we started hitting the body underneath. Full disclosure - I think taking the strut out is easy - can change a set of front springs in an hour. (I use different spring rates for different tracks.) I have all the tools and have a rack, so I am seriously set up for it. Still though, it is a job someone with aptitude can tackle.
-
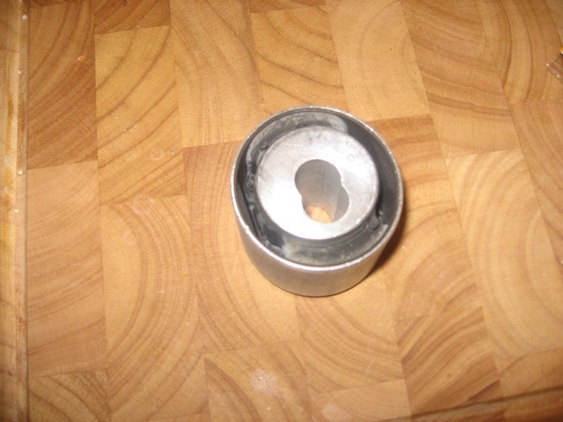
The lower control arm has two bushings - one that is about a third of the way back to which the transverse control arm attaches, and one in the rear where it attaches to the suspension subframe. I have attached a picture of the bushing for the transverse control arm. I have somewhere in my garage the rear bushing, but I cannot find at the moment. It is same except it is skinnier and longer - more cartridge like. You can see the rubber is attached to the outside cylinder in two places opposite of each other. If this were installed, the bushing would not have the oblong shape, and you would be able to see through some in the thin spots. But not in the two big, beefy spots. You are looking for torn, cracked, dried out rubber. You may have to lift the corner and apply pressure in various ways to see if there are cracks. Unfortauntely, a thorough inspection, one with 100 percent certainty, you might need to remove the control arm. Alternatively, if you feel any play where the control arm attaches to the subframe, and the bolts are tight, that would tell you the bushing is likely shot. Same for play where the transverse control arm connects. If you find they need replacing, you do not have to replace the whole control arm - you can get replacement bushings and press the old out and press new ones in. But look at the rubber boot are the ball joint too - see if it is torn. If it is torn, you might want to go with a new arm. A stud at the top of the strut passes through a rubber bushing of the same design. If it moves, the bushing is probably bad. Strut mounts are not terribly expense. The steering bearing probably would not make a clicking sound. It is just two pieces of shape rubber/plasic with small ball bearings in between to allow the strut to more freely rotate with steering angle.

-
cdr 23 radio power cycling
ericinboca replied to rmorgan's topic in 996 Series (Carrera, Carrera 4, Carrera 4S, Targa)
I had same issue on my '03 C4S. The key removal trick didn't do it for me. Eventually traced it to a bad fiber optic cable. -
Rick is likely correct, but check the connection on the sensor. I installed a 996 sender and a gauge in my 986S race car, and sometimes the connection comes undone at the sender - when that happens, it registers above 5 all the time.
-
I have broken off a 3/8 socket before on the axle nut. If you need the extension, use 1/2 socket. It is 32mm. I've used a six foot length of black pipe over a 1/2" breaker bar. Even with an impact wrench, these things are tough. They are tightened to something like 350 ft/lbs.
-
Good question. I do not have a definitive answer. I recommend you call Bilstein and ask. I have talked to the guy in Moorseville NC a couple of times on valving of their shocks and what will work with what spring rates. http://www.bilsteinus.com/about-bilstein/contact.html
-
I have solid engine mounts in mine. The solid engine mounts transfer a lot of noise. Mine is gutted of all carpet and sound deadening material so I am sure that makes it much worse, but I would be hesitant to use solid motor mounts in a car that is also used on the street. If it is a dedicated track car, then do it. I also have a lightweight flywheel. I went back with stock clutch - the other clutches really did not save much weigth wise, but the light weight flywheel is excellent. Big difference.
-
You have a couple of options. I think Vertex stuff is just fine. Vertex puts in new bushings and ball joints. Alternatively you can buy replacement bushings, press out the old and press in new. Pelican has them, but their prices tend to run a little high - I would look around if you want to go in this direction. Consider the price difference if it is worth it to you to do the work of pressing in new versus buying rebuilt or new. Or, if you want, I'm pretty sure I have very lightly used control arm bushings from my 2004 986S. I pressed them out to put in solid bushings when I converted the car to a dedicated track car. The old ones have about 9K miles on them. I can let you have them at a big discount off of new.
-
Parking brake line removal
ericinboca replied to AlejandroFlores's topic in 986 Series (Boxster, Boxster S)
In Loren's picture, part numbers 7, 8 and 9 are like a little hinge. You pry the shoes apart a little so you can open the hinge at the bottom of the assembly. Number 9 is held in by an E clip - you pull that clip off, and remove the hinge pieces, and the hand brake cable with now slide out the tube on the back of the wheel carrier. You may have to give yourself some slack on the cable from in the car by loosening the the cables under the tray floor. in order to have the room to remove the e clip. -
Checking the parking brake is a great place to start, I think. If one of the springs that holds the shoe to the wheel carrier comes out, it can flop around and make a clicking sound. Another possibility is something stuck behind the dust shield, or the dust shield bent some. And finally, you might want to check the rear bearing - the noises from a bearing can be all sorts of things, including an intermittant clicking sound, althouhg more often it is a roar under load.
-
Rear Wheel Bearing 102
ericinboca replied to seafeye's topic in DIY Articles - Boxster (986) - Common Fixes and Repairs
Happy to help. See email. -
Rear Wheel Bearing 102
ericinboca replied to seafeye's topic in DIY Articles - Boxster (986) - Common Fixes and Repairs
Yes, you can. That is what I do. Ironically, I have the tool, but I added permanent studs to replace the lug bolts, and they are too long for the tool to work...(My 986S is a race car and I kill a lot of bearings in a year) You can pretty easily strip down to just the wheel carrier with the wheel hub still attached. The wheel carrier is the big aluminum piece to which all the suspension components are attached. You do not need to take the struts out = the wheel carrier will slip off the bottom of the strut if you get everything disconnected. You do need a ball joint seperator tool to get the control arms off. My guy charges me $30 to press out the hub, then the bearing, press in a new bearing and then press in the hub. He does it while I wait. He does it with either a tool he made that is just like the SIR tool, or he uses a shop press with a bunch of attachments. I provide the part, just because I keep spares since it is a wear item for me. On the rear, if you cannot get the axle to come out of the wheel hub, you can disconnect the axle from the gearbox and take the axle still sticking into the wheel carrier. A shop will be able to press out the axle easily. -
Special Tool for Fuel Pump removal
ericinboca replied to moosport's topic in 986 Series (Boxster, Boxster S)
The special tool is to remove the locking collar, right? I changed the fuel pump on my '04 986S without it. I very carefully used a rubber mallet and a screwdriver (one with a big blade) to tap the collar in the correct rotational direction until it was loose enough to remove with my hands. It did not damage the collar. I replaced the rubber seal under the collar, but I don't remember anything on union nuts. I think I replaced the collar too, though. Just don't remember clearly about replacing the collar. Too many gas fumes:) It was a simple job. -
2000 boxster replacing front + lower control arms
ericinboca replied to lotus425's topic in 986 Series (Boxster, Boxster S)
Stuff I have gotten from Vertex has been fine. Their customer service has been good too, so if you are not happy once they arrive, I think they are customer focused enough that they would take them back. Agree with Loren on the upper strut mounts - and with the new or rebuilt control arms, you will get new bushings in those - new bushings I bet will make a difference in how it feels. Only a couple of other things under there - tie rods; sway bar drop links; and sway bar bushings. -
Harry, I think that is pretty impressive. I got 252 at the wheels in my '04 986S - no motor mods except eliminating all cats, but I still have the stock muffler. I drive the number 32 Boxster, silver, at Chin events - I've seen you there.
-
Thoughts On Nhp Exhaust
ericinboca replied to steve_wilwerding's topic in 986 Series (Boxster, Boxster S)
I can't address the question of cabin drone, but here is some experience/info for what it is worth. I use the NHP racing headers and secondary cat bypass pipes on my 986S race car. They look to me to be a near copy of the Fabspeed design. They welds are machine, and look good. They've held up with no problems at all for 2.5 seasons. I don't put much stock in the claims about HP increase with any vendor - I made the change because as a track car, I was going through catalytic converters every season. Two race shops that have had my car on the rack have told me the size, collectors and design on the NHP is good. I am still using the stock muffler, but am beginning to get a rattle - sounds like a baffle is coming loose. I will eventually replace, and am happy enough with the fit and quality of the NHP, that I will get the NHP muffler. -
One different lug nut per wheel? What is this?
ericinboca replied to jfoxny's topic in 987-1 Series (Boxster, Boxster S)
I lost my lock key socket once...turns out there are about 20 different styles. I had to break down and go to the dealer with the car to have them bring out the kit of lock keys, and go through till they found one that fit. Was $25 - $30 - something like that. -
-
I have an X51 oil baffle in my '04 986S 3.2L track car. http://www.suncoastparts.com/product//x51panAA.html It is a straight change out. Flat6 has a kit that changes the existing baffle, extends the pick ups. It makes sense, but involves some more work. I think Mantis has somehting similar too. But I wonder if your issue is an overwhelmed AOS? If you are getting the smoke when you are standing on the throttle on exit, especially on left handers, that's classic AOS issue for the track. In my '04, I was able to fit a Porsche Motorsports AOS without modification. Not sure about 3.4 or the year of your 3.4. The AOS mounts differently on older cars - the mounts are on the side - with the newer version (and the motorsports version) it mounts through the base. I changed out to the motorsports version a few years ago, and haven't had any smoking since then.
-
2003 996C4S CDR 23 Bose CD changer No PCM Here is the question, followed by the detail - Do the individual fiber optic cables (2 of them) that run from the head unit to the amp and CD changer , transmit only one way? Here is the detail - My CDR 23 quit working. It would cycle on, then off, continuously (no matter what weather conditions). I pulled the head unit, the fuse was fine, as was the fuse in the main panel. I checked all the connections on the back and on the amp and CD changer too. Durametric pointed to a faulty receiver, so I sent the head unit and the amp to becker auto sound for a bench test. They called yesterday and told me the amp and receiver work fine and they suspect the issue is in the fiber optic cable. So to test, I did the following, and found the following - With a light source on the cable where it connects to the head unit in the car, I can see light from ONE of the cables where it connects to the amp and same for where it connects to the CD changer. With the light source on the end that connects to the amp, I can see light from ONE of the cables where it connects to the head unit. Same with the CD changer. Now, there is a connector in the front trunk before the cable splits to go to the CD changer and amp. If I disconnect that connector, so I am only testing a fairly short piece that goes from the head unit into the front trunk, BOTH cables light up from the head unit to the connector, and back the other way. Follow? I'm trying to figure out if the behavior of the short cable is normal and if the behavior of the cable from the connector that splits and goes to amp and CD changer is normal. Thanks.
-
Buying a Boxster...in need of some pointers
ericinboca replied to Gatsby2010's topic in 987-1 Series (Boxster, Boxster S)
where in florida? Destin, Florida Oh...if in my neck of the woods, I was going to offer to take a look for you, but Destin is 600 miles from me in SoFla. Sorry.