Welcome to RennTech.org Community, Guest
There are many great features available to you once you register at RennTech.org
You are free to view posts here, but you must log in to reply to existing posts, or to start your own new topic. Like most online communities, there are costs involved to maintain a site like this - so we encourage our members to subscribe or donate. All subscriptions and donations go to the costs operating and maintaining this site. We prefer that guests take part in our community and we offer a lot in return to those willing to join our corner of the Porsche world. This site is 99 percent member supported (less than 1 percent comes from advertising) - so please consider an annual subscription or donation to keep this site running.
Here are some of the features available - once you subscribe RennTech.org
- View Classified Ads
- DIY Tutorials
- Porsche TSB Listings (limited)
- VIN Decoder
- Special Offers
- Paint Codes
- Registry
- Videos System
- View Reviews
- and get rid of this welcome message
It takes just a few minutes to register, and it's quality Porsche information at a low cost.
Contributing Members also get these additional benefits:
(you become a Contributing Member by subscribing or donating money to the operation of this site)
- No ads - advertisements are removed
- Access the Contributors Only Forum
- Contributing Members Only Downloads
- Send attachments with PMs
- All image/file storage limits are substantially increased for all Contributing Members
- Option Codes Lookup
- VIN Option Lookups (limited)


1schoir
-
Posts
2,739 -
Joined
-
Last visited
-
Days Won
9
Content Type
Profiles
Events
Forums
Exterior Paint Colors
Downloads
Tutorials
Links Directory
Collections
Classifieds
Store
Everything posted by 1schoir
-
HVAC possessed, no air
1schoir replied to 987_RDC's topic in 996 Series (Carrera, Carrera 4, Carrera 4S, Targa)
One easy possible solution to the problem that you describe can is to remove the HVAC unit from the console and unplug it. Then, look in the back of the unit at the small pins onto which the connector was plugged in. Inspect for any corrosion, which will look like fine white powder-like deposits on the pins. Clean off any corrosion and do the same to the female connector receptacles at the end of the connector. I had a similar issue a couple of years ago, and that was the cause for me. Cleaning the corrosion off with emery cloth did the trick. Regards, Maurice. -
Problem with 996 Cab Top
1schoir replied to Jnguyen1976's topic in 996 Series (Carrera, Carrera 4, Carrera 4S, Targa)
Take a look at this illustrated DIY... It's for Boxster tops, but it will give you an idea of what to look for to solve the problem. Specifically look at the article entitled "When the Top Edge Doesn't Fall into the Guide Channels", here: https://sites.google...nce The photo that you attached shows that the top has been having the problem for long enough to cause the vinyl piping on the edge of the top to start to become separated from the canvas edge of the top. You will have to re-sew a small section of the vinyl piping back onto the canvas. It's pretty easy to do if you just put the needle and thread in the exact same holes as the original stitching. Regards, Maurice. -
When I was going to order my ROW M030 kit at the end of June 2012, " there was one kit left in the Porsche warehouse in the USA and none in germany". :rolleyes: :eek: :rolleyes: Regards, Maurice.
-
Broken top in rain
1schoir replied to johnjack11's topic in 987-1 Boxster Convertible Top Issues and Solutions
Glad to be able to help. Keep us posted. Regards, Maurice. -
Broken top in rain
1schoir replied to johnjack11's topic in 987-1 Boxster Convertible Top Issues and Solutions
Jack: Sorry about that... You have to go to the Part III PDF to find pages 38 and 39. The document covers how to install an OEM replacement top from a 2003 or 2004 Boxster onto earlier Boxsters, but it has a section that shows you how to synch the top once you have installed the "new" one. Regards, Maurice. -
Broken top in rain
1schoir replied to johnjack11's topic in 987-1 Boxster Convertible Top Issues and Solutions
Jack: For instructions on how to sync the top, go to this link: https://sites.google...frameona'97 Specifically, select the Part III PDF and go to the text at paragraph 14 on page 38 and the photo at the top of page 39. Regards, Maurice. -
Broken top in rain
1schoir replied to johnjack11's topic in 987-1 Boxster Convertible Top Issues and Solutions
Jack: Did enough water get in the car to get the immobilizer under the seat wet? If so, that could explain why your windows would not function. As to why the top is not responding at all now, there could be a few different causes. First, verify that the idiot light on the dashboard showing that emergency brake is engaged is lit when you pull up on the handbrake. Then check fuses B6 (supplies power to the convertible top double relay) and D3 (supplies power to the electric motor). (Do a search here for photos if you are not sure where the fuse and relay trays are located). If all of those are good, pull out the double relay and check the spades for corrosion. Clean the spades with some emery cloth and re-insert into the relay tray. Once you have done that, move on to checking whether you are getting 12V to the electric motor when you depress the switch. Let us know how if you get any results with the above. Regards, Maurice. -
Here it is available for $5.25 plus shipping from this eBay seller: http://www.ebay.com/itm/New-Ball-Bearing-6003-2RS-669x1-378x-394-/350561731335 (Sorry, I don't use paypal). Regards, Maurice.
-
+1 Regards, Maurice.
-
Take a look at the photo in the Throttle Body DIY I linked to above. The IACV is located immediately to the right of the number "3" in the photo. Go down a little further in the DIY and you'll see exactly what it looks like. Regards, Maurice..
-
It sounds like your Idle Air Control Valve is hanging up. Remove it from the throttle body and clean it thoroughly. You will be surprised at how much gunk gets baked in there. Be careful with the tiny little gasket if you don't have a replacement gasket. Here's a link to a DIY on how to clean the throttle body, which includes nice pics and instructions on cleaning the IACV: http://pedrosgarage.com/Site_3/Clean_the_Throttle_Body.html Regards, Maurice.
-
There are two versions of Mass Air Flow Sensors for the early Boxsters. The first version is more susceptible to fouling and the later version was an improvement as it did not foul as easily. I'm taking an educated guess that the early 996's had the same or similar design MAF's and this may explain the difference in the frequency of MAF sensoor problems. Regards, Maurice.
-
Seeking help from experienced Porsche 986 owners
1schoir replied to vicky_vm's topic in 986 Series (Boxster, Boxster S)
After you have documented the codes, you can clear them with an OBDII scan tool and then see which, if any, of the codes come back. That should help you narrow down the cause of the problem. Regards, Maurice. -
Here is a diagram: Regards, Maurice.

-
Fan AC Noise Behind Glove Box (with video)
1schoir replied to mypctechs's topic in 986 Series (Boxster, Boxster S)
:cheers: Regards, Maurice. -
Fan AC Noise Behind Glove Box (with video)
1schoir replied to mypctechs's topic in 986 Series (Boxster, Boxster S)
If it only makes noise when the fan is blowing (i.e., when you have selected one of the blower speeds), and stops when you turn off the fan, then it's your blower motor/squirrel cage that is making the noise. I could be the bearing in the blower motor or something more simple, such as something having gotten dislodged and rubbing/being hit by the squirrel cage as it spins. Although you have to get in a contorted position, you could get under there with a light and have a look or feel under the dash, directly above the passenger's feet. Regards, Maurice. -
IMS Bearing in SE Florida
1schoir replied to PILFILR's topic in 996 Series (Carrera, Carrera 4, Carrera 4S, Targa)
I can wholeheartedly recommend Pedro of pedrosgarage.com, here: http://www.pedrosgarage.com/Site/About_Us.html Regards, Maurice. -
Leaking Coolant
1schoir replied to jasmus1's topic in 996 Series (Carrera, Carrera 4, Carrera 4S, Targa)
If there are no drops of oil floating in it, you are okay. The coolant in the bottle in the photo looks clear and not murky, so that looks good too. Take a few ounces of the coolant you drained out and mix it in a bottle with a few ounces of the fresh coolant you added to your reservoir and see it you get the same resulting color as what is now in your cooling system. That should put the issue to rest. Regards, Maurice. -
Leaking Coolant
1schoir replied to jasmus1's topic in 996 Series (Carrera, Carrera 4, Carrera 4S, Targa)
Did you examine the color and clarity of the coolant that you drained out of the cooling system? If it looked like what you are seeing now, you should probably drain the entire cooling system to get all fresh coolant in there. How much mileage and how many years since the last "lifetime" coolant change? Regards, Maurice. -
If you are working by yourself, a transmission jack is indispensable, especially when trying to line up the transmission for re-installation. Harbor Freight sells a couple of different units that are both inexpensive and effective for the DIY'er. Regards, Maurice.
-
Is my clutch checking out on me?
1schoir replied to slotsmd's topic in 986 Series (Boxster, Boxster S)
Have you considered that the vibration that you feel through the clutch pedal, around mid-travel, may be caused by a failing throwout bearing? Regards, Maurice. -
Is my clutch checking out on me?
1schoir replied to slotsmd's topic in 986 Series (Boxster, Boxster S)
Replacing a clutch on a Boxster is not a particularly involved job but does require some "heavy lifting". The $2200-3000 price quote is definitely on the high side, but not unusual for a dealer. Try first to ascertain whether your clutch is slipping, as Nimbus suggests. When you accelerate, do the RPM's rise without an immediate rise in the speed of your car and then the RPM's go back down and behave normally? You can test for clutch slip by putting the car, as an example, in third or fourth gear at 25 mph and then stomping on the accelerator. If the RPM's go up suddenly but the car's speedometer trails behind (i.e., the car doesn't speed up immediately), you can be pretty sure that your clutch is toast. Regards, Maurice. -
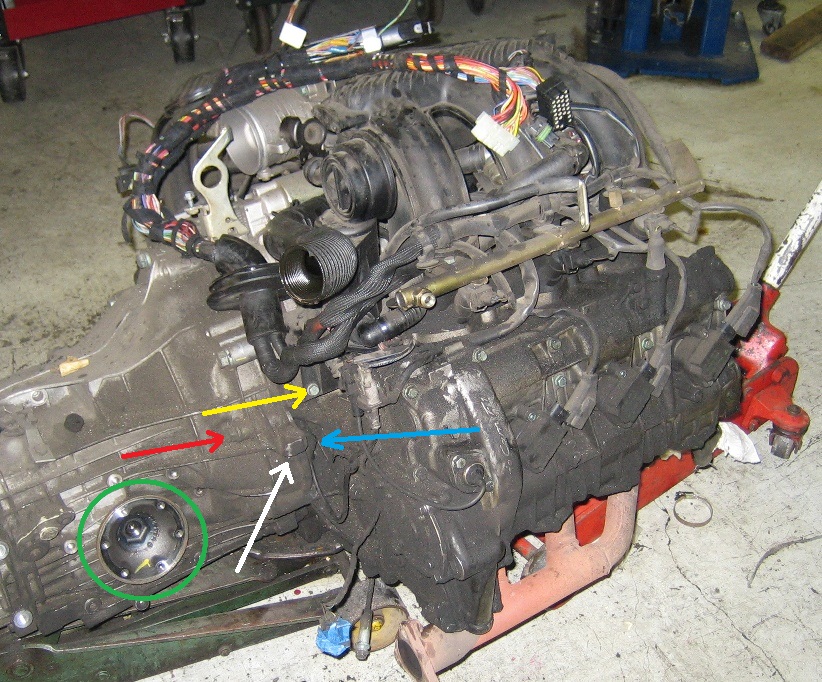
Steve: I don't have photos of the Tiptronic transmission housing, so I'm not familiar with the shape. Although the housing of the Tiptronic transmission is shaped differently from that of the manual transmission housing, there are two points to keep in mind: 1. The bolt pattern is the same, so you can follow the location of the bolts in the photos above, and; 2. On the manual transmission Boxsters, the crankshaft position sensor is actually mounted on the engine case (i.e., NOT on the transmission housing), so it should be in the same location pointed out in the photos. Maybe someone else can provide a photo of that area with a Tiptronic. In the photo that you have provided, you can clearly see the lower of the two bolts to which I referred (and it looks like someone replaced the factory OEM hose clamp oat the base of the AOS bellows with a worm clamp). Take a look (or feel) below and very slightly to the rear of that AOS housing lower bolt. Regards, Maurice.
-
Window Adjustment?
1schoir replied to vfrpilot0's topic in 996 Series (Carrera, Carrera 4, Carrera 4S, Targa)
Thanks Maurice! :) Glad you found a little nugget in that description that makes sense! :eek: Regards, Maurice. -
Steve: You are correct, it is not far from the LOWER of the TWO AOS mounting bolts. If you put your finger on the lower of the two mounting bolts from the AOS, then go straight down about 4 inches, and about 1 or 2 inches towards the rear you will have your finger on the CPS. IIRC, the one bolt that holds the CPS in place is near the top of the CPS. Here is another photo that should nail it down for you, although the engine and transmission are really dirty: To help orient you, the yellow arrow points to the LOWER bolt at the bottom of the AOS housing; the green circle is surrounding where the inboard end of the psgr side half-shaft (axle) attaches to the output flange of the transaxle (the half-shaft has been removed in this photo); the red arrow is pointing to the bolt head that would be in the threaded hole that is immediately above the yellow arrow in the PREVIOUS photo; and the blue arrow points to the CPS. If you click on the photo, you might even be able to see the bolt that holds the CPS in place, although it is covered in dirt in this photo. If you still are not able to see it, put your finger on the flat little square surface on the transmission flywheel housing to which the white arrow is pointing and then slide your finger to the right (i.e., towards the front), and your finger will be on the CPS. Regards, Maurice.