Welcome to RennTech.org Community, Guest
There are many great features available to you once you register at RennTech.org
You are free to view posts here, but you must log in to reply to existing posts, or to start your own new topic. Like most online communities, there are costs involved to maintain a site like this - so we encourage our members to donate. All donations go to the costs operating and maintaining this site. We prefer that guests take part in our community and we offer a lot in return to those willing to join our corner of the Porsche world. This site is 99 percent member supported (less than 1 percent comes from advertising) - so please consider an annual donation to keep this site running.
Here are some of the features available - once you register at RennTech.org
- View Classified Ads
- DIY Tutorials
- Porsche TSB Listings (limited)
- VIN Decoder
- Special Offers
-
OBD II P-Codes - Paint Codes
- Registry
- Videos System
- View Reviews
- and get rid of this welcome message
It takes just a few minutes to register, and it's FREE
Contributing Members also get these additional benefits:
(you become a Contributing Member by donating money to the operation of this site)
- No ads - advertisements are removed
- Access the Contributors Only Forum
- Contributing Members Only Downloads
- Send attachments with PMs
- All image/file storage limits are substantially increased for all Contributing Members
- Option Codes Lookup
- VIN Option Lookups (limited)


Schnell Gelb
-
Posts
309 -
Joined
-
Last visited
Content Type
Profiles
Events
Forums
External Paint Colors
Downloads
Tutorials
Links Directory
Collections
Classifieds
Store
Everything posted by Schnell Gelb
-
Thank you for Posting all the details of this fix. Particularly mentioning that the offending seat belt must have the buckle fastened. I found that the latest Durametric update fixed other diagnostic bugs also.
-
Don't forget to clean all the leaves and debris from the radiators. Bumper off !
-
Low oil pressure after oil change
Schnell Gelb replied to Brew's topic in 996 Series (Carrera, Carrera 4, Carrera 4S, Targa)
No just a local pal who has now been introduced to the virtues of JGDT-40 -
Low oil pressure after oil change
Schnell Gelb replied to Brew's topic in 996 Series (Carrera, Carrera 4, Carrera 4S, Targa)
I described the whole story in another Thread. The short version is the owner put Bardahl No Smoke and some other snake oil in his oil to 'fix' a red 'Low Oil Pressure" Warning Light. I did an oil pressure test and dropped the filter and pan. Cut the filter & voila. Correct oil+new filter fixed it ! -
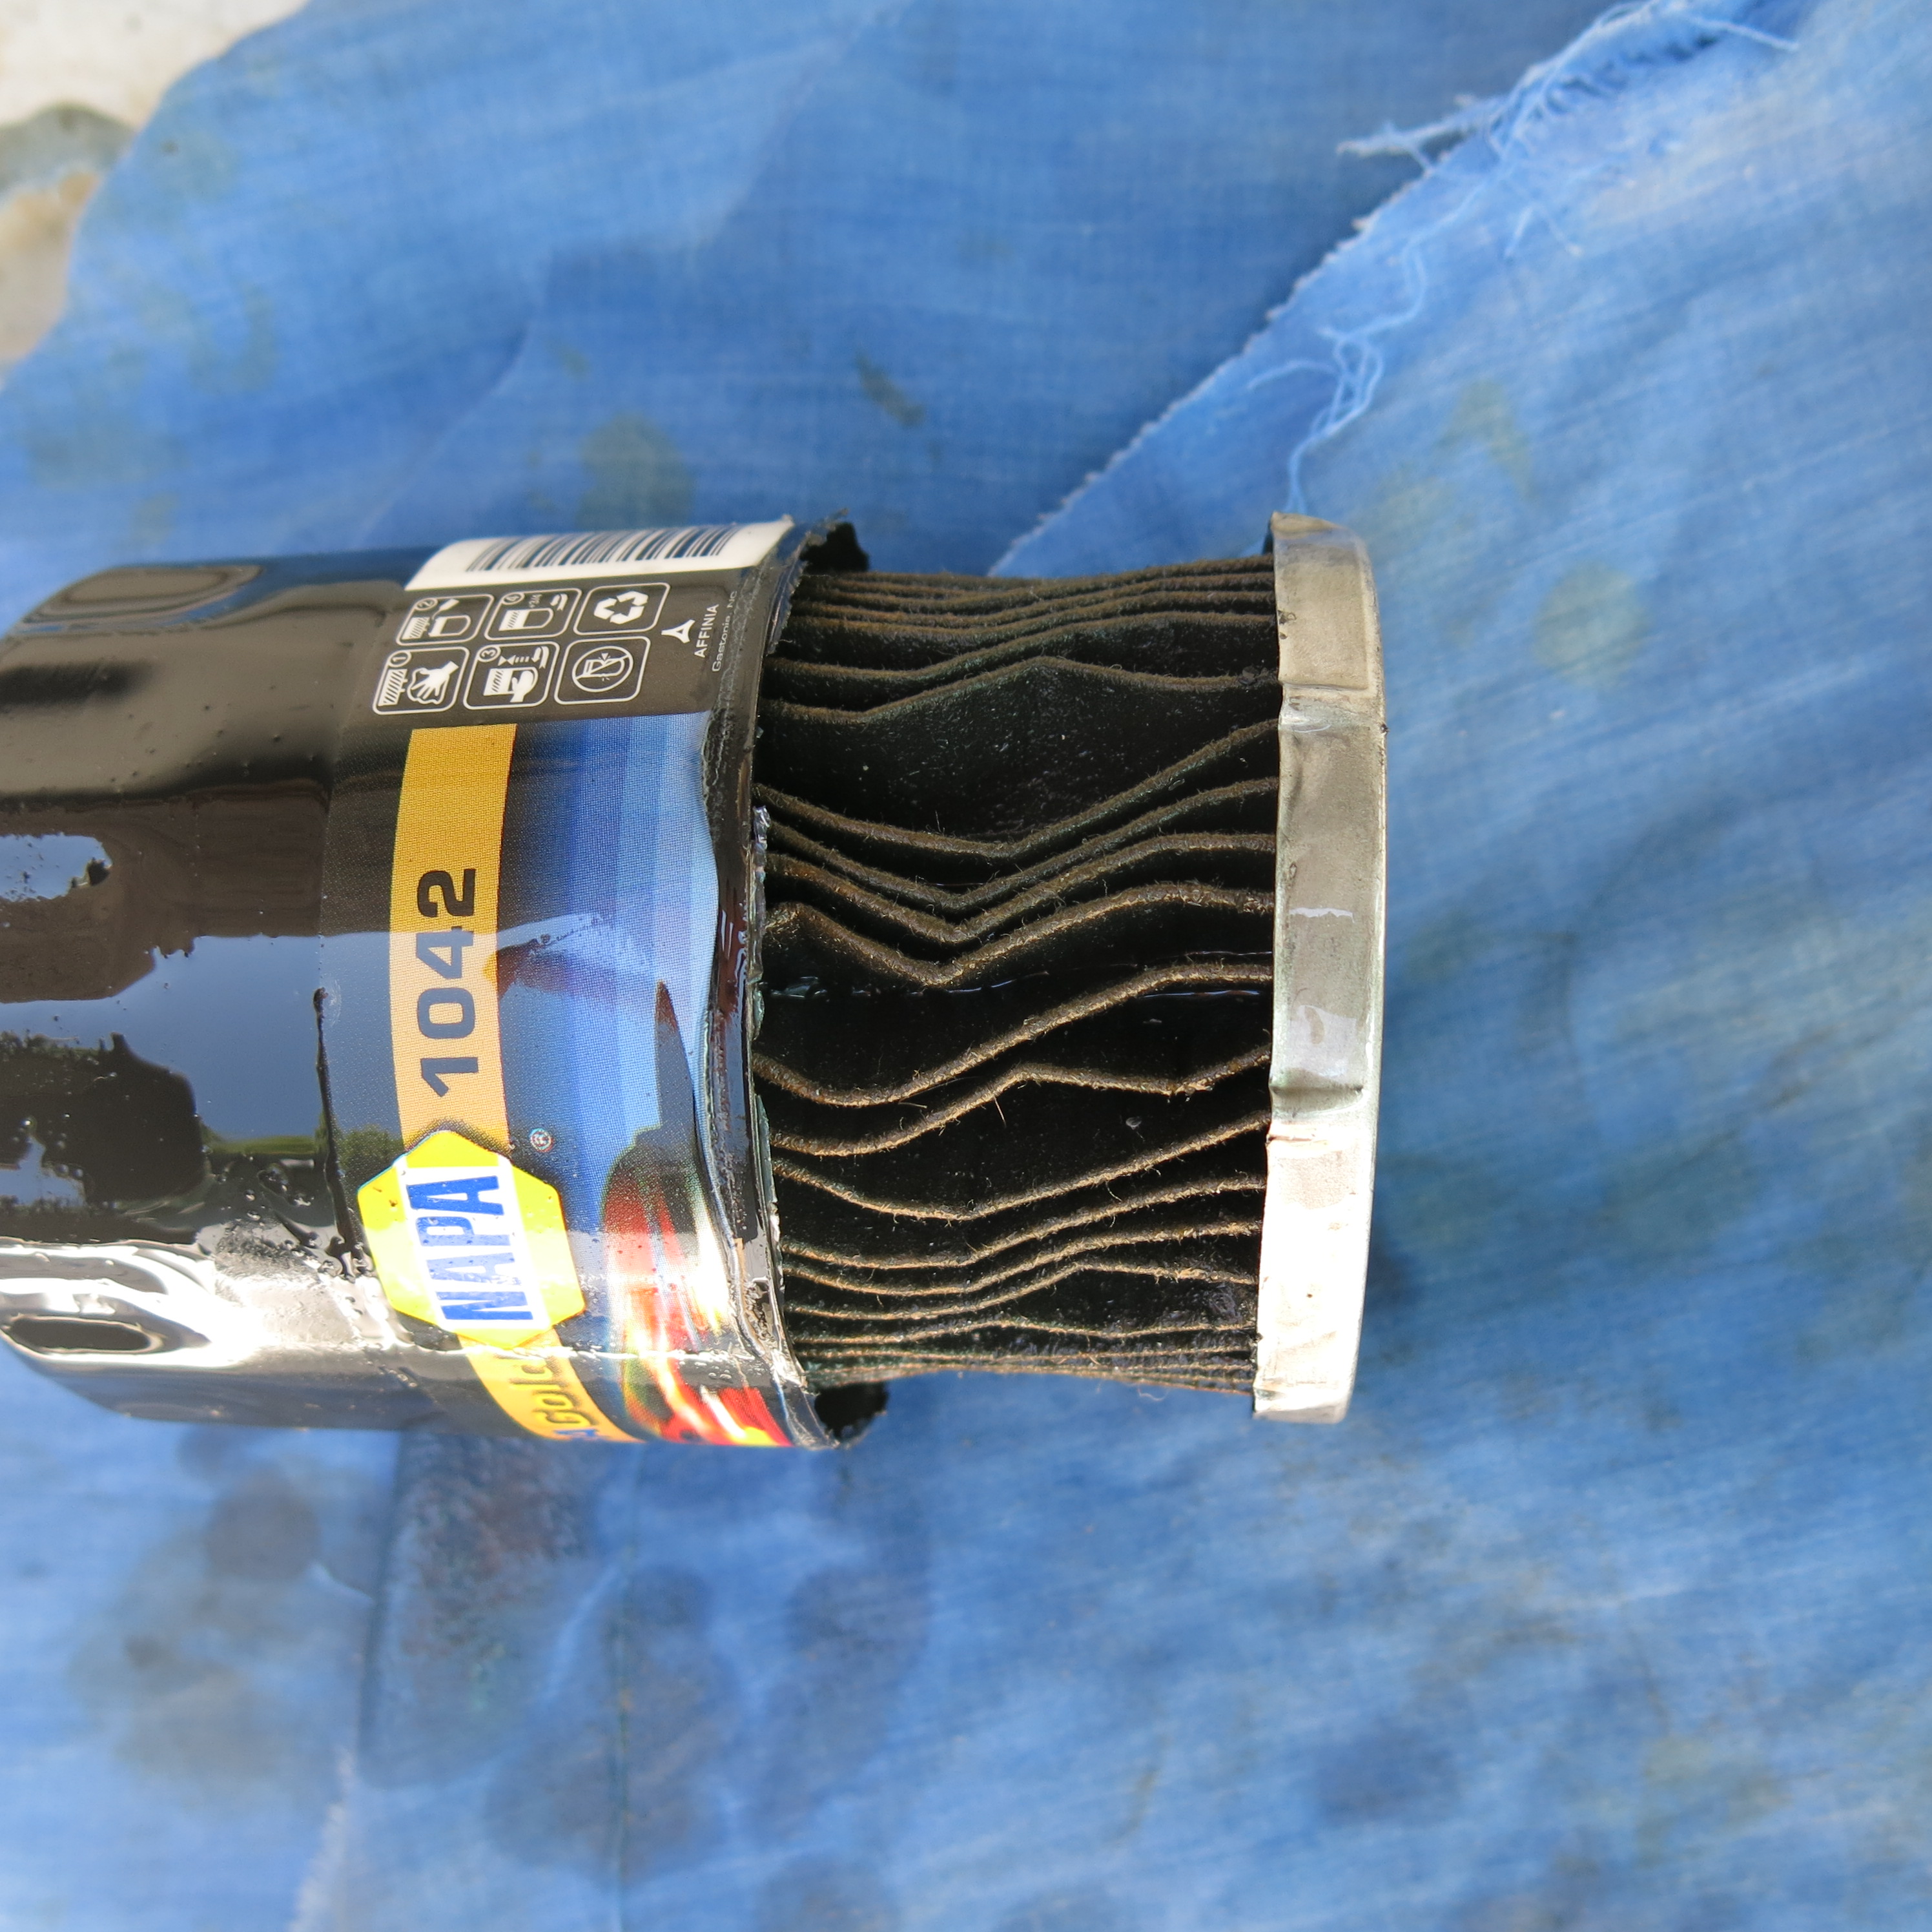
Low oil pressure after oil change
Schnell Gelb replied to Brew's topic in 996 Series (Carrera, Carrera 4, Carrera 4S, Targa)
Here is a photo of the collapsed filter pleats on a Napa 1042
-
Low oil pressure after oil change
Schnell Gelb replied to Brew's topic in 996 Series (Carrera, Carrera 4, Carrera 4S, Targa)
Interesting point about the flow capacity being 2-3 times greater than conventional filters. It can do no harm ..? Unless they just double the pore diameter ! The recommendation on the LN site is: " We use the Napa Gold 1042 or Platinum 1042 " . It would be interesting to read what LN say about the flow capacity issue. I'm not suggesting there is a problem with LN's recommendation but the incremental cost is small, so why not ? Perhaps LN would say that if a paper-element filter collapses because the oil was too viscous, no higher-flow filter would behave differently. The problems are different. If the problem was dirty oil and half the pores in either filter were blocked - yes, the highr flow filter has an advantage. Moral of the speculation- use the correct grade of oil w/o snake oil additives ? http://lnengineering.com/products/other-watercooled-stuff/spin-on-oil-filter-adapter-for-my97-08-boxster-cayman-911.html Some smart people also mention the synthetic media upgrade here years ago (Napa/Wix 51042XP): Here is a cross reference site for the geeks: http://www.oilfilter-crossreference.com/ http://wixfilters.com/Lookup/InterchangeMultiSearch.aspx?q=51042XP&o=me -
Low oil pressure after oil change
Schnell Gelb replied to Brew's topic in 996 Series (Carrera, Carrera 4, Carrera 4S, Targa)
It is both easy and inexpensive to connect Harbor Freight Oil pressure Tester and get a reliable reading.It connects to the port used by the Oil Pressure Sender on the top of Bank1 so is easy to access. I recently did this and the short version is that when I cut open the aftermarket spin-on oil filter ,the pleats had collapsed ! -
Secondary Air Test Readiness monitor incomplete
Schnell Gelb replied to mesutter's topic in 986 Series (Boxster, Boxster S)
The O2 readings are as you helpfully describe. In another Thread someone suggested to do a cold start and then immediately run the revs up to 3000 rpm and hold there for 90 seconds. In desperation I decided to try this because in the interim I got 2 new codes P0410 and P0411.Mine is a (E-Gas) 2001 Boxster S. The 3k rpm for 90 seconds produced a "Pass" for the SAI Readiness Status - Hallelujah- but why ? I fixed nothing.So for others with this Secondary Air Readiness "Fail" problem - try it. At least it is a fix that doesn't involve removing the intake manifolds to hunt vac leaks ! The 2 new codes P0410 & P0411 remain.They return immediately(within seconds) when I cancel them with Durametric which suggests a significant defect - so it should be easy to find - right ! The SAI pump runs correctly. It is easy to hear in the Boxster with the covers off.You can reach over from the Driver's seat and feel it run even with a laptop running Durametric on your lap. I also bench tested it to feel how forceful the air flow is - seemed great. I can also turn it on with Durametric.The Electric Change-Over Valve can also be operated with Durametric - you can hear it click. Mine has the newer "Shut Off Valve which replaces the earlier(troublesome) 2 valve system. So this eliminates several of the possible causes of the P0410 & P1411. Vac leaks or my stupidity remain the likely culprits. I'll spend some time with a Mighty-Vac and a manometer this evening to do some simple checks before removing the intake or alternator.. Another Forum member is developing a hack circuit for the fickle SAI code .His circuit sends a false signal to the DME that all is functioning correctly. I may have to try it because my stickers have expired and all this road testing at constant speed makes me easy/expensive CHiP bait. I hope this Thread will eventually help others solve this problem and avoid a problem with Law Enforcement ! -
Boxster Recurring P0343 & Now flashing CE!!
Schnell Gelb replied to stphnsns's topic in 986 Series (Boxster, Boxster S)
Based on my amateurish experience with a related issue- inspect the coils in bright light with a lens after you have cleaned them. Mine had hairline cracks beginning. That is where moisture will eventually penetrate and cause a Misfire.Bad for the Cat also. The coils have been updated - slightly thicker so supplied with longer bolts. Spark plugs and tubes at the same time while you are in there? I hope this helps you. -
CEL : P0410 + P1411
Schnell Gelb replied to siddharth's topic in 996 Series (Carrera, Carrera 4, Carrera 4S, Targa)
Here is the link to the parts you show in your helpful photo for the E-Gas cars like my 2001 Boxster S: http://www.autoatlanta.com/porsche-parts/hardparts.php?dir=986-97-04§ion=108-06 The new 'combo' valve is now called a "Shut Off Valve"- 997 113 249 90- $115 If I understand correctly this replaces the so called SI valve and the check valve with the hose between them. The Parts diag for the 99 cars(older) is here: http://www.autoatlanta.com/porsche-parts/hardparts.php?dir=986-97-04§ion=108-05 The other suspect parts appear to be unchanged: An electrically controlled "Change Over Valve" 996 605 123 -01 $30 The Vacuum Tank 993 110 140-03 $23 It takes so much time to access these parts it may be prudent to pre-order all 3 of them and replace regardless of the condition of the old parts ? I hope this helps -
CEL : P0410 + P1411
Schnell Gelb replied to siddharth's topic in 996 Series (Carrera, Carrera 4, Carrera 4S, Targa)
-
Battery Maintainer
Schnell Gelb replied to 356to966's topic in 996 Series (Carrera, Carrera 4, Carrera 4S, Targa)
The LED bulb replacement is a great project. Somone should write up a Tutorial with all the part numbers and a good source for the new bulbs? Thanks for the suggestion. -
Secondary Air Test Readiness monitor incomplete
Schnell Gelb replied to mesutter's topic in 986 Series (Boxster, Boxster S)
In my case the O2 Sensor performance (according to Durametric ) is perfect. There are no DTC's and no Pending DTC's. So I agree -more cold starts. Fascinating to watch what happens on Durametric. Thank you Loren and Ahsai for helping. -
Secondary Air Test Readiness monitor incomplete
Schnell Gelb replied to mesutter's topic in 986 Series (Boxster, Boxster S)
I never anticipated how useful this Thread would be - particularly ecarmans comments above. I was just a spectator but now I have been fighting the SAI Readiness problem for many days against a Smog Test deadline. There are a huge number of desperate Posts on Readiness Status and my year (2001 S with 7.2 DME) seems to be one of the most recalcitrant. So I would like to add a few of my own experiences . I hope the smarter guys will comment on any mistakes so I can correct them in this Post and acknowledge their correction. First ,you can tell this is an issue because there are dozens of conflicting recommendations on Drive Cycles. The most frequently mentioned is the "BMW Drive Cycle".Ignore the 993 Drive Cycle.Most are impractical & dangerous and on a Freeway in Los Angeles and perfect CHiP bait. Second, unlike many mechanical faults ,the repair is NOT merely a procedural (as JR modestly says about M96 rebuilding!). It is very opaque. So here are a few amateur tips to save others time & money. 1. Log everything on your Durametric so you can show it to a Tech. It is highly unlikely the average Porsche diy guy(like me) has a clue what the significant parameters and events are - because they are mostly secret code. 2. If the Dealer or Indie offers to fix the Readiness Status problem - decline . Ask instead to pay for him to fix it AND get you a Smog Certificate .Do not agree to take the car to the Smog Test yourself. Don't be surprised if the Not Ready flags reappear randomly after the successful Smog Test. Just pre-book an Indie Appt in time for the next biennial Test. It is a matter of Faith,not mechanics.Nor Ready does not mean a malfunction with 100% certainty. It just means Not Ready/not in the mood iykwim. 3. Until you fix all the DTC's you can't begin work on the Readiness Status. If you keep clearing a DTC , you will never fix the Readiness Flags. If you keep disconnecting the battery &/or have a weak/failing battery - that will also cause interminable Readiness Hell. 4. Trying to run a Drive Cycle on Jack stands seems like a clever idea but nobody claims it actually works ! A dyno - maybe ? Allegedly, A PWIS or some Dealer-only device can "Force" Readiness - cost is a bargain at $200 but see 2. above ! 5. The time and aggravation in this process may be huge, Trying to nickle and dime it is futile. I had already fitted new battery,plugs.coils, all O2 sensors. gas cap,fresh oil+filter,fresh tank of fuel ,new air filter,AOS ,clean MAF and a Propane test for vac leaks - particularly under the Vac reservoir. All trivial compared to actually eliminating the Readiness "Fail" Status. 6. You MUST be able to hear the SAI pump run at a cold start. So consider removing access panels or listening carefully at the Engine purge fan vent by the Passenger Door(L.H.D.car) Even if it runs, it does not confirm the Air is getting through the ports(plugged with carbon?) or the vacuum-controlled actuators are working/connected. In my case I had personally rebuilt the entire engine down to the last nut,bolt (except 1 spring:-)),so I was confident it was all clean and functional.Otherwise you may need to do some very intrusive tests/inspections. By this stage I hope that the merely average diy guys like me will have accepted that this may be a task they can not do. But at least all the Durametric logs will help the clairvoyant Tech who can. For those of you who chafe at this ,think of the concession to go to the Indie like agreeing to go to Therapy with your S.O. Defies all logic but effective - for a while. Please add your experiences here so we can build a record of proven solutions and eliminate the misleading nonsense - like adding Thinner to the gas tank, using anti-foulers/extenders on the rear O2 sensors,Italian tune-ups, impulsively replacing catalytic converters ,etc. BTW at this time my SAI Readiness is still not Ready = Fail ! I'll just keep doing cold restarts for another week...But all the others eventually became Ready (no real clue why!) -
To change the pads both camshafts,the Actuator and cam-to-cam chain are usually removed as an assembly. The pad/chain change is done on the bench.Some good Youtube videos may help. You need to plan how you will compress the actuator - is yours a right hand thread or Left hand ?
-
Have you tried researching in Renntech 986 Boxster ? It has a Section on the Top. And search for Posts by "Maurice" - he seemed to be a guru for these issues
-
Not really. And it is easy to get a reliable diagnosis. Buy a $30, S.O.C. & S.O.H. Battery Tester. Easier,cheaper and more reliable than "toaster-style" load testers and cheaper than the carbon pile alternative. Next ,get a battery charger that has an automatic "Pulse" or reconditioning function to remediate the sulphation. If you get the type Porsche uses(but without their sticker) it can be used as an over-winter maintainer also. CTek MUS 4.3.
-
John , But what bent the tooth ? Maybe you have a Byron situation?
-
I feel both foolish and fortunate. The loss of the spring was foolish but the rescue was fortunate. For Renntech users in future there is a hidden benefit to this tedious saga. I was forced to test every aspect of the entire system and offer the results for scrutiny by experts here. That rigor produced a cheap method for fabricating the many test harnesses with customized connectors . These harnesses are based on recommendations in other Threads of what ohms/volts to measure where and in what circumstances and with what precautions. The short version is that these harnesses provided results that confirmed that the Bank 1 Solenoid(part # 99660590100 ), the DME, the wiring & connectors were perfect. By logical elimination ,this left the Bank 1 Tensioning Element a.k.a. Variocam Actuator - part # 99610505158 - number 7 here -as defective. Yes, it is $1000 ! The labor to get to it and replace it would be more. http://www.autoatlanta.com/porsche-parts/hardparts.php?dir=986-97-04§ion=103-10 This was indeed proved to be the correct diagnosis but only when I dismantled the Actuator. The missing spring was discovered by accident (see Posts of April 2)and remedied by the generosity of a fellow Forum member. You can see a diagram of the internal parts of the Tensioning Element(Variocam Adjuster) in the FSM Sec. 15-37-19 The other benefit for Renntech-ers who read this in future is the questions about the orientation of small parts. I had not seen those answers anywhere else. Part of the significance of those answers is that even with a functional Actuator if you accidentally re-orient some parts , you will get the 1341 code when you reassemble and retest- that is a major re-do - even assuming you would know what to look for - and you would not unless you read this Thread - to The End. Edit- Recently ECU Doctors have noted that the 13 ohm Solenoid Test above may be incomplete. There is a fault condition where the Solenoid draws abnormally high current.This causes the wiring harness to overheat,melts insulation and causes damage in the DME. This damage can be detected by a burnt smell in the DME if you remove the cover. If this fault occurs, merely replacing the Solenoid +/- Actuator will not fix the problem. The DME must be repaired and the damaged harness replaced.
-
Just to conclude the saga. The spring generously donated by Porschetech3 works well. The Vatiocam advance works perfectly to spec. It worked within minutes of starting. I was a bit surprised because the oil pump has a lot of cavities and oilways to fill when one Bank has been dismantled and has been draining& dripping for a few weeks. Durametric says the engine has zero Deviation - I assume because of the new chains and pads on both Banks. I'll post Actual Values when the assembly has had chance to 'settle'. I may just tweak the static timing so both Banks 'match' their Actual Values at idle speed when warm. That will be an interesting & perhaps futile exercise but the engine is so smooth (balanced both ends of rods and pistons ) that is tempting to see if even greater refinement can be achieved. I am most grateful to all who helped me through this project. Thank you all. Actual Values after 'settling" No tweaking of the Static Timing required. But i had to be patient and let the engine get up to temperature.By then I presume the oilways had purged any air/assembly grease. The Actual Values fluctuate over a narrow range & are not exactly the same on both Banks. May be insignificant(?) but Bank 1 range 'settled' to +0.2 to +0.6 Crk deg. Initially it had been negative 7 ! Bank 2 is slightly negative - 0.2 to -0.5 Crk deg. at idle. The Cam advance just exceeds 20 Crk deg for both Banks over 3000rpm with a warm engine. Now I can replace the smashed windshield Then to try to fix all the fickle Readiness monitors that currently all show "FAIL". I am dreading the Drive Cycle because although I have Reg &Insurance & paid Tags, I have no Smog Cert - so no current "Sticker" -CHIP bait to add to the complications .
-
We're with you all the way. Take your time,be methodical. You don't want a do over because you missed a little thing - like a small spring !
-
Won't shift into 3, 4,5, or 6
Schnell Gelb replied to JayG99's topic in 986 Series (Boxster, Boxster S)
Jay , Thank you for Posting the Clip-Trans Cable # 986-424-411-00 .2 clips required. Many of us hack diy mechanics have been using ugly zip ties on very expensively rebuilt power trains . RND or Sunset would also have it. Here is a link to a larger photo of the clip: http://www.autoatlanta.com/results.php?partnumber2=986 424 411 00 I suspect that even with new clips, fitting zip ties at the same time is a good idea? -
Thank you Porschetech3. The devil is in the details. We'll never know how many M96 engines have their pads upside down. If you look carefully at the Actuator for Bank 1 it has a single large oil port at one end only .This 'feeds' the pad with the 'O' ring and 2 oil ports. See Post #6 for photos and details here. Note the photo is of Bank 2, not Bank 1 http://986forum.com/forums/general-discussions/60995-vario-cam-adjuster-plunger-question-re-p1324-code.html
-
The idea of using chilled grease to (maybe) centralize the spring in the bore was too much of a haphazard solution. So I dismantled everything again. I am really slick at this now ! I figured out the solution to aligning the spring in the bore of the Actuator. Use a brass guide-rod through the oilway hole at the bottom of the Actuator bore to centralize the spring. Gently push the shuttle valve into the bore while retracting the brass rod. Keep the point on the brass rod firmly engaged in the central counterbore in the leading face of the shuttle valve. With the third hand that JFP suggests, attach the Solenoid. Remove brass rod. Practice makes perfect - eventually ?
-
Thanks for the clarification about the Bank 1 & 2 Actuators having different shuttle valves.I have never seen this discussed. The photos in this link are for Bank 2. http://986forum.com/forums/general-discussions/60995-vario-cam-adjuster-plunger-question-re-p1324-code.html The photo of the Bank 2 Actuator chain pad clearly shows the 2 oil holes close to the solenoid. So for Bank 1, the pads would be reversed .Meaning the pad with no holes would be next to the Bank 1 Solenoid. A photo of the Actuator plus Solenoid for Bank 1 from the same perspective would show no oil holes in the pad next to the Solenoid. This makes sense because there is an oil feed in the Actuator clearly visible to supply the pad with the oil holes + 'O' ring. FSM Section 15-19 has a diagram showing this. Thanks.